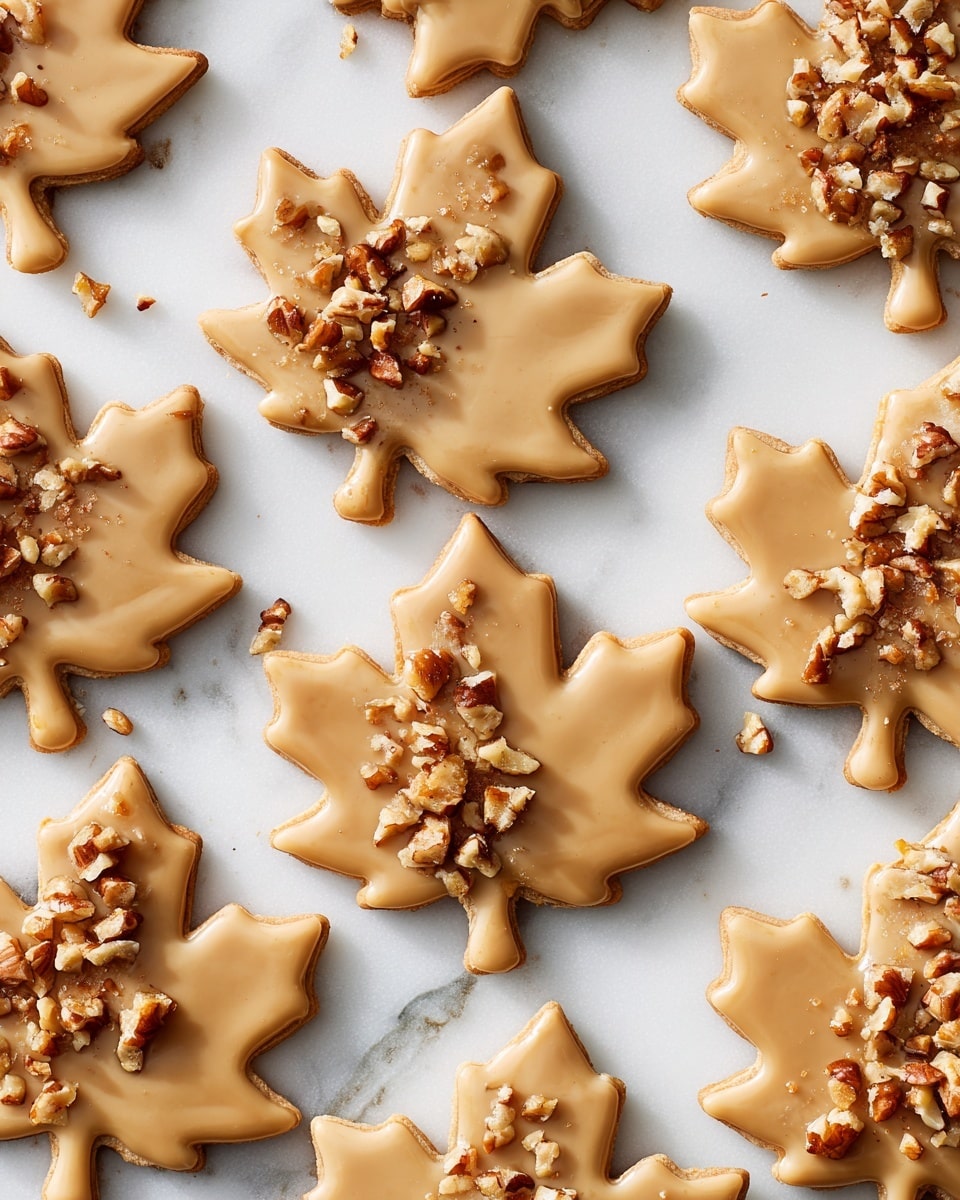
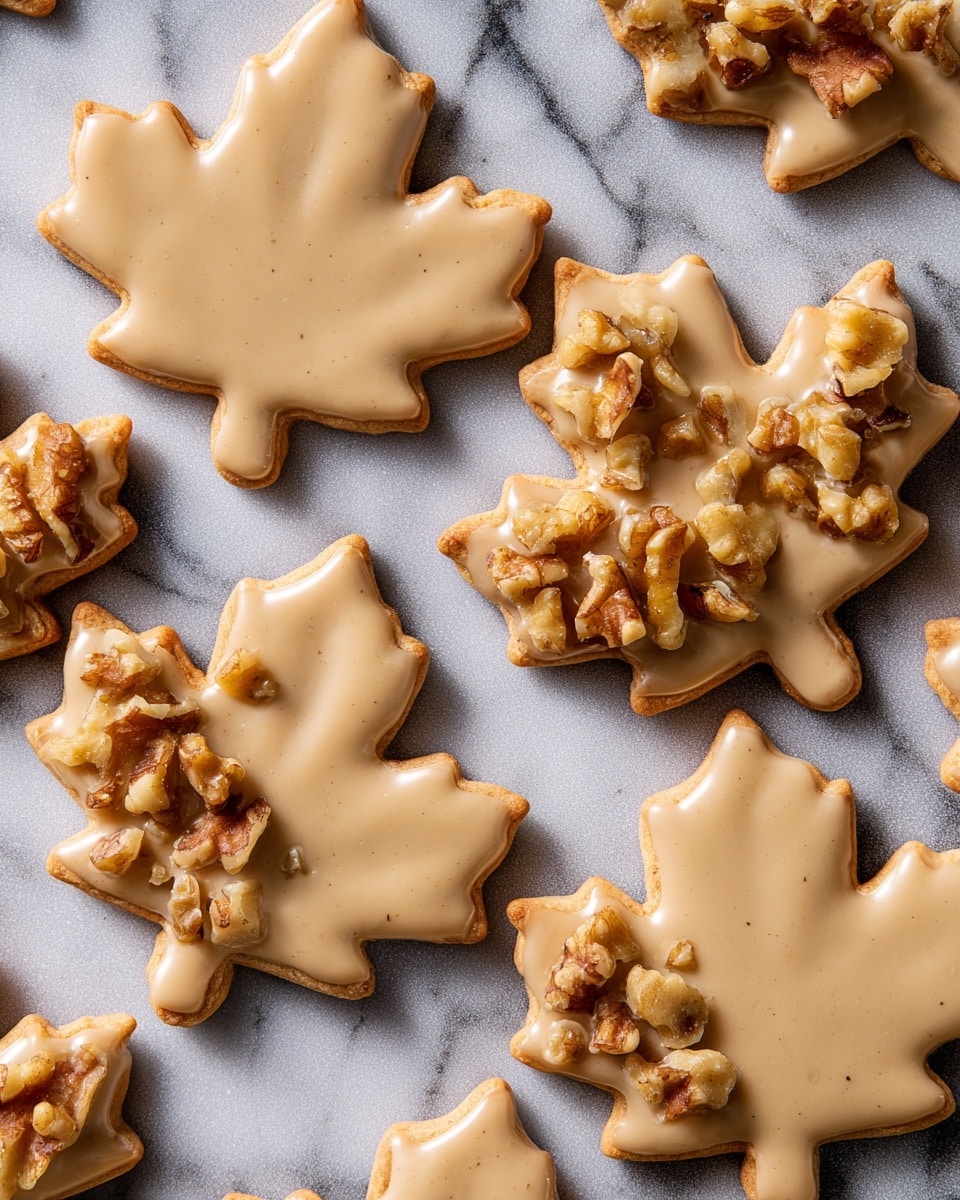
I absolutely love this Glazed Maple Leaf Cookies Recipe because it’s like a little bite of fall magic with every nibble. The combination of finely ground walnuts in the cookie dough paired with the rich, buttery maple-infused glaze creates a flavor and texture that’s simply irresistible. Whenever I bake these, my kitchen fills with the cozy scent of cinnamon and maple—you’ll find it’s the perfect treat for chilly afternoons or holiday gatherings.
What’s really special about this recipe is how versatile it is. Whether you’re making cookies for a festive party or just craving something sweet to enjoy with your coffee, these maple leaf-shaped cookies bring a lovely seasonal touch. Plus, the glaze isn’t overly sweet, so you get the perfect balance of nutty, buttery, and that warm maple flavor that everyone seems to go crazy for.
Why You’ll Love This Recipe
- Unique Flavor Combo: The toasted walnut base blended with the maple glaze sets these cookies apart from your everyday sweets.
- Perfect for Fall & Holidays: These maple leaf shapes are fun to make and delightful to gift or share during the cooler months.
- Make Ahead Friendly: You can refrigerate the dough up to two days ahead, making prep stress-free.
- Simple Techniques: Even if you’re new to cookie glazing, the step-by-step method here makes it easy to get beautiful results.
Ingredients You’ll Need
Each ingredient in this Glazed Maple Leaf Cookies Recipe plays a key role in building those rich textures and balanced tastes. From the raw walnuts for a nutty crunch, to the real maple syrup for authentic sweetness, you’re working with quality elements that complement each other beautifully.
- All-purpose flour: The sturdy base of your cookie dough; using more for dusting helps with rolling out the dough smoothly.
- Raw walnuts: I like using raw rather than toasted walnuts here to grind fresh flavor into the dough.
- Baking powder: A subtle leavening agent that keeps the cookies tender without making them puff up too much.
- Ground cinnamon: Adds warm spice that complements the maple perfectly.
- Kosher salt: Balances the sweetness and elevates the walnut flavor.
- Unsalted butter: Be sure to use softened butter for easy creaming and rich buttery taste.
- Granulated sugar: Sweetens the dough without overpowering it.
- Large egg: Helps bind everything together for a smooth dough.
- Whole milk: Just a tablespoon adds moisture and richness.
- Pure maple syrup: The star of this recipe—choose a good quality syrup for best flavor.
- Light brown sugar: For the icing, it adds a deeper, caramel-like sweetness.
- Maple extract or pure vanilla extract: Either works for enhancing the glaze; I prefer real maple extract when I have it.
- Confectioners’ sugar: Gives the glaze its smooth, sweet texture.
- Ground nutmeg & pinch of kosher salt: Small touches that add warmth and a hint of complexity to the icing.
- Crushed raw walnuts and maple sugar (optional): Great for garnishing if you want extra crunch and sparkle.
- Maple leaf-shaped cookie cutter: Yes, the shape makes these cookies so festive and fun to make!
Variations
I like to play around with this Glazed Maple Leaf Cookies Recipe depending on the occasion or what I have in my pantry. You can easily adjust flavors or make it friendlier for different diets.
- Nut-Free Version: I once swapped walnuts with finely ground oats for a similar texture—my nephew with nut allergies loved it and didn’t miss the nuts at all.
- Spiced Up: Adding a pinch of ground ginger or cloves gives the glaze a festive little kick, perfect around the holidays.
- Extra Maple Punch: Drizzling a little extra maple syrup on top after glazing takes these cookies from great to next-level for maple lovers like me.
- Make It Vegan: You can replace butter with coconut oil and use a flax egg—it changes the texture slightly but still tastes amazing.
How to Make Glazed Maple Leaf Cookies Recipe
Step 1: Grind and Mix Your Dry Ingredients
Start by pulsing the flour and raw walnuts in a food processor until the walnuts are finely ground—this really infuses the dough with their fresh flavor without big chunks getting in the way. Next, add baking powder, ground cinnamon, and salt, then pulse a few more times to evenly combine everything. I discovered this trick because simply tossing walnuts in whole gave me weird texture contrasts I didn’t like in each bite.
Step 2: Cream Butter and Sugar, Then Combine
In a large bowl, I use a handheld mixer on medium-high speed to beat softened butter and granulated sugar until fluffy and pale—this takes about 2 minutes and is the key to light, tender cookies. Then, beat in the egg, whole milk, and maple syrup until just combined. Gradually add in your dry ingredient mixture on medium-low speed and mix until there are no dry streaks. The dough will hold together nicely without being sticky. Wrap it tightly in plastic wrap and refrigerate for at least 1 hour—this step really helps the dough firm up so it rolls out smoothly.
Step 3: Roll, Cut, and Chill Before Baking
Lightly flour your surface and roll the chilled dough to about 1/8-inch thickness; I like my cookies thin and delicate, which intensifies the walnut flavor. Using your maple leaf cookie cutter, cut out shapes and gather scraps to re-roll for about 48 cookies in total. Pop the shaped cookies onto parchment-lined baking sheets and freeze them for 10 minutes—this step keeps them from spreading too much in the oven and helps the edges crisp up just right.
Step 4: Bake to Golden Perfection
Preheat your oven to 350°F with racks arranged in the upper and lower thirds. Bake the cookies for 10–12 minutes, rotating the baking sheets halfway through so they brown evenly. You’ll know they’re done when the edges start to turn lightly golden but the centers still feel slightly soft—this ensures a tender bite. Let them cool completely before moving on to the glaze; trust me, it makes all the difference!
Step 5: Whip Up the Maple-Infused Glaze
In a small saucepan over low heat, gently cook the brown sugar and butter while stirring constantly so nothing burns—about 2 to 3 minutes until the sugar dissolves fully. Transfer this warm mixture to a bowl and let it cool a bit to avoid melting your sugar later. Whisk in maple extract and pure maple syrup to really deepen that maple flavor. Then, slowly add the confectioners’ sugar, stirring until smooth before adding the salt and a pinch of nutmeg for warmth. Finally, whisk in the milk; the glaze will become a lovely light brown color.
Step 6: Glaze and Garnish
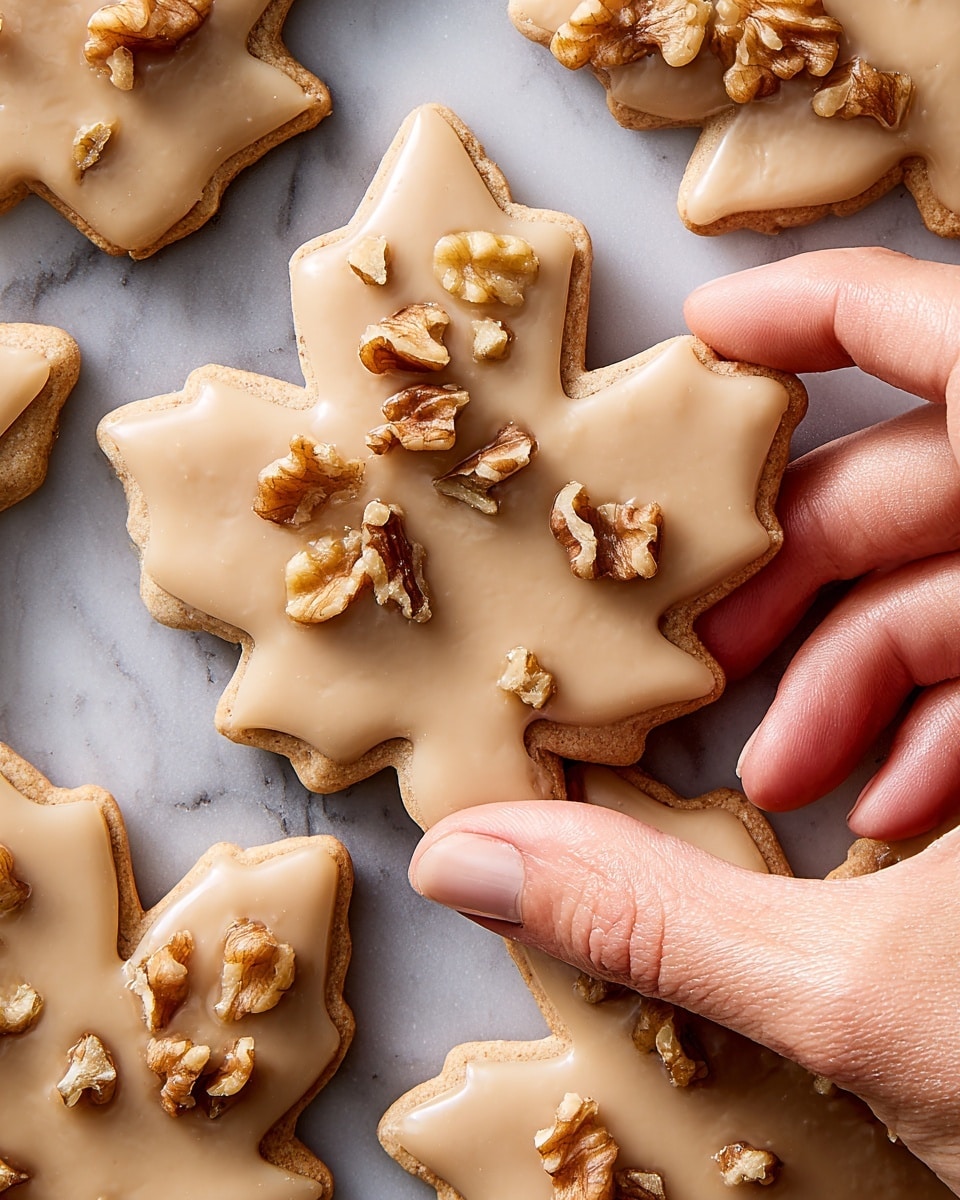
Dip one side of each cooled cookie into the glaze, letting any excess drip off before setting it on a wire rack or parchment paper. For an extra special touch, I sprinkle crushed raw walnuts or maple sugar on top of the wet glaze—adds a nice crunch and looks so pretty. Let the glaze set before packing or eating, and you’re ready to enjoy!
Pro Tips for Making Glazed Maple Leaf Cookies Recipe
- Grinding Walnuts Finely: I learned grinding walnuts finely rather than chopping helps the cookies hold together better and gives a uniform nutty texture.
- Chilling the Dough Is Key: Refrigerating the dough lets the flavors meld and makes rolling easier without sticky mess.
- Freezing Cookies Before Baking: This helps maintain their shape during baking and gives those crisp edges I love.
- Avoid Overbaking: Pull them when edges start to turn golden to keep cookies tender inside—overbaking dries them out quickly.
How to Serve Glazed Maple Leaf Cookies Recipe
Garnishes
I love to top these cookies with crushed walnuts for that extra nutty crunch, and a sprinkle of maple sugar if I want a little sparkle and subtle sweetness. It makes them look perfect for gifting or afternoon tea. Sometimes a tiny dash of edible gold dust gives a festive shimmer, which impresses guests every time!
Side Dishes
These cookies are fabulous alongside a cup of hot apple cider, chai tea, or even just a bold black coffee. They also pair well with sharp cheeses on a fall-inspired dessert board if you’re feeling adventurous. I’ve served them with creamy pumpkin soup for a sweet finish after a cozy meal—trust me, it works!
Creative Ways to Present
I’ve had a lot of fun arranging these glazed maple leaf cookies on rustic wooden platters with fresh autumn leaves for Thanksgiving or cozy get-togethers. Wrapping a stack in parchment with a twine bow makes an adorable homemade gift. I’ve even tied small cookie bags with themed tags for neighborhood treats—it’s a crowd-pleaser and conversation starter.
Make Ahead and Storage
Storing Leftovers
I keep leftover cookies in an airtight container at room temperature for up to 5 days. The glaze stays soft and the cookies maintain that tender yet crisp texture. If you live somewhere humid, I recommend adding a silica gel packet (food-safe) or a piece of bread to help absorb moisture and keep them fresh longer.
Freezing
I usually freeze the unbaked, cut cookie dough wrapped tightly in plastic wrap and then in a freezer bag—this way you can bake fresh cookies anytime within 2 months. If you freeze baked and glazed cookies, keep them in single layers separated by parchment to avoid sticking. Thaw at room temperature before serving.
Reheating
If you want to gently warm up cookies, I pop them in a preheated 325°F oven for 5 minutes—not too hot or they’ll become dry. This makes the glaze slightly softer and the aroma of maple and walnuts pop right back. Avoid microwaving, as it tends to ruin the glaze texture.
FAQs
-
Can I use pre-ground walnuts instead of whole raw walnuts?
While you technically can, I don’t recommend it for the Glazed Maple Leaf Cookies Recipe. Whole raw walnuts ground fresh in the food processor release more natural oils and flavor, resulting in a more tender, flavorful cookie. Pre-ground walnuts tend to dry out and might affect texture.
-
What’s the best way to get sharp maple leaf shapes?
After cutting, freeze the cookies on the baking sheet for about 10 minutes before baking—this firms up the dough and prevents spreading, keeping the edges crisp and defined. Also, roll dough evenly at 1/8-inch thickness for best shape retention.
-
Can I make the glaze ahead of time?
You can prepare the glaze a few hours in advance and keep it covered at room temperature or in the fridge. Just give it a whisk before dipping your cookies because the glaze can thicken or separate slightly when chilled.
-
How do I store glazed cookies to keep them fresh?
Store glazed cookies in a single layer in an airtight container at room temperature. If stacking, place parchment paper between layers to prevent sticking. They’ll keep well for about 5 days without losing that tender, saucy glaze feel.
Final Thoughts
This Glazed Maple Leaf Cookies Recipe really holds a special place in my heart—it reminds me of cozy weekends spent baking with loved ones and the simple joy of sharing something homemade and comforting. I hope you give this recipe a try and find as much happiness in making and tasting them as I do. Trust me, once you try these, they might just become a seasonal favorite you’ll want to make year after year!
Print
Glazed Maple Leaf Cookies Recipe
- Prep Time: 20 mins
- Cook Time: 12 mins
- Total Time: 1 hr 50 mins
- Yield: 48 cookies
- Category: Baking
- Method: Baking
- Cuisine: North American
Description
Delight in these charming Glazed Maple Leaf Cookies, featuring a tender walnut and cinnamon-spiced dough kissed with a luscious maple-infused glaze. Perfectly shaped with a maple leaf cutter, these cookies offer a lovely balance of crunch and sweet maple flavor, ideal for festive occasions or everyday treats.
Ingredients
Cookies
- 3 cups (360 g) all-purpose flour, plus more for dusting
- 1 cup raw walnuts
- 1 tsp baking powder
- 1 tsp ground cinnamon
- 1/2 tsp kosher salt
- 1 cup (2 sticks) unsalted butter, softened
- 1 cup (200 g) granulated sugar
- 1 large egg
- 1 Tbsp whole milk
- 1 tsp pure maple syrup
Icing
- 3/4 cup (160 g) light brown sugar
- 6 Tbsp unsalted butter
- 1/2 tsp maple extract or pure vanilla extract
- 1/2 tsp pure maple syrup
- 1 1/2 cups (175 g) confectioners’ sugar
- Pinch of kosher salt
- Pinch of ground nutmeg
- 3 Tbsp whole milk
For Serving (Optional)
- Crushed raw walnuts
- Maple sugar
Instructions
- Prepare the Cookie Dough: In a food processor, pulse the flour and walnuts until the walnuts are finely ground. Add the baking powder, ground cinnamon, and kosher salt, then pulse again until combined uniformly.
- Cream Butter and Sugar: In a large bowl, beat the softened butter and granulated sugar with a handheld mixer on medium-high speed until the mixture is fluffy and pale, about 2 minutes. Incorporate the egg, whole milk, and pure maple syrup, beating until fully combined.
- Combine Dry and Wet Ingredients: Gradually add the dry ingredient mixture into the wet ingredients, beating at medium-low speed until no dry streaks remain and dough forms.
- Chill the Dough: Transfer the dough onto a clean surface, shape it into a disk, wrap it tightly in plastic wrap, and refrigerate for at least 1 hour, or up to 2 days, to firm up.
- Roll and Cut Cookies: On a lightly floured surface, roll the chilled dough out to 1/8 inch thickness. Use a maple leaf-shaped cookie cutter to cut out about 48 cookies, re-rolling any scraps as necessary.
- Freeze Before Baking: Place the cut cookies on two parchment-lined baking sheets and freeze them until cold, about 10 minutes. This step helps maintain their shape during baking.
- Bake the Cookies: Position oven racks in the upper and lower thirds, then preheat the oven to 350°F (175°C). Bake the cookies for 10 to 12 minutes, rotating the baking sheets halfway through, until the edges turn lightly golden. Remove from oven and let cool completely.
- Make the Maple Glaze: In a small saucepan over low heat, cook the light brown sugar and unsalted butter, stirring constantly for 2 to 3 minutes until the sugar dissolves without burning. Transfer the mixture to a heatproof medium bowl and allow it to cool slightly.
- Prepare the Icing: Whisk in the maple extract (or vanilla) and pure maple syrup into the cooled butter mixture. Gradually add confectioners’ sugar and blend until smooth. Stir in the pinch of kosher salt and ground nutmeg. Finally, whisk in the whole milk to achieve a light brown, pourable glaze.
- Glaze and Decorate Cookies: Dip one side of each cooled cookie into the maple glaze and allow excess to drip off. Optionally, sprinkle the glazed side with crushed raw walnuts or maple sugar for an extra touch of flavor and texture. Let the glaze set before serving.
Notes
- Chilling the dough is essential to prevent spreading and to maintain the sharp details of the maple leaf shapes.
- Freezing the cut cookies before baking helps preserve their form and ensures even baking.
- Maple extract can be substituted with pure vanilla extract if desired, though maple extract enhances the authenticity of flavor.
- Store glazed cookies in an airtight container at room temperature for up to 5 days; the glaze may soften slightly over time.
- For a nuttier crunch, use toasted walnuts in the dough and as garnish.
Nutrition
- Serving Size: 1 cookie
- Calories: 135
- Sugar: 10g
- Sodium: 60mg
- Fat: 7g
- Saturated Fat: 3.5g
- Unsaturated Fat: 3g
- Trans Fat: 0g
- Carbohydrates: 18g
- Fiber: 1g
- Protein: 2g
- Cholesterol: 25mg

