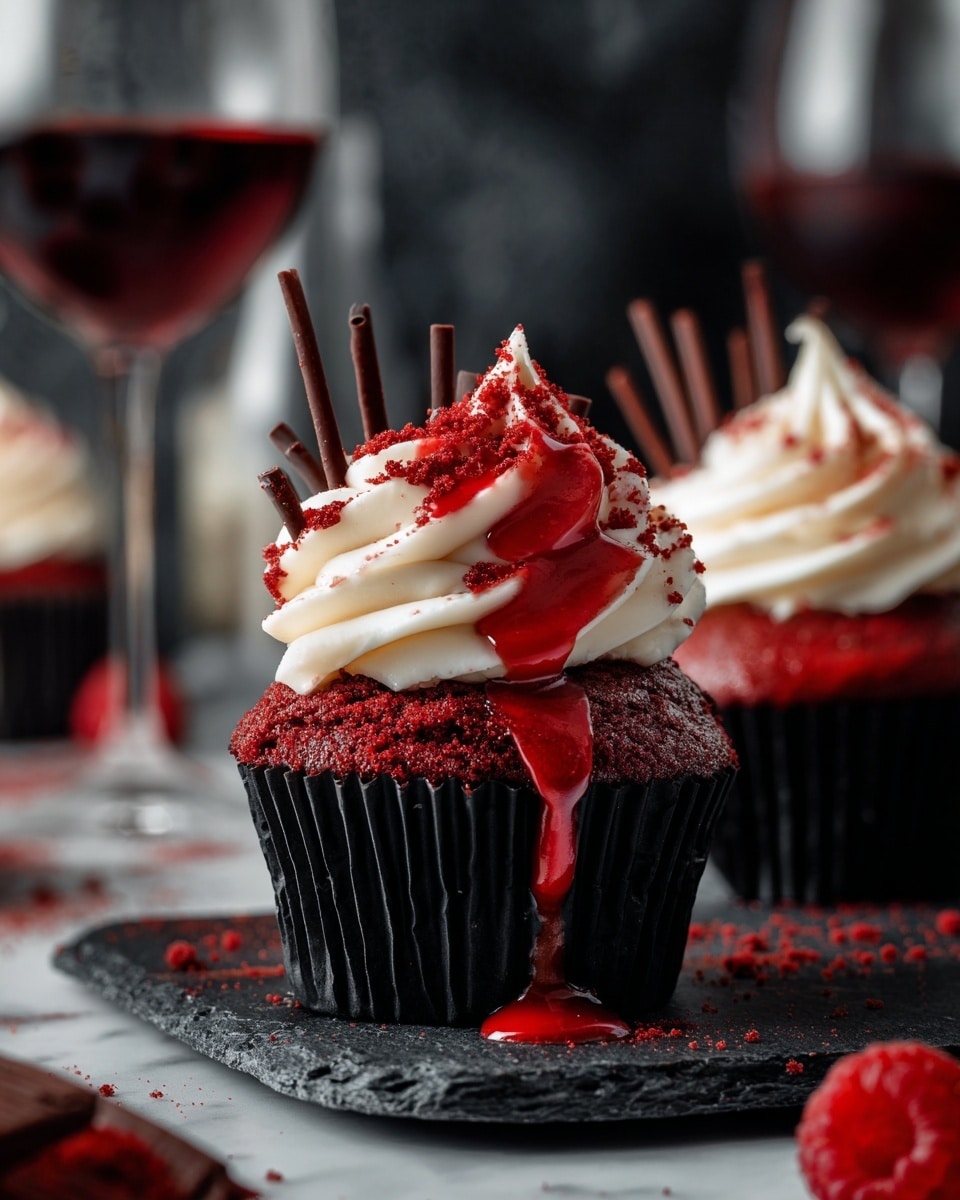
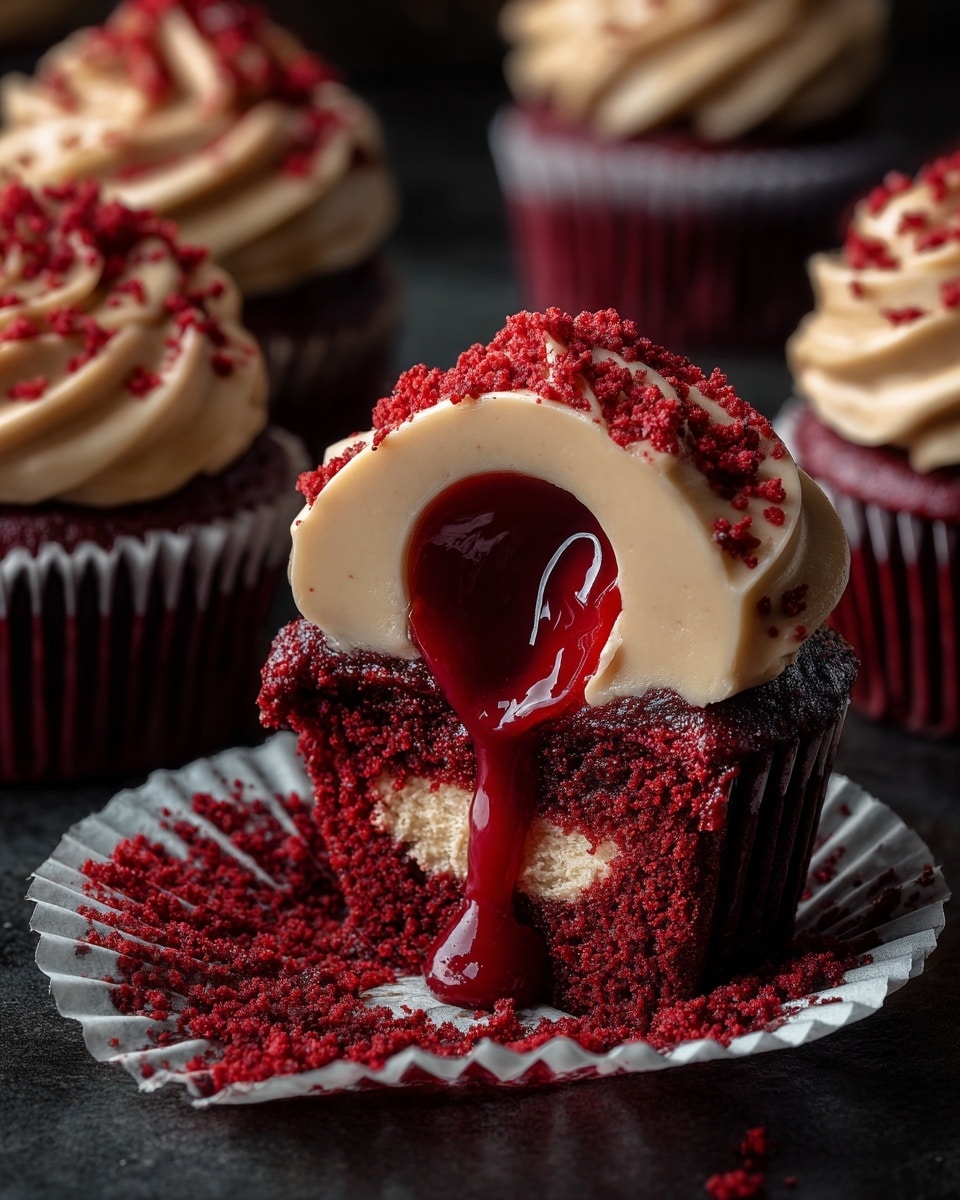
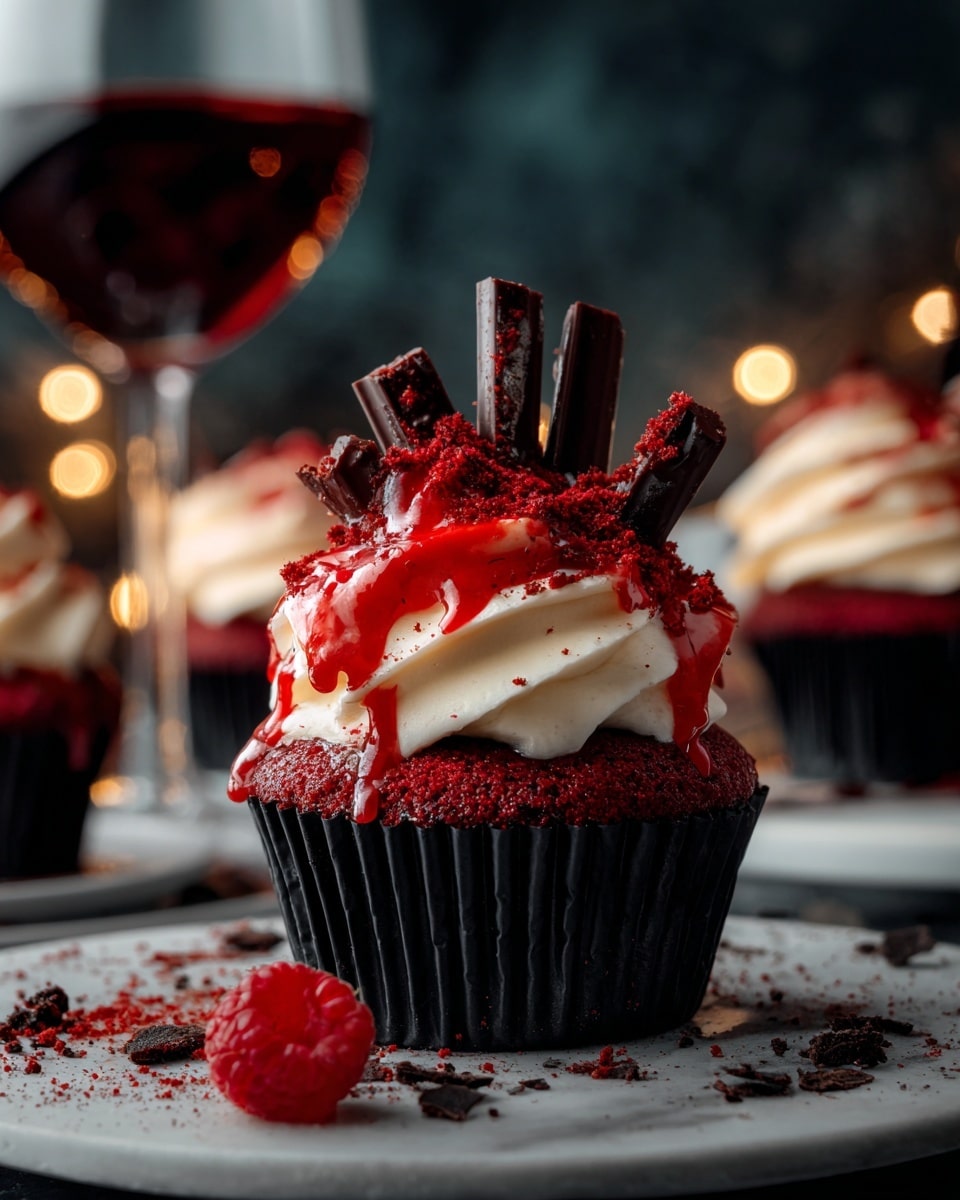
If you’re looking for a show-stopping treat for Halloween that’s as delicious as it is spooky, you’ve got to try this Vampire Bite Halloween Cupcakes Recipe. I absolutely love how these cupcakes come together—moist, rich chocolate cake with a surprise “bloody” cream cheese filling, all topped with a skin-toned frosting and those creepy vampire bite marks dripping red syrup. When I first made these, my family went crazy for them, and I promise, once you try this recipe, you’ll feel the same way. Stick around because I’m sharing tips to help you nail that perfect eerie look and flavor every time!
Why You’ll Love This Recipe
- Super Moist & Flavorful: The cocoa and buttermilk combo keeps these cupcakes tender and rich.
- Eye-Catching Halloween Decor: The red gel “bite marks” really bring the creepy factor to life.
- Unexpected Surprise Filling: The blood-red cream cheese center is fun and delicious.
- Easy to Customize: You can swap fillings or tweak colors to make them your own.
Ingredients You’ll Need
This Vampire Bite Halloween Cupcakes Recipe uses pantry staples but with a few fun twists — like red food coloring for the perfect Halloween vibe and cream cheese filling that looks like blood. Here’s a quick glimpse of what you’ll gather before we dive in.
- All-purpose flour: The base for a soft, tender cake that holds the filling well.
- Cocoa powder: Adds subtle chocolate flavor without overpowering the red color.
- Baking soda: Helps the cupcakes rise nicely and stay light.
- Salt: Balances sweetness and enhances all the flavors.
- Butter: Unsalted, so you control the salt — gives the cupcakes a tender crumb and richness.
- Sugar: Granulated for sweetness and moisture.
- Eggs: Lift and structure for your cupcakes.
- Buttermilk: It tenderizes the crumb and balances the sweetness.
- Vinegar: Reacts with baking soda for lift and keeps cupcakes moist.
- Red food coloring: Gel works best for vibrant color without thinning batter.
- Vanilla extract: Adds warmth and depth of flavor.
- Cream cheese: For a luscious, tangy filling.
- Powdered sugar: Sweetens both the filling and frosting smoothly.
- Heavy cream: Whipped to lighten the filling and perfect for fluffy frosting.
- Unsalted butter (for frosting): Softened to creamy perfection.
- Peach or ivory food coloring (for frosting): Creates the creepy skin-tone effect.
- Red gel icing or syrup: For the dramatic, realistic vampire bite blood drips.
- Toothpick: To make those signature bite puncture marks with precision.
Variations
I love playing around with this Vampire Bite Halloween Cupcakes Recipe to suit my mood or dietary needs. Whether you prefer a fruitier filling, a dairy-free option, or even a spooky Halloween twist, feel free to experiment!
- Fruit Filling Swap: I once switched the cream cheese filling with raspberry jam for a lighter, tangy surprise that still brought that “bloody” effect and loved how fresh it tasted.
- Dairy-Free Version: Using coconut cream and vegan butter, I managed a similar creamy texture for the frosting and filling that’s just as festive.
- Spiced Variation: Adding a pinch of cinnamon and chipotle powder to the cocoa mix gives it a slightly smoky kick perfect for an adult Halloween party.
- Mini Cupcakes: Perfect way to serve at parties for easy grabbing and portion control without losing any of the drama.
How to Make Vampire Bite Halloween Cupcakes Recipe
Step 1: Prep and Mix Your Dry Ingredients
Start by preheating your oven to 350°F and lining a muffin tin with your favorite liners. Then, sift together the flour, cocoa powder, baking soda, and salt. I find sifting really helps prevent clumps — which means a smoother batter and lighter cupcakes. It’s a small step, but it makes a noticeable difference.
Step 2: Cream Butter and Sugar, Add Eggs
Beat your softened butter and sugar together until the mixture is pale and fluffy – this usually takes about 3-4 minutes. That fluffiness is key for a tender cupcake. Add the eggs one at a time, mixing well after each addition. This ensures the batter is smooth and stable, which helps prevent dense cupcakes.
Step 3: Alternate Adding Dry Ingredients and Buttermilk
Gently fold in your dry ingredients alternately with the buttermilk. Starting and ending with the dry mix creates a nice batter structure. After this, add vinegar, red food coloring, and vanilla. I use gel food coloring because it delivers a rich red without watering down the batter.
Step 4: Bake and Cool Completely
Fill your cupcake liners about two-thirds full and bake for 18 to 20 minutes. You’ll know they’re ready when a toothpick inserted comes out clean. Here’s a little tip: let them cool entirely before filling and frosting—warm cupcakes can make the filling runny, and nobody wants soggy muffins!
Step 5: Make the ‘Bloody’ Cream Cheese Filling
While cupcakes cool, beat cream cheese and powdered sugar until smooth. Then gently fold in whipped heavy cream for a light texture. Adding red gel food coloring here gives the filling that perfect “bloody” appearance. It’s such a fun effect and really brings the vampire theme to life!
Step 6: Core Your Cupcakes and Fill
Using a small knife or a corer, carefully remove the center of each cupcake. Save those pieces for a little taste test (or sneak snack). Spoon the red cream cheese filling into each hollow — you want it just below the top, so it doesn’t spill out under the frosting.
Step 7: Frost with Skin-Toned Buttercream
Beat butter until soft and creamy, gradually adding powdered sugar. Then drizzle in heavy cream until the frosting reaches a smooth, spreadable consistency. Tint it with peach or ivory food coloring to mimic human skin tones — it’s a little spooky, a lot cool. Spread or pipe the frosting evenly to resemble smooth skin.
Step 8: Add Those Iconic Vampire Bites
This is the moment the cupcakes really come alive. Use a toothpick to make two small, evenly spaced puncture holes on the frosting for bite marks. Carefully place a drop of red gel icing or syrup into each hole and let it drip naturally for realistic blood. If you want to get really theatrical, add candy vampire fangs or extra drops of “blood” around the marks. Trust me, it’s worth the extra effort!
Pro Tips for Making Vampire Bite Halloween Cupcakes Recipe
- Use Gel Food Coloring: It delivers vibrant color without thinning your batter or frosting, which I learned after a few too-thin batches.
- Chill Cupcakes Before Filling: This keeps the frosting firm and prevents your filling from leaking out — a game changer for presentation.
- Don’t Overmix Batter: Stir just until combined to keep cupcakes light and tender, avoiding a chewy texture.
- Be Gentle with the Bite Marks: Poke small holes carefully with a toothpick — too big and the “blood” might flood the frosting.
How to Serve Vampire Bite Halloween Cupcakes Recipe
Garnishes
I personally like to top mine with a tiny drizzle of extra red gel icing around the bite marks for that fresh “bleeding” effect. Candy vampire fangs or small Halloween-themed sprinkles add a fun touch — just enough to be spooky without overpowering the cupcake itself.
Side Dishes
Pair these cupcakes with some classic Halloween drinks like a sparkling blood orange punch or a warm spiced cider to keep the theme going. For a savory balance, some popcorn tossed with a little chili seasoning or caramel corn works surprisingly well.
Creative Ways to Present
For Halloween parties, I like serving these cupcakes on a platter surrounded by dry ice for that eerie fog effect. You can also place them on a cake stand decorated with fake spider webs or on a dark wooden board with scattered faux autumn leaves — it totally ups the spooky factor.
Make Ahead and Storage
Storing Leftovers
I store leftover cupcakes in an airtight container in the fridge — this keeps the frosting firm and the filling fresh. Just make sure to let them come to room temperature before serving because the flavors open up beautifully when not too cold.
Freezing
These cupcakes freeze well, either fully assembled or just the baked cakes without frosting. When I freeze them with frosting, I place the cupcakes on a tray to harden the frosting first, then pop them into a container to prevent damage. Thaw overnight in the fridge for best results.
Reheating
Since these are cupcakes, reheating isn’t really necessary — but if you want to slightly warm them, take them out of the fridge about 30 minutes ahead to soften, or microwave briefly (5-7 seconds). Be careful not to melt the frosting or filling!
FAQs
-
Can I make Vampire Bite Halloween Cupcakes Recipe dairy-free?
Absolutely! Substitute dairy butter with vegan butter, use coconut cream instead of heavy cream, and a dairy-free cream cheese alternative for the filling. Just note these swaps may slightly change texture, but will still taste delicious and look amazing.
-
What’s the best red food coloring to use for this recipe?
I highly recommend gel food coloring because it gives a vibrant, true red color without adding extra liquid that could thin your batter or frosting. It also helps keep your cupcakes moist without making them too runny.
-
Can I prep these cupcakes a day ahead?
You sure can! Bake the cupcakes and prepare the filling and frosting ahead of time. Store them separately and assemble just before your party for the freshest look, or fully assemble and let chill in the fridge overnight if time is tight.
-
How do I get the realistic “bite marks” effect?
Use a toothpick to carefully poke two small holes, and then use red gel icing or syrup to fill and create drippy blood-like effects. Let it drip naturally for realism. Adding candy fangs near the marks ups the creepy factor too!
Final Thoughts
This Vampire Bite Halloween Cupcakes Recipe isn’t just a treat—it’s a whole experience that’s fun to make and even more fun to eat. I love how it surprises your guests with that juicy red filling and creepy bite detail, making it perfect for Halloween or anytime you want to impress. Honestly, every time I bring these out, they’re the star of the party. So go ahead, try it out, and I bet you’ll be as hooked as I am!
Print
Vampire Bite Halloween Cupcakes Recipe
- Prep Time: 15 minutes
- Cook Time: 20 minutes
- Total Time: 45 minutes
- Yield: 12 cupcakes
- Category: Dessert
- Method: Baking
- Cuisine: American
Description
These Vampire Bite Halloween Cupcakes are a spooky and delicious treat perfect for Halloween celebrations. Featuring rich cocoa cupcakes filled with a creamy, blood-red cream cheese filling and topped with skin-tone frosting, these cupcakes are finished with realistic vampire bite marks using red gel icing. The combination of deep chocolate flavor, tangy filling, and smooth frosting makes them both visually striking and irresistible.
Ingredients
Cupcakes
- 1 1/2 cups all-purpose flour
- 2 tablespoons cocoa powder
- 1 teaspoon baking soda
- 1/2 teaspoon salt
- 1/2 cup butter
- 1 cup sugar
- 2 large eggs
- 1 cup buttermilk
- 1 teaspoon vinegar
- 2 tablespoons red food coloring
- 1 teaspoon vanilla extract
Filling
- 4 oz cream cheese
- 1/2 cup powdered sugar
- 1/2 cup heavy cream
- Red food coloring (gel recommended)
Frosting
- 1 cup unsalted butter
- 3 cups powdered sugar
- 3–4 tablespoons heavy cream
- Peach or ivory food coloring
Decoration
- Red gel icing or syrup (for vampire bite effect)
- Toothpick (for making puncture marks)
- Optional: candy vampire fangs or extra ‘blood’ drips
Instructions
- Preheat and Prepare Pan: Preheat your oven to 350°F (175°C) and line a muffin pan with cupcake liners to ready it for baking.
- Sift Dry Ingredients: In a bowl, sift together the all-purpose flour, cocoa powder, baking soda, and salt to ensure even mixing and avoid lumps.
- Cream Butter and Sugar: In a separate large bowl, cream the butter and sugar together until the mixture becomes pale and fluffy, which helps create a light texture.
- Add Eggs: Beat in the eggs one at a time, making sure each is fully incorporated before adding the next.
- Combine Wet and Dry Ingredients: Alternately add the sifted dry ingredients and buttermilk to the creamed mixture, starting and ending with the dry ingredients. Then mix in the vinegar, red food coloring, and vanilla extract thoroughly to get the vibrant red hue and flavor.
- Fill and Bake: Spoon the batter into the prepared cupcake liners, filling each about two-thirds full. Bake in the preheated oven for 18–20 minutes or until a toothpick inserted into the center comes out clean.
- Cool: Allow cupcakes to cool completely on a wire rack before filling and frosting to prevent melting and soggy texture.
- Prepare Filling: Beat the cream cheese and powdered sugar together until smooth. Gently fold in the heavy cream that has been whipped to soft peaks. Tint this filling with gel red food coloring to create a bloody appearance.
- Fill Cupcakes: Core out the center of each cooled cupcake and spoon the red cream cheese filling inside for a surprising vampire bite effect.
- Make Frosting: Whip the unsalted butter until creamy. Gradually add powdered sugar while continuing to whip. Then add 3 to 4 tablespoons of heavy cream to reach spreading consistency, and tint the frosting with peach or ivory food coloring to mimic skin tone.
- Frost Cupcakes: Smoothly frost the cupcakes with the tinted buttercream, covering the filled centers to create a skin-like appearance.
- Create Vampire Bites: Use a toothpick to poke two small puncture marks side by side on each cupcake’s frosting. Drop red gel icing or syrup into these holes and allow it to drip slightly for a realistic vampire bite look.
- Optional Decoration: For an extra spooky effect, add candy vampire fangs near the bites or drizzle more red gel icing around the cupcake.
Notes
- Chill the cupcakes before filling to prevent the filling from making the cupcake soggy.
- Red gel icing is recommended for the vampire bite effect as it provides the most realistic blood-like drips.
- You can substitute the cream cheese filling with raspberry jam or strawberry coulis for a fruity alternative.
Nutrition
- Serving Size: 1 cupcake
- Calories: 320
- Sugar: 28g
- Sodium: 180mg
- Fat: 18g
- Saturated Fat: 10g
- Unsaturated Fat: 7g
- Trans Fat: 0g
- Carbohydrates: 38g
- Fiber: 2g
- Protein: 4g
- Cholesterol: 55mg

