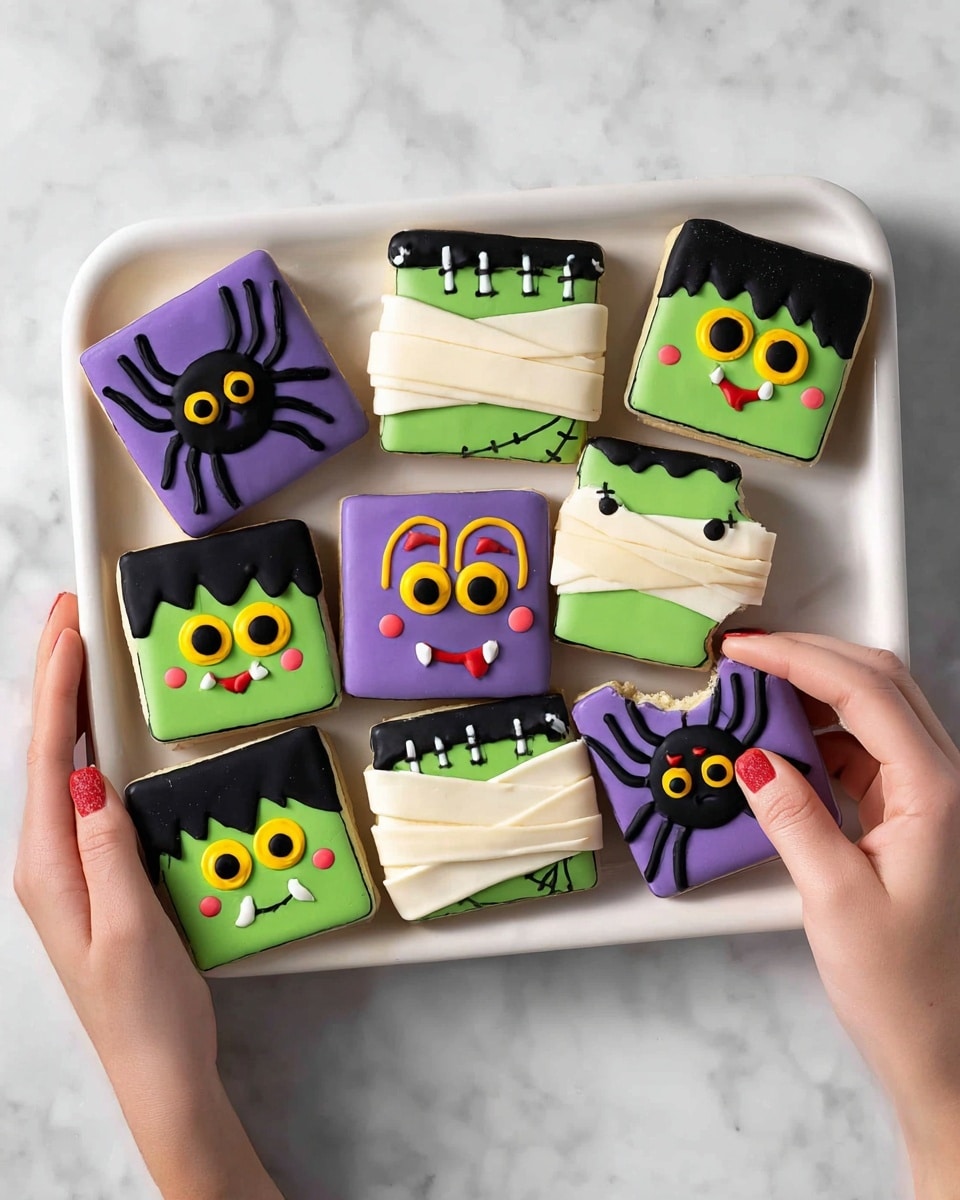
If you’re hunting for a spook-tacular treat that’s both fun to make and delightfully delicious, you’re going to love this Monster Mash Halloween Brownies (kids recipe) Recipe. This isn’t just any brownie—it’s a playful Halloween twist that kids (and adults) will have a blast decorating and devouring. I’ve found that turning baking time into a creative costume party right in the kitchen makes this recipe a total hit every year. Keep reading, and I’ll share all the tricks and tips to nail these creepy, cute brownies!
Why You’ll Love This Recipe
- Kid-Friendly Fun: The decorating phase is a blast for kids to get creative with spooky frosting and licorice.
- Rich, Fudgy Flavor: These brownies are perfectly dense and chocolatey, thanks to melted dark chocolate and cocoa powder.
- Step-By-Step Clear Instructions: I broke the process down so you’ll avoid the usual baking pitfalls and have confidence from start to finish.
- Multiple Monster Designs: From Frankenstein to Dracula, you’ll get to try out four unique monster styles that make this recipe stand out.
Ingredients You’ll Need
The magic of these Monster Mash Halloween Brownies (kids recipe) Recipe is in the simple, quality ingredients that come together for rich brownies and colorful, fun frosting. Here’s what you’ll want to keep on hand—and a few notes on selecting the best versions.
- All-purpose flour: Make sure it’s fresh for the best texture and consistency in the brownies.
- Unsweetened cocoa powder: I love using natural cocoa for that deep chocolate flavor without any added sweetness.
- Granulated sugar: Regular white sugar works perfectly here to balance the chocolate bitterness.
- Unsalted butter: Melting it before mixing helps create that fudgy, moist brownie texture.
- Dark chocolate: Use good-quality dark chocolate—this really intensifies the chocolatey richness!
- Large eggs: These add structure and moisture—don’t skip or swap out for too small eggs.
- White and dark chocolate chips: They add texture and little chocolatey bursts, which kids love discovering in each bite.
- American buttercream frosting: This is your base for all the colorful frostings; it’s smooth, creamy, and perfect for piping.
- Cocoa powder (for frosting): Adds richness and depth to the black frosting.
- Milk: Thins out the frosting for easier piping and smoother texture.
- Food gels (various colors): Pick bright, concentrated gels to really bring your monster creations to life—liquid food coloring just doesn’t pack the same punch.
- Liquorice roll: This is your go-to for all the “monster parts” like Frankenstein’s bolts or spider legs.
Variations
I like to switch things up a bit with this Monster Mash Halloween Brownies (kids recipe) Recipe depending on the season or what I have on hand. You can make it your own! Here are a few fun ways to tweak it that I’ve tried myself.
- Dairy-Free Twist: Swap the butter for coconut oil and use dairy-free chocolate chips—I’ve done this and the texture stays super fudgy while making it allergy-friendly.
- Nutty Addition: Toss in chopped walnuts or pecans with the chocolate chips for a crunchy surprise; my family goes crazy for this little change.
- Extra Spooky Colors: Replace the food gels with neon or glow-in-the-dark edible paints for an ultra Halloween party wow factor.
- Mini Brownies: Bake the batter in a mini muffin tin for bite-sized monster treats—perfect for party platters!
How to Make Monster Mash Halloween Brownies (kids recipe) Recipe
Step 1: Prep your frosting colors
I always start with the frosting first because it needs a bit of time to settle and develop those vibrant colors. Split your buttercream frosting into seven portions, then add specific food gels to each—black with cocoa powder and milk for richness, then green, yellow (in a few shades), red, purple, and leave one portion white for contrast. It’s a fun moment to get the kids involved using spoons and mixing bowls—they love seeing the color magic happen!
Step 2: Bake the chocolatey brownies
Preheat your oven to 175°C (340°F) fan forced and prep a 32cm x 24cm baking tin with non-stick spray and parchment paper. Melt the butter and dark chocolate together gently in bursts in the microwave—20 seconds at a time—and stir until silky smooth. Add in your sugar and whisk until glossy, then incorporate the eggs one at a time. Stir in your cocoa powder and flour with a spatula, and finally, fold in both white and dark chocolate chips for those surprise pockets of sweetness. Bake for about 30 minutes—don’t be afraid if the skewer comes out with moist crumbs, that fudgy texture is what you want. Let the brownies chill at room temp for an hour, then pop them in the fridge for another hour to firm up; this step is key if you want those clean monster shapes!
Step 3: Cut and create monster shapes
Once cooled, use a 2 ½ inch square cookie cutter to cut out 12 perfect brownie squares. This uniform size helps keep the decorating process manageable and fun. The kids will love this part too—it’s like cookie-cutter fun but with brownies!
Step 4: Decorate your Monster Mash Halloween Brownies!
This is the part that really makes this recipe shine. You’ll use piping bags fitted with different Wilton tips to create four classic monsters:
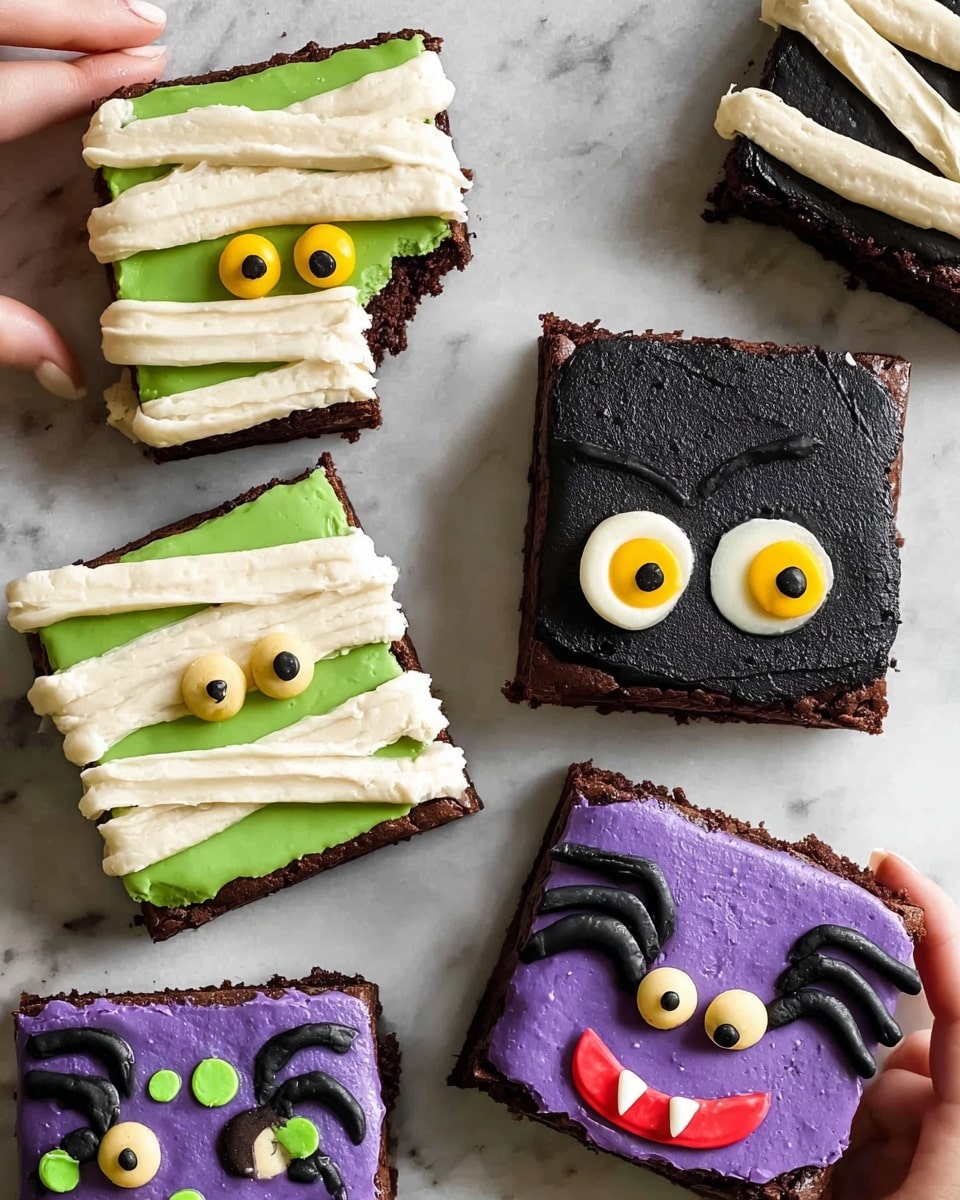
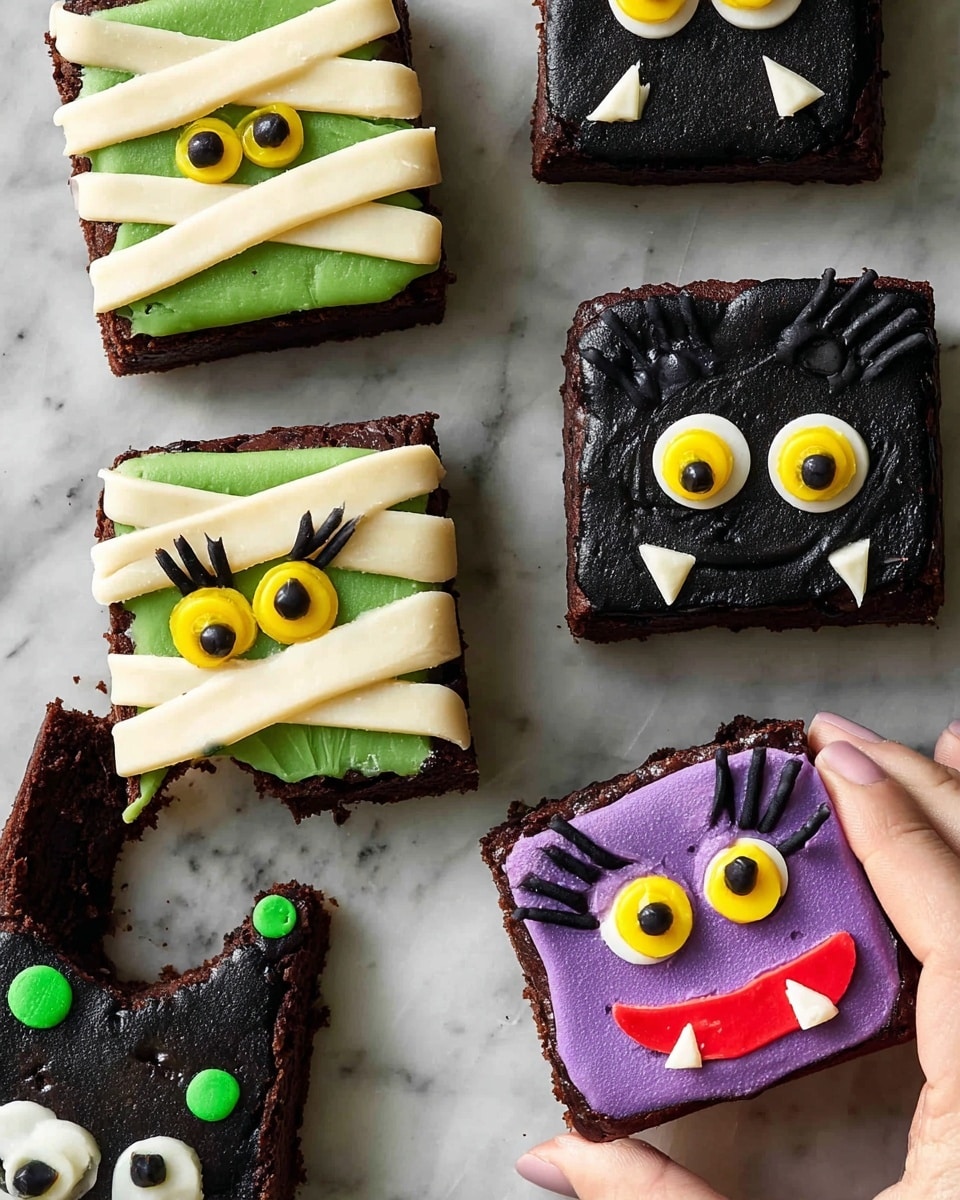
- Frankenstein: Pipe green frosting squares around 6 brownies, smooth with a spatula; add monobrows, stitches, and bolt details using black and yellow frosting, and finish with licorice bolts.
- Mummy: Over the green frosted brownies, pipe light yellow frosting lines across to mimic bandages and use black and yellow frosting for wide spooky eyes.
- Spider Monster: Use purple frosting squares on 3 brownies, pipe black smiling mouths, red fangs, and green eyes, then stick liquorice “legs” on the sides for extra creepiness.
- Dracula: Finish 3 brownies with widow’s peaks of black frosting and a white frosting face, repeating the eye steps and spider mouth design from earlier.
It’s a bit like painting little canvases—you get to see your monsters come alive! I promise once you start piping, it’s hard to stop.
Pro Tips for Making Monster Mash Halloween Brownies (kids recipe) Recipe
- Chill, Chill, Chill: I learned the hard way that skipping the chilling stage makes cutting and decorating messy; cold brownies cut clean and hold the frosting better.
- Use Gel Food Coloring: It’s so much more vibrant and doesn’t water down your frosting as liquids do—totally worth it for the bright monster colors.
- Piping Bag Prep: Don’t over-fill your piping bags; it’s easier to control your designs and prevents frosting messes everywhere.
- Licorice Placement: When using liquorice for legs or bolts, gently poke holes in the brownie first so you don’t tear the frosting or crumb surface.
How to Serve Monster Mash Halloween Brownies (kids recipe) Recipe
Garnishes
I’m usually all about keeping things simple here—extra sprinkles or edible googly eyes can add some fun pop to your monster faces without complicating things. Sometimes I sprinkle crushed candy corn or edible glitter on top of the frosting for that Halloween sparkle that the kids just adore.
Side Dishes
These brownies shine as a sweet treat after a pumpkin soup or spooky spaghetti dinner. I like pairing them with a cold glass of milk or a fun Halloween-themed punch to balance all that rich chocolate goodness. You can also serve along some fresh fruit to lighten the mood.
Creative Ways to Present
You can get super creative by placing the Monster Mash Halloween Brownies on a decorated platter lined with artificial spider webs and plastic spiders. Another idea is to serve them individually in mini Halloween-themed cupcake liners or on colorful plates with little flags or toothpicks that say “Boo!” or “Eek!”—the kids love the extra thought and fun vibes.
Make Ahead and Storage
Storing Leftovers
These brownies actually taste better the next day, but you have to store them right! Keep them in an airtight container in the fridge for up to three days to maintain texture and freshness. I always make sure they’ve cooled completely before stacking them so the frosting doesn’t melt or smudge.
Freezing
I’ve frozen the uncut brownies right after baking and chilling, wrapped tightly with plastic wrap and then foil. When you’re ready, thaw overnight in the fridge, cut, and decorate fresh. I don’t recommend freezing fully decorated brownies, as the frosting can get messy, but in a pinch, flash freeze them uncovered, then transfer to a container.
Reheating
These brownies are meant to be enjoyed chilled or at room temperature, but if you like them a bit warm, microwave a brownie for about 10 seconds. Be sure to remove the licorice parts first! Reheating longer starts to melt the frosting, and you’ll lose that perfect monster look.
FAQs
-
Can kids make the Monster Mash Halloween Brownies (kids recipe) Recipe by themselves?
Absolutely! The baking part with adult supervision is safe and fun, but the frosting and decorating is where kids really shine. I encourage letting them pipe and create the monster faces—it’s messy but so rewarding, plus great fine motor skill practice!
-
Do I have to use all the different frosting colors?
Not at all! You can simplify the recipe by using fewer colors or even one color frosting for the whole batch. But if you want that full monster effect, the color variations really bring the characters to life and make it extra festive.
-
Can I make these brownies gluten-free?
You can swap the all-purpose flour for a gluten-free baking blend, but I recommend testing it once first as gluten-free flours bake differently. Adding an extra binding agent like xanthan gum might help keep the brownies fudgey without crumbling.
-
How do I prevent the frosting from melting onto warm brownies?
Make sure the brownies are completely cooled — the chilling steps in the recipe really help with this. Piping on warm brownies causes the frosting to melt and lose its shape, which is frustrating and messy.
Final Thoughts
This Monster Mash Halloween Brownies (kids recipe) Recipe holds a special place in my heart because it turns baking into a joyful family event. I love how it brings out creativity, and how the brownies disappear almost as quickly as they’re decorated. Whether it’s for a Halloween party, school bake sale, or just a cozy night in with the kids, you’ll find this recipe is a guaranteed crowd-pleaser. Give it a go—you’ll have so much fun making monsters that taste incredible too!
Print
Monster Mash Halloween Brownies (kids recipe) Recipe
- Prep Time: 1 hour 30 minutes
- Cook Time: 30 minutes
- Total Time: 2 hours 15 minutes
- Yield: 12 brownies
- Category: Baking
- Method: Baking
- Cuisine: American
- Diet: Vegetarian
Description
Delight your kids this Halloween with these fun and spooky Monster Mash Halloween Brownies. Featuring rich chocolate brownies topped with colorful buttercream frostings and creative decorations like licorice, these treats are perfect for festive parties and family gatherings. Easy to bake and decorate, these brownies combine classic chocolate flavors with playful monster designs.
Ingredients
Brownies
- 1/2 cup (75 g) all-purpose flour
- 3/4 cup (75 g) unsweetened cocoa powder
- 1 1/2 cups (300 g) granulated sugar
- 1 1/4 cups (300 g) unsalted butter, melted
- 1 1/2 cups (300 g) dark chocolate, melted
- 6 large eggs
- 1 cup (200 g) white chocolate chips
- 1 cup (200 g) dark chocolate chips
Frosting
- 1 1/4 batches American buttercream frosting
- 1/4 cup (20 g) cocoa powder
- 2 tbsp milk
- 10 drops black food gel
- 3 drops teal food gel + 3 drops yellow food gel (green frosting)
- 2 drops yellow food gel (light yellow frosting)
- 5 drops yellow food gel (yellow frosting)
- 10 drops red food gel (red frosting)
- 10 drops purple food gel + 5 drops pink food gel (purple frosting)
Decorations
- 20 cm roll of licorice
Instructions
- Prepare the Frosting: Divide the prepared American buttercream frosting into 7 portions. Mix 2 portions with teal and yellow food gel to make green frosting. Add cocoa powder, milk, and black food gel to 1 portion for black frosting. Color the remaining portions as follows: 1 portion purple (purple and pink gel), 1 portion red (red gel), ½ portion yellow (yellow gel), ½ portion light yellow (yellow gel), and leave 1 portion white. Mix each thoroughly.
- Preheat Oven and Prepare Pan: Preheat a fan-forced oven to 175°C (340°F). Grease a 32cm x 24cm baking tin with non-stick spray and line the bottom with parchment paper. Set aside.
- Melt Butter and Chocolate: Place unsalted butter and dark chocolate in a microwave-safe bowl. Microwave in 20-second intervals, stirring with a spatula between each, until smooth and melted.
- Mix Brownie Batter: To the melted chocolate and butter, add sugar and whisk until fully incorporated. Add the eggs one at a time, whisking thoroughly after each addition. Sift in cocoa powder and flour, then fold them into the mixture using a spatula. Finally, stir in white and dark chocolate chips until evenly dispersed.
- Bake Brownies: Pour batter into the prepared baking tin. Bake for approximately 30 minutes or until a skewer inserted comes out with moist crumbs. Remove from oven and allow to cool at room temperature for 1 hour, then transfer to the fridge to chill for an additional hour.
- Cut Brownies: Use a 2 ½ inch square cookie cutter to cut out 12 brownie squares once chilled for ease of decorating.
- Decorate Frankenstein Brownies: Fit a piping bag with a Wilton #8 tip and pipe a green frosting square border around the edges of 6 brownies. Smooth the frosting with a small offset spatula. Using a #3 tip, pipe the mouth, eyes, monobrow, and mouth stitches with black frosting. Pipe yellow frosting inside the eyes, fill the pupils with black frosting, and add small licorice pieces on the sides as bolts. Set 3 aside.
- Decorate Mummy Brownies: Using the remaining 3 green frosted brownies, pipe light yellow frosting lines horizontally across the brownies with a Wilton 2B tip to mimic bandages. Use black frosting (#3 tip) to pipe eyes, surrounding them with yellow frosting before filling in the pupils with black frosting.
- Decorate Spider Monster Brownies: Pipe a purple frosting square border on 3 brownies with the Wilton #8 tip. Smooth with a spatula. Using black frosting and a #3 tip, pipe smiles. Add red fangs with red frosting and green eyes using a #3 tip. Attach long licorice pieces on the sides to resemble spider legs.
- Decorate Dracula Brownies: Use two piping bags fitted with Wilton #8 tips filled with black and white frosting. Pipe a widow’s peak at the top of remaining 3 brownies using black frostings, then fill the rest with white frosting. Follow mummy brownie eye decoration steps and use spider brownie mouth decoration to finish the look.
Notes
- Store brownies in an airtight container in the fridge for up to 3 days.
- Allow brownies to thaw at room temperature for about 30 minutes before serving.
- Ensure brownies are fully chilled before cutting and decorating for clean edges and ease of piping.
- Use gel food coloring for vibrant frosting shades that won’t alter the consistency.
- For best results, use a fan-forced oven to ensure even baking.
Nutrition
- Serving Size: 1 brownie (approx. 75 g)
- Calories: 380
- Sugar: 32 g
- Sodium: 70 mg
- Fat: 24 g
- Saturated Fat: 14 g
- Unsaturated Fat: 8 g
- Trans Fat: 0 g
- Carbohydrates: 40 g
- Fiber: 4 g
- Protein: 5 g
- Cholesterol: 90 mg

