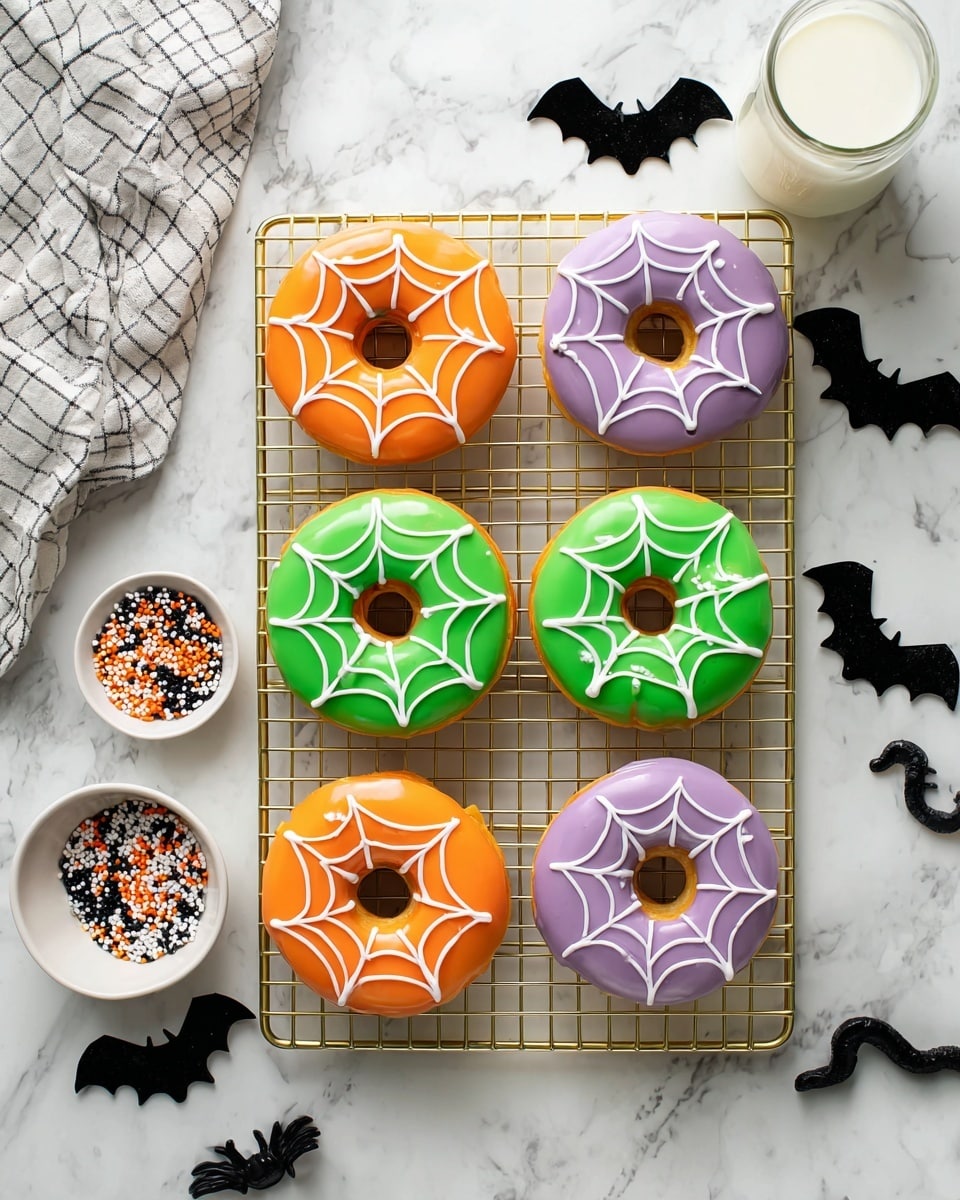
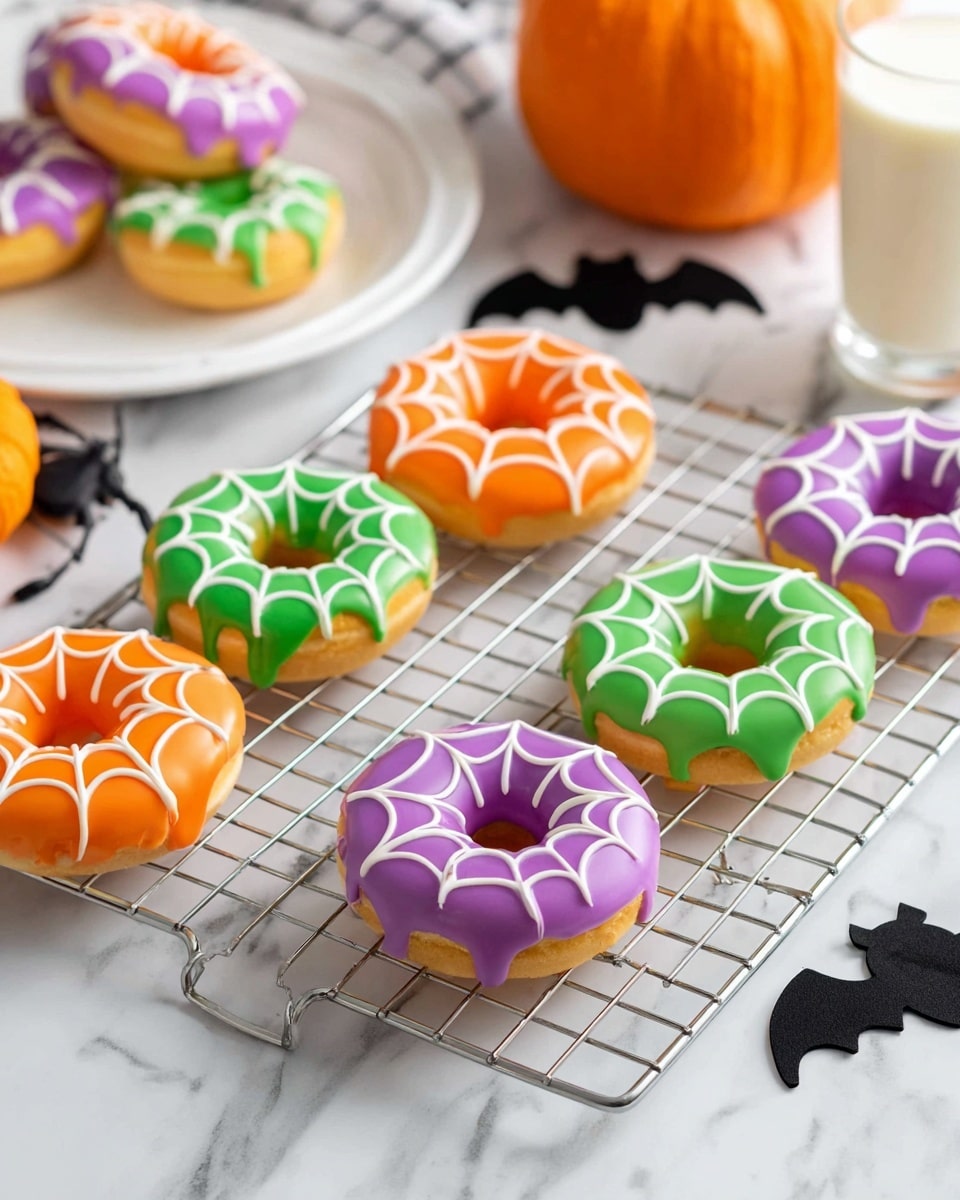
If you’re looking for a fun and festive treat this season, I absolutely adore sharing my Halloween Baked Donuts with Colorful Glaze and White Chocolate Decorations Recipe with you. These donuts are tender, moist, and come with just the right amount of sweetness, plus you can customize their colors and decorations to your heart’s content! Whether you’re baking with kids or need a friendly crowd-pleaser for a party, you’ll find this recipe easy, enjoyable, and downright delicious. Ready to impress everyone with spooky or cute donuts that won’t leave a greasy mess? Let’s get baking!
Why You’ll Love This Recipe
- No Frying Required: You get that classic donut flavor and texture but baked to perfection, so it’s healthier and less messy.
- Customizable Glazes and Decorations: You can pick your favorite Halloween colors and add white chocolate designs for that extra wow factor.
- Quick and Simple: Ready from start to finish in under 30 minutes, which is perfect for last-minute Halloween fun or sweet treats.
- Perfectly Moist and Tender: This recipe balances ingredients just right so your donuts stay soft but hold their shape beautifully.
Ingredients You’ll Need
When I bake these donuts, I love their simplicity. The ingredients come together smoothly, and each one plays a role in making the donuts light, moist, and ready to shine with that colorful glaze and chocolate decoration. Here’s a quick rundown with some little tips I’ve picked up along the way.
- All-purpose flour: The base for our donuts; plain and simple, it gives structure without anything too heavy.
- Granulated sugar: Adds just the right level of sweetness; you won’t want to skip or swap this.
- Baking powder: Helps the donuts rise nicely—make sure it’s fresh for the best puff.
- Salt: Balances the sweetness and brings out flavor, even in baked donuts.
- Unsalted butter: Melted for easy mixing, this keeps the donuts tender and rich.
- Egg: The glue that holds everything together and brings moisture.
- Milk: Added in two parts, it keeps the batter smooth and impacts the overall softness.
- Vanilla extract: My secret weapon for depth of flavor—you can never go wrong with vanilla!
- Powdered sugar: For the glaze, this gives that beautiful smooth and sweet coating.
- Food coloring (Halloween purple, orange, or green): To get the glaze perfectly festive; use gel food coloring for the brightest hues.
- White melting chocolate: For the adorable decorations; melts easily, perfect for piping fun designs.
- Piping bag and small round tip: These tools make decorating your donuts a breeze and are totally worth having around.
Variations
I love how versatile this Halloween Baked Donuts with Colorful Glaze and White Chocolate Decorations Recipe is, so I encourage you to make it your own. Maybe you want to turn up the spooky factor or try a different glaze flavor—go for it! Experimenting is half the fun.
- Gluten-Free Version: One time, I swapped in a gluten-free all-purpose blend and had success; just expect a slightly denser donut that still tastes delightful.
- Pumpkin Spice Flavor: Adding a teaspoon of pumpkin pie spice to the batter instantly made my kitchen smell like fall heaven—a must try!
- Vegan Swap: Substituting the egg with a flax egg and using plant-based milk worked well when I had vegan friends over; the texture remained nicely soft.
- Different Decorations: Instead of white chocolate, you can use melted dark chocolate or candy melts in Halloween colors for some variation in look and flavor.
How to Make Halloween Baked Donuts with Colorful Glaze and White Chocolate Decorations Recipe
Step 1: Mix Your Dry Ingredients
Start by whisking together the flour, granulated sugar, baking powder, and salt in a large bowl. I like to give them a good mix so that the baking powder is evenly distributed—this really helps the donuts rise uniformly without any weird dense spots.
Step 2: Combine Wet Ingredients Separately
In another bowl, whisk together the melted butter, egg, milk, and vanilla extract until smooth and well-combined. When I first tried this recipe, I noticed that mixing wet ingredients separately made the batter come together much better than just dumping everything in one bowl.
Step 3: Bring It All Together
Pour the wet ingredients into the dry ingredients and gently fold everything together just until combined. Avoid overmixing here; I learned this the hard way! Overworked batter can result in tough donuts, and trust me—you want them tender. A few lumps are totally okay.
Step 4: Bake the Donuts
Pour the batter into a lightly greased donut pan, filling each cavity about 3/4 full. Bake at 350°F (175°C) for about 8 minutes—keep an eye on them! They’ll puff up just right and bounce back when touched. I usually check at 7 minutes because ovens run differently, and I don’t want them to overbake.
Step 5: Make the Colorful Glaze
Whisk together powdered sugar, milk, and vanilla extract until smooth. Divide the glaze into small bowls and tint each bowl with your chosen Halloween colors (purple, orange, green). Use gel food coloring for the brightest colors without thinning the glaze too much.
Step 6: Dip and Decorate
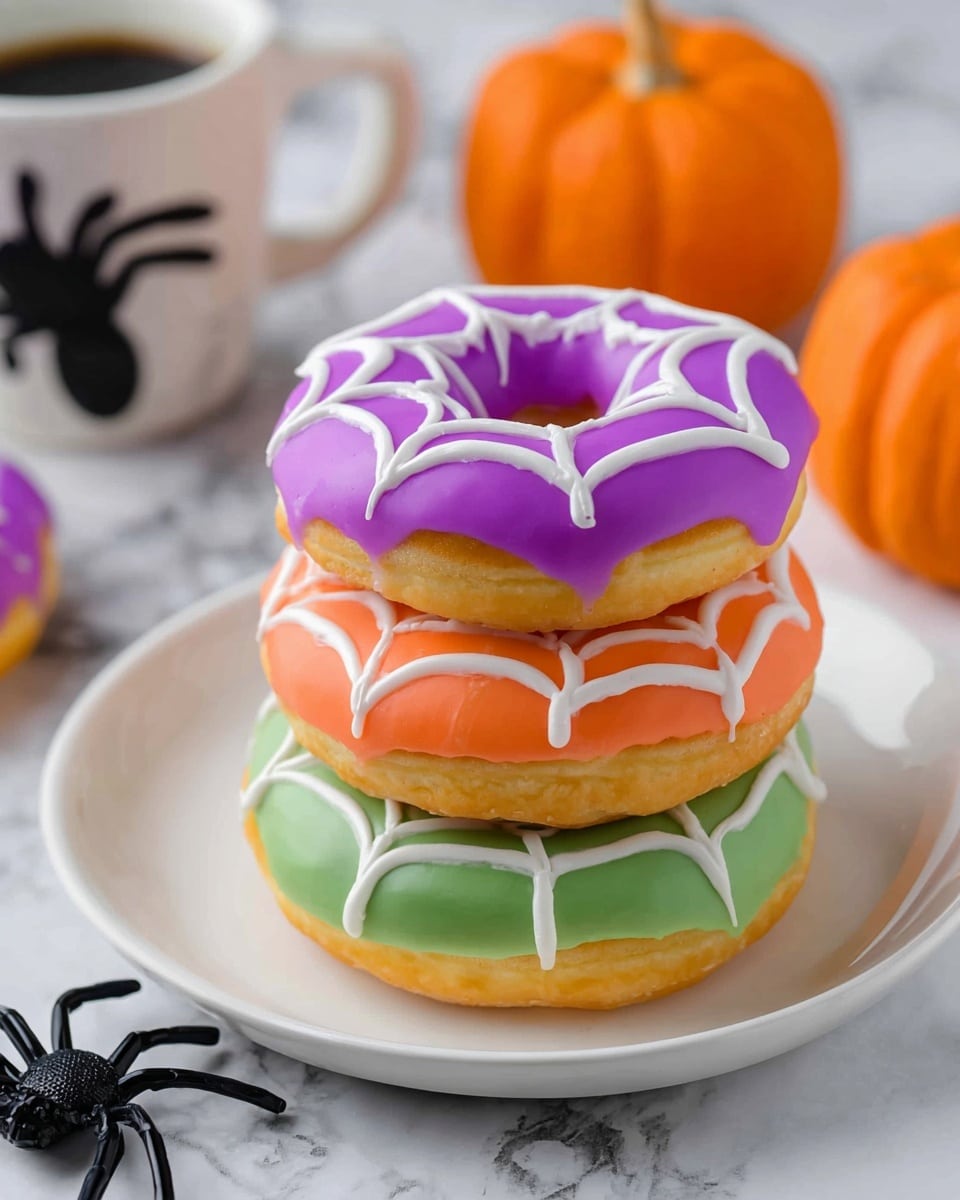
Once the donuts have cooled, dip them into the colorful glaze and let excess drip off. While the glaze is still wet, make your white chocolate decorations. Melt the white chocolate and pipe fun Halloween shapes—like spider webs, ghosts, or pumpkins—using your piping bag with a small round tip. This part is where I always invite my niece over—she has the most creative ideas!
Pro Tips for Making Halloween Baked Donuts with Colorful Glaze and White Chocolate Decorations Recipe
- Gentle Folding: I always fold the batter gently to keep those donuts soft and airy—don’t overdo the mixing!
- Use Gel Food Coloring: I discovered gel colors keep the glaze thick and vibrant without watering it down.
- Cool Completely Before Glazing: Trust me, dipping warm donuts makes the glaze slide right off.
- Practice Piping on Parchment: I always test my white chocolate designs on parchment before decorating the donuts—less stress and more fun!
How to Serve Halloween Baked Donuts with Colorful Glaze and White Chocolate Decorations Recipe
Garnishes
For garnishes, I love sprinkling these donuts with tiny edible Halloween-themed candies or crushed candy corn right after glazing. It adds a playful crunch and makes every bite exciting. You can also dust a little edible glitter for extra sparkle—it always wows the kids!
Side Dishes
Pair these donuts with a steaming cup of spiced apple cider, pumpkin latte, or even a fun black cherry soda for the kids. I like serving some fresh fruit or a light yogurt parfait alongside, balancing the sweetness with some freshness.
Creative Ways to Present
One year, I arranged mine on a tiered dessert stand shaped like a haunted house and added little paper bats and pumpkins around the edges. You can also serve them on Halloween-themed plates with some fake cobwebs for a spooky vibe. For parties, try wrapping each donut in colorful cellophane tied with a ribbon—instant take-home gift!
Make Ahead and Storage
Storing Leftovers
Once glazed and decorated, store leftover donuts in an airtight container at room temperature for up to two days. From experience, keeping them out of the fridge prevents the glaze from getting sticky and dull.
Freezing
If you want to make these ahead, freeze the baked (but unglazed) donuts in a single layer on a baking sheet until firm, then transfer to a freezer-safe bag. Freeze for up to a month. When you’re ready, thaw and glaze fresh—this keeps the decoration crisp and fresh-tasting.
Reheating
To warm leftovers, I gently microwave them for about 10-15 seconds. This softens the donut without melting the glaze or decorations too much. Avoid reheating too long, or you risk losing that perfect texture.
FAQs
-
Can I make these donuts without a donut pan?
Great question! While I recommend using a donut pan for the classic shape, you can make the batter into muffins or mini cupcakes in a regular muffin tin. You won’t get the hole in the middle, but the flavor and texture will still be delightful.
-
How do I prevent the glaze from being too runny or too thick?
Start by adding milk a little at a time to your powdered sugar until you reach a thick but dippable consistency. If the glaze is too thin, add more powdered sugar. Using gel food coloring helps keep the glaze thick and vibrant without watering it down.
-
Can I make the white chocolate decorations ahead of time?
Absolutely! You can pipe white chocolate designs on parchment paper and let them harden completely before storing them in an airtight container. Then, gently place them atop the glazed donuts. It’s a great way to save time on busy Halloween mornings.
-
What if I don’t have white melting chocolate?
You can use white chocolate chips melted carefully with a bit of coconut oil or vegetable shortening to smooth the texture. Alternatively, candy melts in white color work perfectly and are designed for easy melting and decorating.
Final Thoughts
Honestly, this Halloween Baked Donuts with Colorful Glaze and White Chocolate Decorations Recipe quickly became one of my favorites because it’s such a joyful way to celebrate the season with loved ones. I love that it’s approachable, fun, and yields donuts that look like tiny edible works of art. Whether you’re making them for a school party, family treat, or just because, you’ll have a blast decorating and devouring these festive creations. Give it a try—you might just find it your new go-to Halloween treat!
Print
Halloween Baked Donuts with Colorful Glaze and White Chocolate Decorations Recipe
- Prep Time: 20 min
- Cook Time: 8 min
- Total Time: 28 min
- Yield: 6 donuts
- Category: Dessert
- Method: Baking
- Cuisine: American
- Diet: Vegetarian
Description
These Halloween Donuts are a festive and delicious treat perfect for celebrating the spooky season. Baked rather than fried, these donuts are tender, moist, and easy to prepare. They feature a simple batter sweetened with powdered sugar glaze and are topped with melted white chocolate decorated with colorful Halloween-themed food coloring. Enjoy a fun and less messy alternative to traditional fried donuts with this charming recipe suitable for all skill levels.
Ingredients
Donut Batter
- 1 cup all-purpose flour
- 1/3 cup granulated sugar
- 1 teaspoon baking powder
- 1/2 teaspoon salt
- 2 tablespoons unsalted butter, melted
- 1 egg
- 1/3 cup + 1 1/2 tablespoons milk
- 1 teaspoon vanilla extract
Glaze
- 3 cups powdered sugar
- 1/4 cup milk, plus more if needed
- 1 teaspoon vanilla extract
- Halloween purple, orange, or green food coloring
Decoration
- 6 oz white melting chocolate
- Piping bag
- Small round tip
Instructions
- Prepare the batter: In a mixing bowl, combine the all-purpose flour, granulated sugar, baking powder, and salt. In a separate bowl, whisk together the melted butter, egg, milk, and vanilla extract. Gradually add the wet ingredients to the dry ingredients and mix until just combined, forming a smooth batter.
- Preheat and prepare donut pan: Preheat your oven to 350°F (175°C). Lightly grease a donut pan to prevent sticking.
- Fill the donut pan: Spoon the batter into the prepared donut pan, filling each mold about 3/4 full to allow room for rising during baking.
- Bake the donuts: Place the pan in the oven and bake for about 8 minutes or until the donuts are golden and a toothpick inserted in the center comes out clean.
- Cool the donuts: Remove the donuts from the oven and let them cool in the pan for a few minutes before transferring them to a wire rack to cool completely.
- Prepare the glaze: In a bowl, whisk together the powdered sugar, 1/4 cup milk, and vanilla extract until smooth. If the glaze is too thick, add milk a teaspoon at a time until the desired consistency is reached. Divide the glaze and tint portions with Halloween purple, orange, or green food coloring if desired.
- Glaze the donuts: Dip the cooled donuts into the glaze or spread it evenly over the tops. Allow the glaze to set slightly.
- Melt and decorate with white chocolate: Melt the white melting chocolate according to package instructions. Transfer the melted chocolate to a piping bag fitted with a small round tip. Pipe fun Halloween designs onto the glazed donuts to create cute or spooky motifs. Allow the chocolate to set completely before serving.
Notes
- These donuts are baked, eliminating the mess and oil of frying while maintaining tender, moist texture.
- You can customize the glaze colors and chocolate decorations to get as creative or spooky as you like.
- If glaze is too thick, thin it with small amounts of milk to reach desired consistency.
- Allow donuts to cool completely before glazing to prevent melting the glaze.
- Use a silicone donut pan for easy release and better shape retention.
Nutrition
- Serving Size: 1 donut
- Calories: 568 kcal
- Sugar: 88 g
- Sodium: 243 mg
- Fat: 15 g
- Saturated Fat: 9 g
- Unsaturated Fat: 6 g
- Trans Fat: 0 g
- Carbohydrates: 105 g
- Fiber: 1 g
- Protein: 6 g
- Cholesterol: 46 mg

