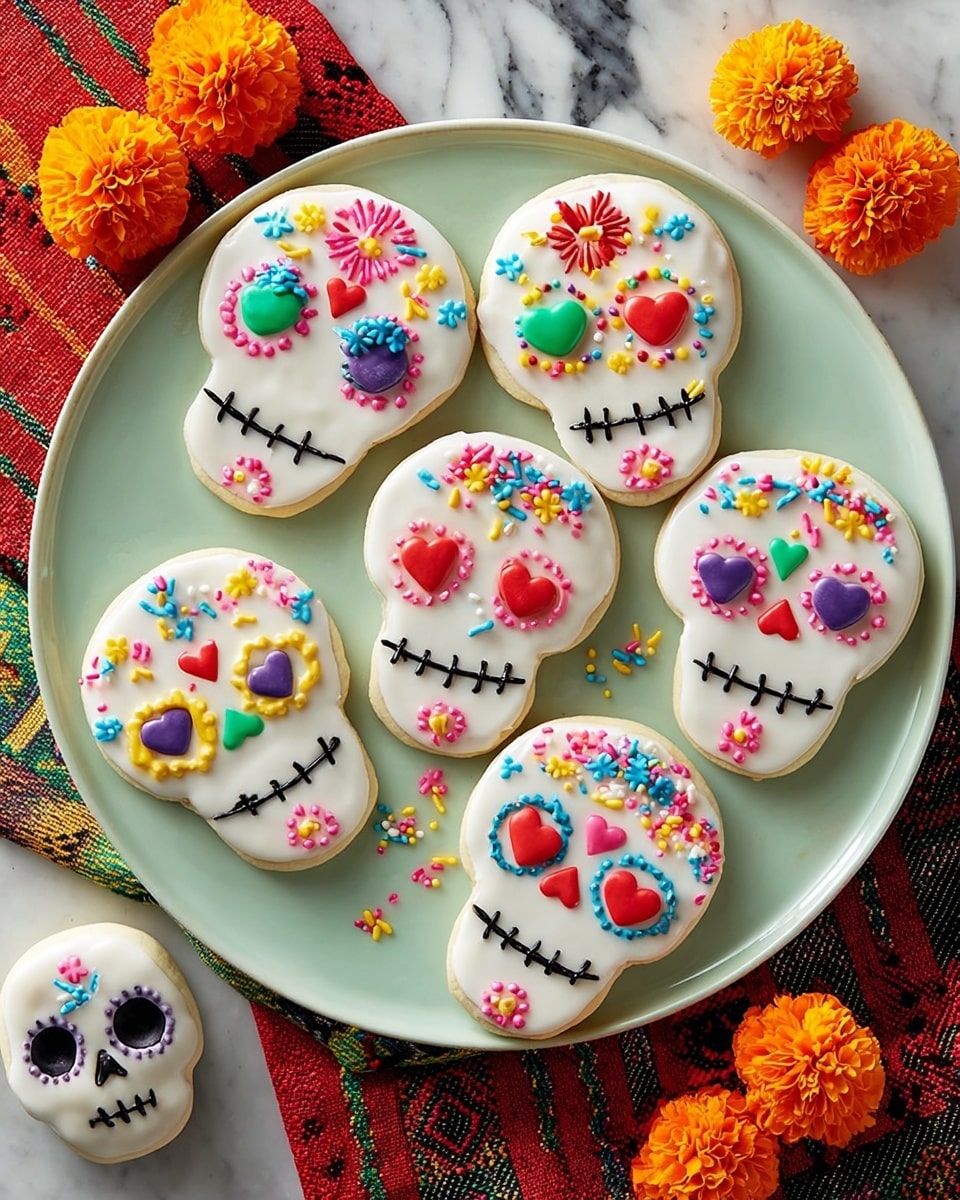
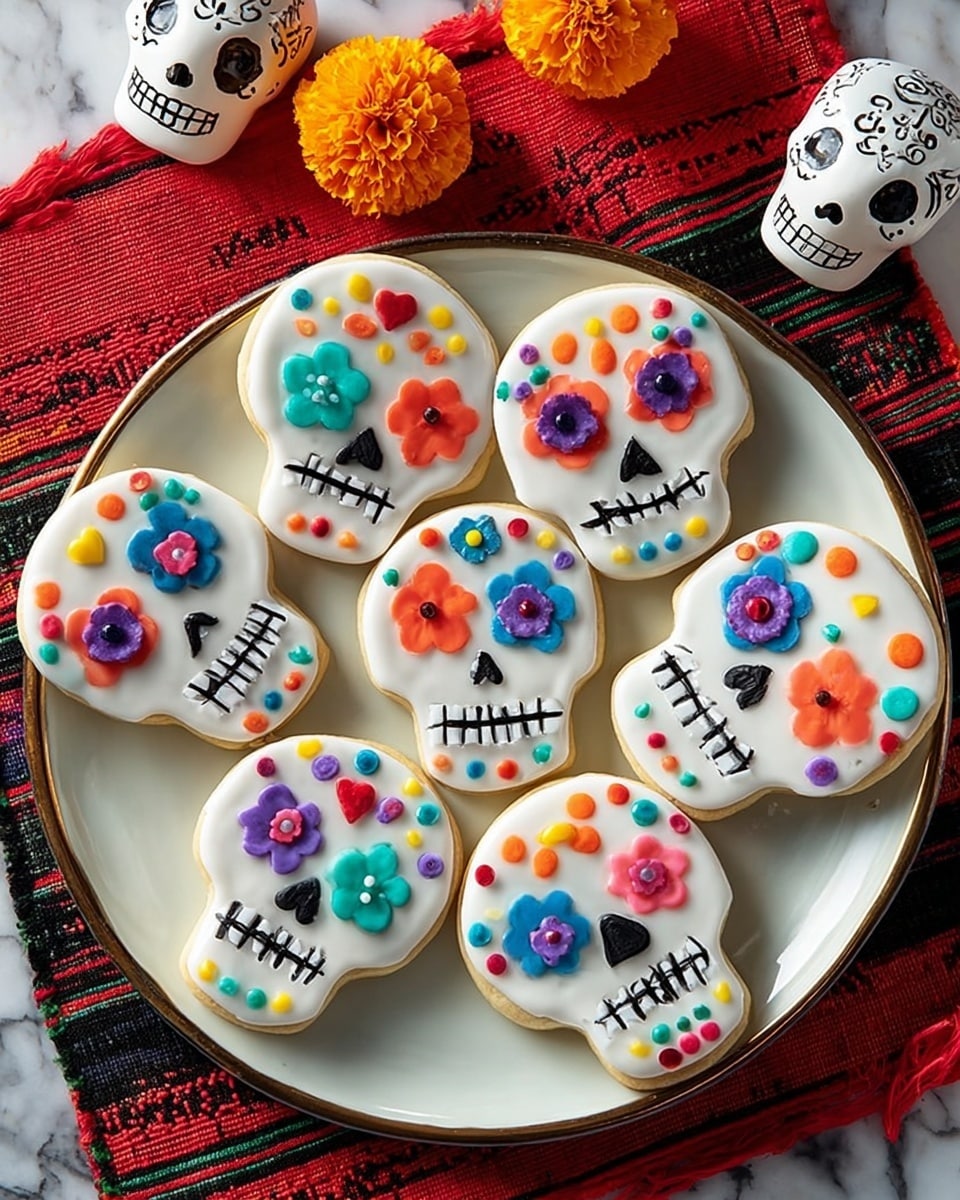
If you’re looking for a fun, festive treat that brings a little cultural flair to your kitchen, I’ve got just the thing for you. This Day of the Dead Cookies Recipe is not only adorable but downright delicious—perfect for celebrating Día de los Muertos with a sweet twist. I absolutely love how these cookies come together: tender, buttery, and dressed up with colorful candy decorations that make each one a little piece of edible art. Trust me, once you try this recipe, you’ll be hooked!
Why You’ll Love This Recipe
- Cultural Celebration: These cookies bring the vibrant spirit of Día de los Muertos right to your table.
- Fun Decorating: Decorating these cookies offers a creative, joyful activity for all ages.
- Perfect Texture: The dough balances buttery softness with enough structure for clean cutouts.
- Versatile & Customizable: You can personalize each cookie with your favorite candies and colors.
Ingredients You’ll Need
Each ingredient in this Day of the Dead Cookies Recipe plays a special role in texture and flavor. I always recommend using good-quality almond paste—it really adds a subtle richness that lifts these cookies beyond simple sugar cookies.
- Butter: Use softened butter for easy creaming and a tender crumb.
- Confectioners’ sugar: This keeps the dough smooth and not grainy—important for light, delicate cookies.
- Almond paste: Adds a lovely depth of flavor and moistness; not almond extract, so don’t substitute!
- Egg: Helps bind the dough; make sure it’s at room temperature to mix evenly.
- 2% milk: Just enough liquid to bring the dough together without being sticky.
- Vanilla extract: Adds warmth and sweetness that complements the almond.
- All-purpose flour: The base for structure; measure carefully to avoid dry or tough cookies.
- Salt: Enhances all the flavors, especially the sweetness and almond notes.
- White candy coating melts: For dipping and decorating; melts smoothly for that glossy finish.
- Optional decorations: From jumbo sprinkles to colorful candies, these bring the cookies’ “sugar skull” look to life.
- Black paste food coloring: To tint remaining candy melts for piping facial details like mouths.
Variations
What I adore most is how you can make this Day of the Dead Cookies Recipe your own. I often switch up the decorations based on what candies I have around or choose different food coloring shades to match a theme. Feel free to get creative!
- Gluten-Free Version: I once experimented with a gluten-free flour blend that worked out well, though you might need a bit more moisture to keep the dough pliable.
- Flavored Candy Coating: For a twist, I’ve used colored candy melts in orange or purple which make the cookies stand out even more.
- Vegan Adaptation: Replacing butter with coconut oil and egg with flaxseed can work, but the texture changes—try small batches first!
- Spiced Dough: Add a pinch of cinnamon or nutmeg to the dough for a warm, fall-flavored vibe that pairs beautifully with the tradition.
How to Make Day of the Dead Cookies Recipe
Step 1: Creaming and Mixing the Dough
Start by creaming the butter and confectioners’ sugar together until the mixture is light and fluffy—this usually takes about 3 to 4 minutes with an electric mixer. I discovered that taking the time here matters because it sets the foundation for that soft, melt-in-your-mouth crumb. Then, add in the almond paste and beat it into the butter mixture until fully blended. Next, beat in the egg, milk, and vanilla until smooth. This is your chance to check the mixture for any lumps of almond paste, so keep mixing until you get a uniform batter.
Step 2: Incorporating Dry Ingredients and Chilling
Mix the flour and salt together in a separate bowl. Then, gradually add the flour mix to your wet ingredients. The dough will start to come together—don’t over-mix here, or your cookies might get tough. Once it’s combined, cover the dough and pop it in the fridge for at least one hour. Chilling is a game changer—it firms up the dough so rolling and cutting is clean and stress-free.
Step 3: Rolling, Cutting, and Baking
On a lightly floured surface, roll the dough out to about 1/4-inch thickness. I love using a non-stick rolling pin to help keep the dough smooth—not too thick, because thinner cookies bake with a crisp edge but stay tender inside. Use a 5-inch skull-shaped cookie cutter dusted with flour to cut out your shapes. Place the cookies about 1 inch apart on ungreased baking sheets. Bake at 375°F for 7 to 9 minutes; they should be firm when you gently touch the edges but still pale on top. Let them rest on the baking sheet for 2 minutes to set before moving them to wire racks to cool completely—this helps prevent breakage.
Step 4: Coating and Decorating Your Cookies
While the cookies cool, melt the white candy coating melts in a shallow microwave-safe dish following the package directions. Dip the top side of each cookie into the melted coating, letting excess drip off—this glossy white canvas is what makes your decorations pop. Place the coated cookies on waxed paper. Add your chosen candies right away before the coating sets—I’ve found it’s best to work quickly but gently. For the final touch, tint remaining candy coating with black paste food coloring and pipe on mouths or other facial details. Let your masterpieces set completely before handling.
Pro Tips for Making Day of the Dead Cookies Recipe
- Chill Your Dough Twice: I sometimes chill the dough again after cutting, before baking, to keep the cookie shapes sharp and prevent spreading.
- Use Parchment Paper: I line my baking sheets with parchment to make clean removal easier and avoid flipping cookies mid-bake.
- Test Your Candy Coating: Melt a small amount first to check consistency and workability, especially if microwaving.
- Avoid Overbaking: Pull cookies out as soon as edges are set to keep their softness and prevent cracks in the candy coating.
How to Serve Day of the Dead Cookies Recipe
Garnishes
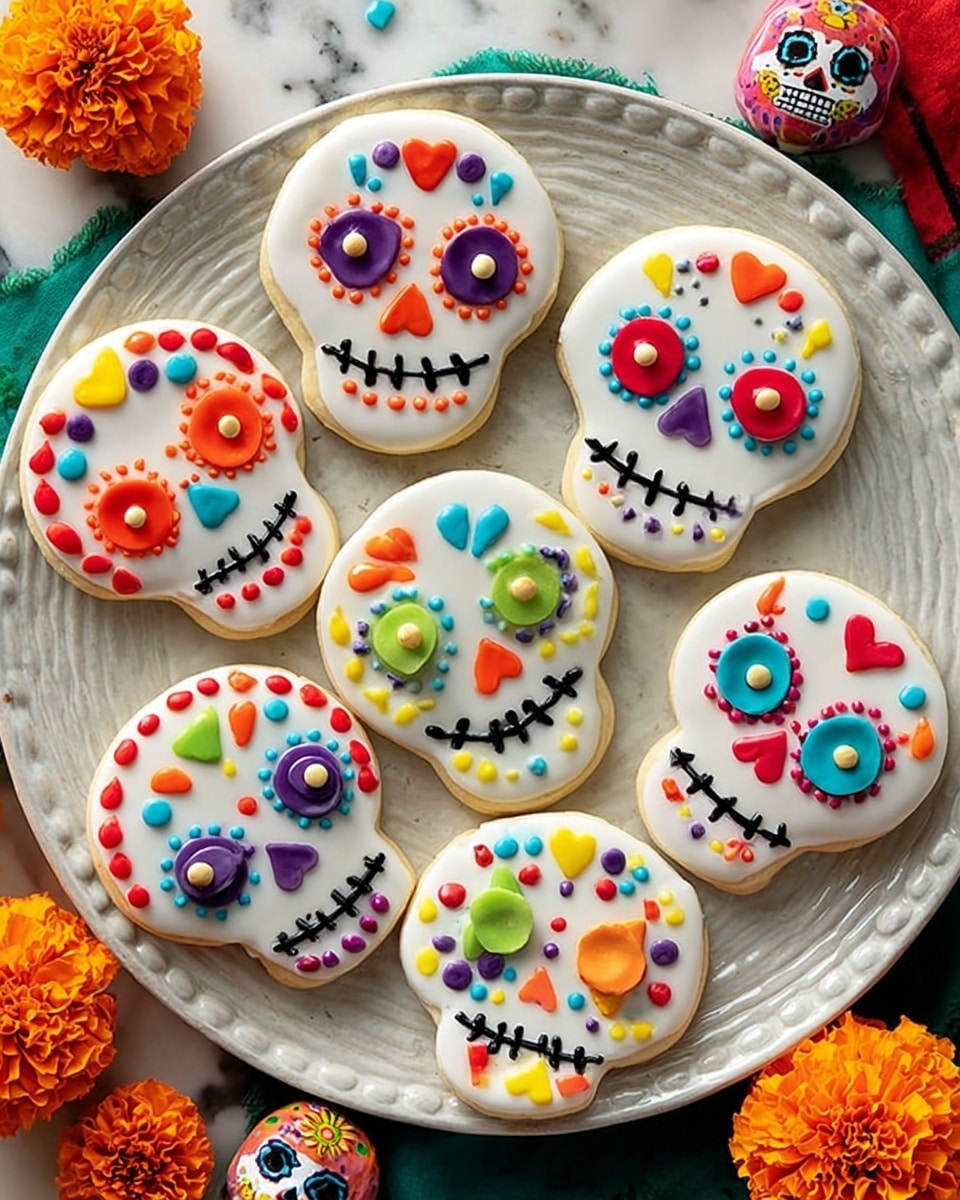
I typically garnish with big, colorful sprinkles and candy-coated sunflower kernels—they add a playful crunch and authentic vibe. Sometimes I use peppermint candies or rainbow Skittles for bright pops of color. The key is to choose decorations that contrast well with the white dipped coating so your cookies really stand out on the table.
Side Dishes
These cookies shine when paired with a warm cup of Mexican hot chocolate or café de olla. A platter with fresh fruit like sliced oranges or pomegranate seeds also complements the sweet, nutty flavors beautifully. I’ve found it really elevates the whole experience when you add some traditional drinks alongside.
Creative Ways to Present
For a festive Day of the Dead party, I like to arrange the cookies on a colorful paper doily or wooden serving tray surrounded by marigold flowers. Another fun idea is to tie a few decorated cookies on sticks and place them in a small vase as a vibrant centerpiece. Kids love this interactive display and it makes for eye-catching photos!
Make Ahead and Storage
Storing Leftovers
I store leftover cookies in an airtight container layered with parchment paper to keep them from sticking together. They stay fresh and maintain their texture for up to a week if kept at room temperature in a cool, dry place.
Freezing
If you want to make these ahead for a big event, I recommend freezing the plain, uncoated dough or baked but uncoated cookies. Wrap tightly in plastic wrap and aluminum foil before freezing. When you’re ready, thaw overnight in the fridge and decorate just before serving for the freshest look.
Reheating
Because these are cookies, they don’t need reheating, but if you want to slightly freshen them up, a quick few seconds in the microwave (10-15 seconds) can soften the texture a tad without melting the candy coating. Just be careful not to overdo it!
FAQs
-
Can I substitute almond paste with almond extract in this Day of the Dead Cookies Recipe?
Almond paste adds moisture and texture along with flavor, so substituting it with almond extract alone won’t work well. If you don’t have almond paste, you might try increasing butter slightly and adding almond extract for flavor, but expect a less rich cookie.
-
How do I keep the white candy coating from cracking on the cookies?
Make sure your cookies are completely cool before dipping, and avoid overbaking the cookies. Also, dip quickly and let excess coating drip off well before placing them on wax paper. Properly tempered candy melts and avoiding humidity helps prevent cracks, too.
-
What if I don’t have a skull-shaped cookie cutter?
While the skull shape is iconic, you can use any cookie cutter you love! Flowers, hearts, or even simple rounds work great for decorating in a fun Day of the Dead theme.
-
Can I make this Day of the Dead Cookies Recipe egg-free?
Yes, you can try substituting the egg with a flax or chia egg (1 tablespoon ground seeds + 3 tablespoons water, rested). It might change the texture slightly but is a good alternative for those with allergies.
Final Thoughts
Making this Day of the Dead Cookies Recipe is always a joyful occasion in my kitchen, especially when friends or family join in on the decorating fun. Not only are the cookies delicious and satisfying, but they also bring a meaningful cultural celebration to life through flavor and color. I hope you enjoy baking and sharing these as much as I do—it’s such a lovely way to remember tradition while creating new happy memories.
Print
Day of the Dead Cookies Recipe
- Prep Time: 2 hours (including chilling)
- Cook Time: 7-9 minutes per batch
- Total Time: Approximately 2 hours 20 minutes (including baking and cooling)
- Yield: 1 dozen cookies
- Category: Cookies
- Method: Baking
- Cuisine: Mexican
Description
Celebrate the vibrant Day of the Dead with these festive skull-shaped cookies, coated in white candy melts and decorated with colorful candies and black icing for authentic, eye-catching treats.
Ingredients
Cookie Dough
- 1-1/4 cups butter, softened
- 1-3/4 cups confectioners’ sugar
- 2 ounces almond paste
- 1 large egg, room temperature
- 1/4 cup 2% milk
- 1 teaspoon vanilla extract
- 4 cups all-purpose flour
- 1/2 teaspoon salt
Decoration
- 2 packages (12 ounces each) white candy coating melts
- Optional decorations: Jumbo sprinkles, peppermint candies, candy-coated sunflower kernels, Skittles, Twizzlers Rainbow Twists, Good & Plenty candies
- Black paste food coloring
Instructions
- Cream Butter and Sugar: In a large bowl, beat the softened butter and confectioners’ sugar together for 3-4 minutes until the mixture is light and fluffy. Add the almond paste and continue mixing to combine thoroughly.
- Add Wet Ingredients: Beat in the egg, followed by milk and vanilla extract, ensuring the batter is smooth and well incorporated.
- Combine Dry Ingredients: In a separate bowl, mix the all-purpose flour and salt together. Gradually add this to the creamed mixture, stirring well to form a cohesive dough.
- Chill Dough: Cover the dough and refrigerate for 1 hour to firm up, which will make it easier to roll and cut.
- Roll and Cut: On a lightly floured surface, roll out the chilled dough to about 1/4 inch thickness. Use a floured 5-inch skull-shaped cookie cutter to cut out shapes. Place the cookies 1 inch apart on ungreased baking sheets.
- Bake Cookies: Preheat the oven to 375°F (190°C). Bake the cookies for 7-9 minutes or until they are firm to the touch. Let them stand on the baking sheet for 2 minutes before transferring to wire racks to cool completely.
- Melt Candy Coating: In a large, shallow, microwave-safe dish, melt the white candy coating melts according to package instructions until smooth.
- Dip Cookies: Dip the top side of each cooled cookie into the melted white candy coating, letting the excess drip off. Place the dipped cookies on waxed paper to set.
- Decorate: While the coating is still tacky, apply optional decorations like jumbo sprinkles, peppermint candies, candy-coated sunflower kernels, Skittles, Twizzlers Rainbow Twists, and Good & Plenty candies as desired.
- Create Black Icing: Tint the remaining white candy coating black using black paste food coloring. Use this to pipe on the mouths of the skulls and any additional details. Allow the coating and decorations to set completely before serving.
Notes
- Make sure the dough is well chilled to prevent sticking and maintain cookie shape during baking.
- Use a skull-shaped cookie cutter approximately 5 inches wide for authentic shapes.
- Choose decorations that are lightweight to avoid weighing down the candy coating.
- Store cookies in an airtight container at room temperature for up to 5 days.
- For a firmer candy coating, refrigerate dipped cookies to speed up setting.
Nutrition
- Serving Size: 1 cookie
- Calories: 280
- Sugar: 18g
- Sodium: 90mg
- Fat: 16g
- Saturated Fat: 9g
- Unsaturated Fat: 6g
- Trans Fat: 0g
- Carbohydrates: 29g
- Fiber: 1g
- Protein: 3g
- Cholesterol: 35mg

