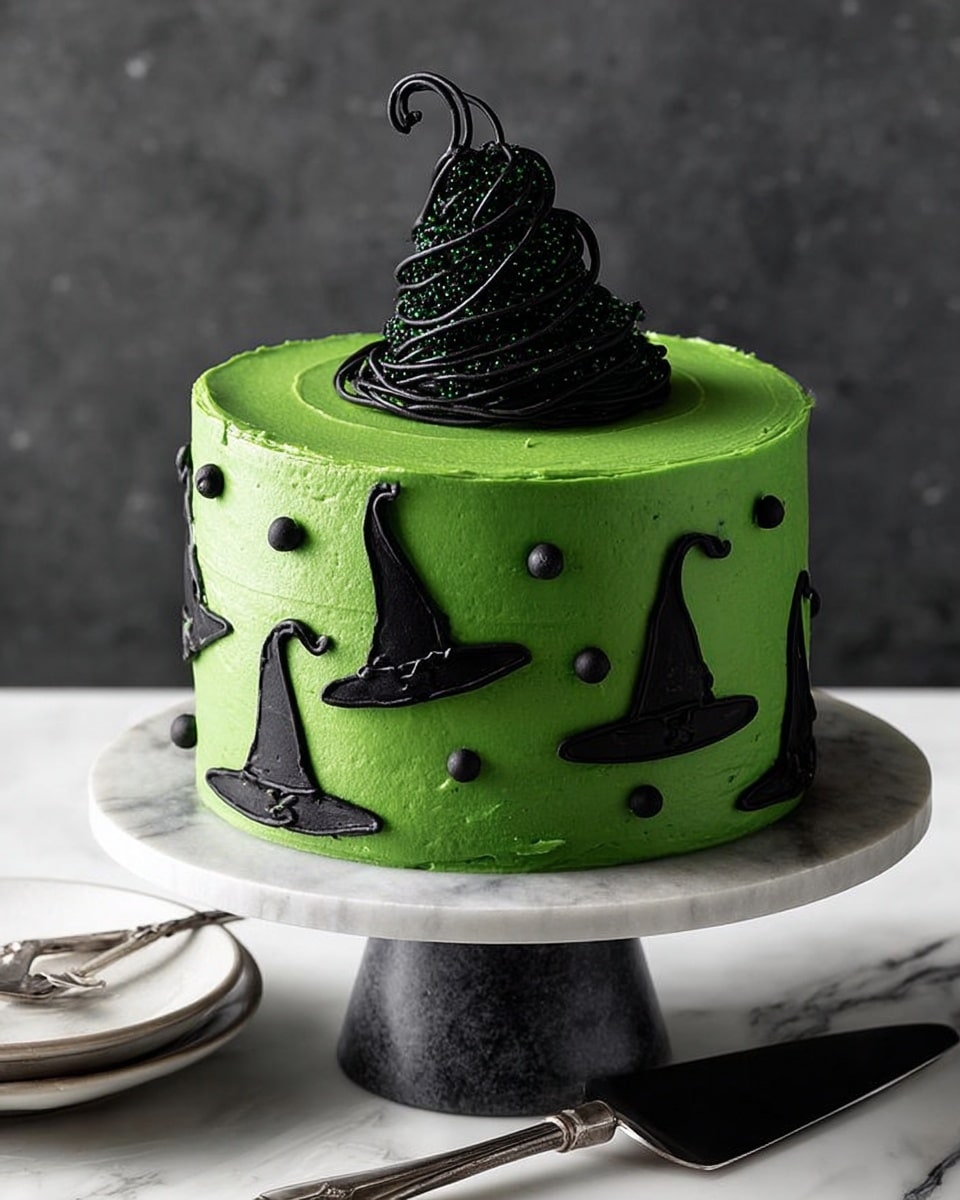
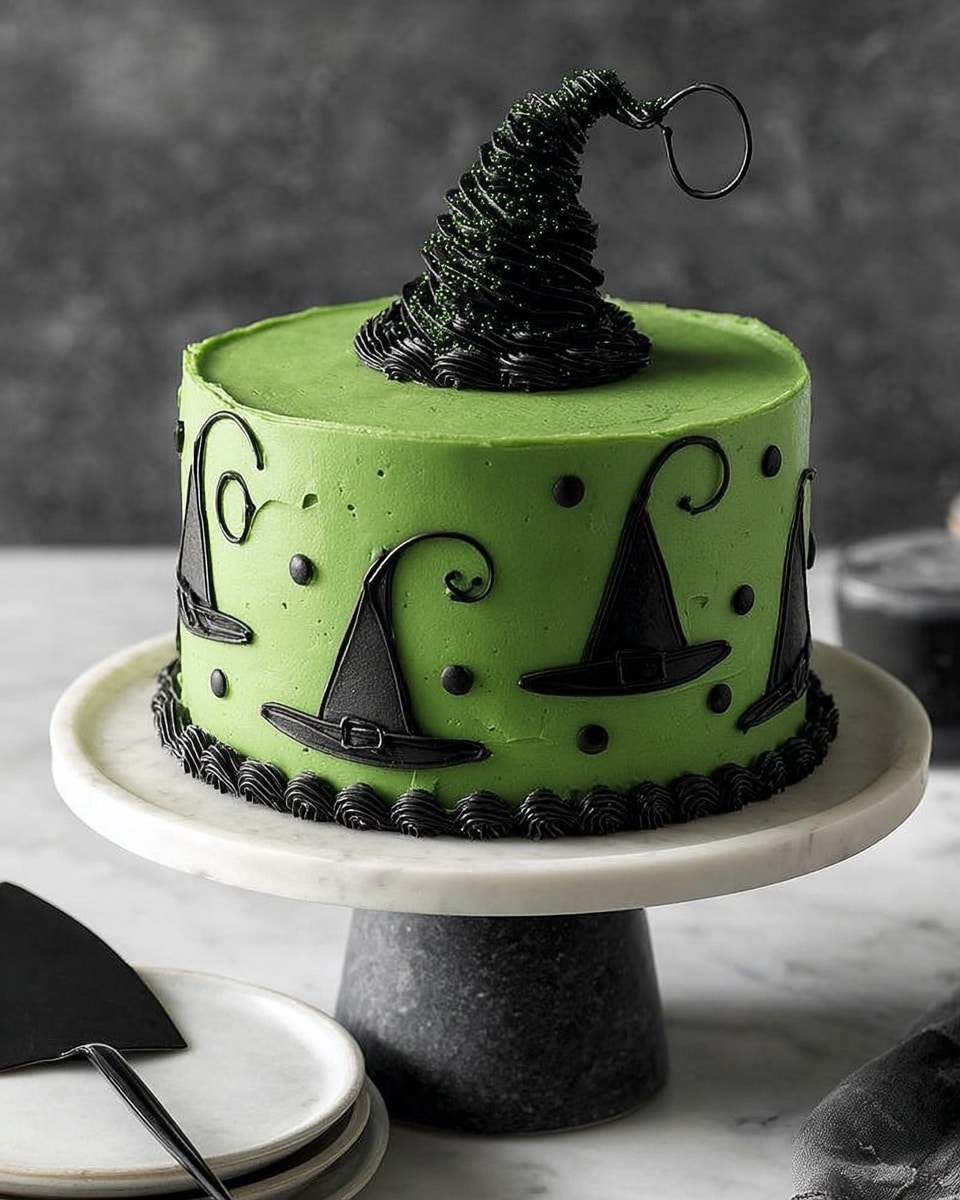
If you’re looking to wow your friends and family this spooky season, you absolutely have to try my Halloween Witch Cake Recipe. It’s rich, chocolaty, and festively decorated with these adorable witch hats that my kids go crazy for every year. Trust me, whether you’re a seasoned baker or just trying something fun for Halloween, you’ll find this recipe not only delicious but totally doable. So grab your apron, and let’s get baking!
Why You’ll Love This Recipe
- Impressive Appearance: The witch hat decorations make this cake a total showstopper at Halloween parties.
- Moist and Flavorful: The sour cream and melted chocolate create a tender crumb with deep chocolate flavor.
- Kid-Friendly Fun: Decorating the cake is an activity your little witches and wizards will love joining in on.
- Make-Ahead Friendly: You can bake and frost the cake a day before your party with no stress.
Ingredients You’ll Need
All the ingredients in this Halloween Witch Cake Recipe come together to balance rich chocolatey goodness with a light, fluffy texture. Keep an eye out for good quality semisweet chocolate and fresh eggs for the best results.
- Butter: Softened butter helps create a light, creamy batter and silky frosting.
- Brown sugar: Using packed brown sugar adds moisture and a subtle caramel note.
- Eggs: Room temperature eggs whip better, ensuring a fluffy cake texture.
- Semisweet chocolate: Melted and cooled to add decadent chocolate flavor without overpowering.
- Vanilla extract: Enhances the chocolate flavor and adds warmth to the cake.
- All-purpose flour: The right balance to keep the cake tender but sturdy.
- Baking soda: Helps give the cake a good rise and tender crumb.
- Salt: Balances sweetness and enhances overall flavor.
- Sour cream: The secret to moistness and subtle tanginess that keeps the cake from feeling dry.
- Water: Adds to the batter’s moisture for a perfect consistency.
- Confectioners’ sugar: For the silky smooth frosting base.
- Gel food coloring (green and black): To create the creepy witchy vibes on the frosting and decorations.
- Black candy coating disks: Melted to pipe the witch hats, adding a professional touch.
- Black sprinkles, sanding sugar, pearls: Assorted decorations to give the cake a spooky sparkle and texture.
Variations
I like to mix things up sometimes with this Halloween Witch Cake Recipe by tweaking the decorations or even the flavor profile. Feel free to get creative and make it your own—after all, Halloween is all about fun and imagination!
- Chocolate Ganache Frosting: Instead of the traditional buttercream, I once swapped in a smooth ganache for a rich and slightly less sweet finish, which was a hit.
- Spiced Pumpkin Version: I added a teaspoon of cinnamon and nutmeg to the batter and swapped water for pumpkin puree—perfect for a fall twist!
- Dairy-Free Adaptation: Using coconut oil instead of butter and dairy-free sour cream gives a lovely moist crumb and lets everyone enjoy.
- Decor Alternatives: Try using purple and orange gel colors or edible glitter for more witchy vibes or a festive Halloween palette.
How to Make Halloween Witch Cake Recipe
Step 1: Prep Your Pans and Preheat
Start by preheating your oven to 350°F. I always line my 8-inch round baking pans with parchment paper and grease them well—it makes removing the cake layers a breeze and keeps everything perfectly shaped. This little prep work really saves you from a cracked or stuck cake later.
Step 2: Cream Butter and Sugar
Using a stand mixer or hand mixer, cream together the softened butter and packed brown sugar until the mixture is light and fluffy—about 5 to 7 minutes. This step is key because it incorporates air into your batter, making your cake delightfully airy and tender.
Step 3: Add Eggs, Chocolate, and Vanilla
Next, beat in the eggs one at a time, making sure each is fully incorporated before adding the next. Then, pour in the melted and cooled semisweet chocolate along with the vanilla extract. Cinnamon be darned—this is where the magic really starts to happen.
Step 4: Combine Dry Ingredients and Alternate With Sour Cream
Mix together the flour, baking soda, and salt in a separate bowl. Then, add these dry ingredients to your butter mixture alternately with sour cream, starting and ending with the dry ingredients. Beat well after each addition to get a smooth batter. This alternating method helps maintain the batter’s tenderness while ensuring it’s fully blended.
Step 5: Add Water and Bake
Lastly, gradually beat in the water to thin the batter slightly, making it easy to pour. Divide the batter evenly among your prepared pans. Bake for 40-45 minutes, or until a toothpick inserted into the center comes out clean. I find setting the timer for 40 minutes first helps to avoid overbaking—nobody wants a dry cake!
Step 6: Cool and Level Your Cake
Let the cakes cool in their pans for 10 minutes before carefully turning them out onto wire racks to cool completely. If the layers have domed on top, use a serrated knife to level them—this makes stacking easier and your finished cake more stable and professional-looking.
Step 7: Make the Frosting and Tint It
Beat the softened butter until smooth, then gradually add the confectioners’ sugar, vanilla, salt, and milk until you reach your desired frosting consistency. Split the frosting into two bowls: tint the larger portion with green gel food coloring and the smaller portion with black gel coloring. This contrast is perfect for capturing the spooky Halloween vibe.
Step 8: Assemble and Frost the Cake
Place one cake layer on your serving plate, then spread about two-thirds of a cup of green frosting evenly over it. Repeat layering and frosting with the next two layers, then frost the top and sides of the cake with the remaining green frosting. The key here is to keep your frosting smooth and even—you can dip a knife in hot water and wipe it dry for perfect edges.
Step 9: Create Witch Hats and Decorate
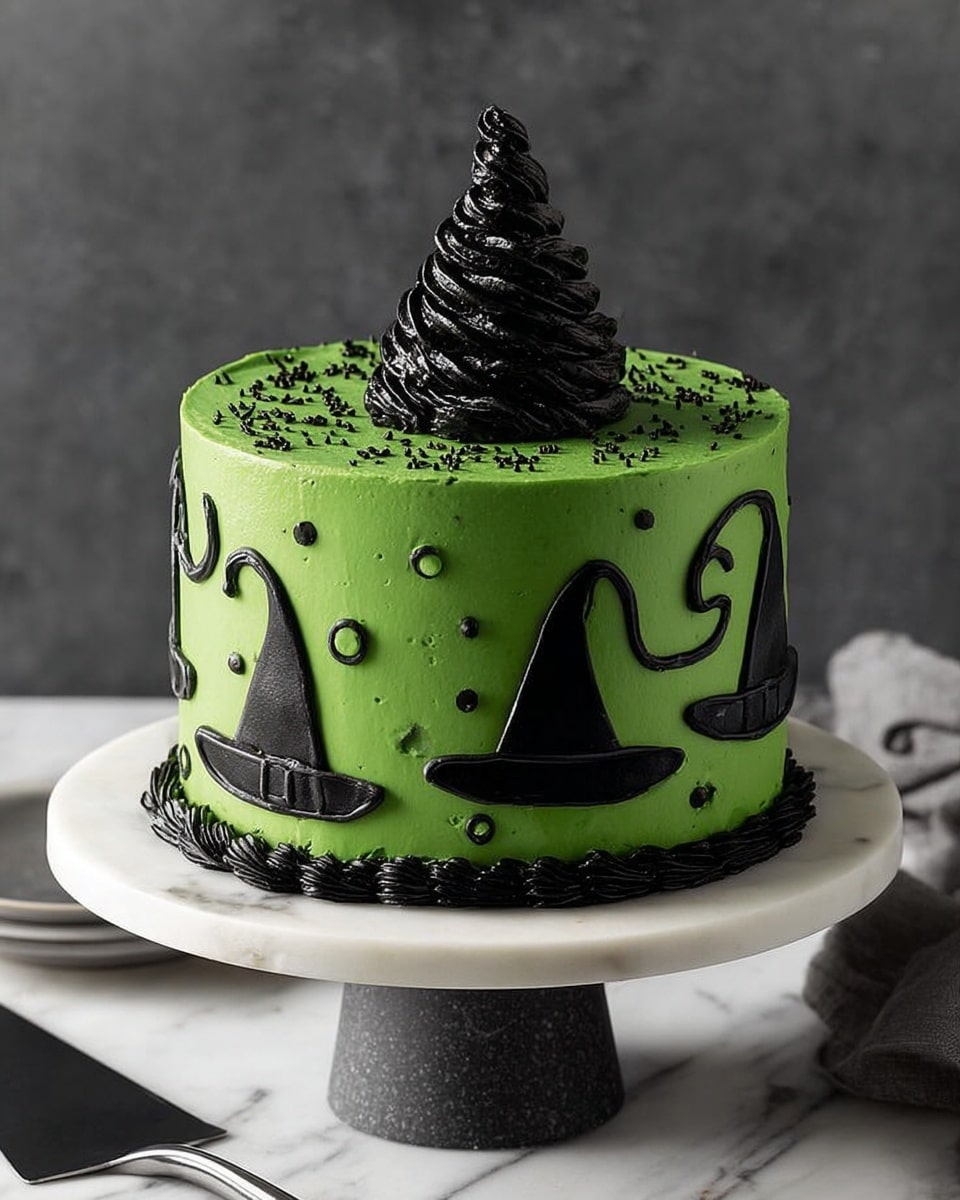
Melt the black candy coating disks and pour into a small piping bag fitted with a round tip. Pipe little witch hat shapes onto waxed paper and let them set completely. Once solid, stand one hat on top of your cake right before serving, and press the others gently into the sides of your frosted cake. Add sprinkles and edible pearls for that magical finishing touch. You’re going to love the look of these hats—trust me, it’s my favorite part!
Pro Tips for Making Halloween Witch Cake Recipe
- Use Room-Temperature Eggs: I learned that cold eggs don’t mix in as smoothly, which can affect the cake’s rise and texture.
- Don’t Skip Sifting Sugar: Sifting your confectioners’ sugar prevents clumps and smooths out your frosting—making it easier to spread.
- Level Cakes for Stability: Trimming those domed tops saved me from disaster more than once—your cake stays sturdy and looks polished.
- Pipe Witch Hats in Advance: Making the witch hats a day ahead means you’re just putting finishing touches on the cake when the party starts!
How to Serve Halloween Witch Cake Recipe
Garnishes
I stick to the black pearls, sanding sugar, and a mix of black sprinkles because they add just the right shimmer and texture. Plus, the color contrast makes the green frosting pop — really giving that eerie witchy vibe that’s perfect for Halloween.
Side Dishes
Pair this cake with some fresh fruit like cranberry or blood orange slices to cut through the sweetness. I also love serving it alongside a warm cup of spiced apple cider or a cozy hot chocolate to complete the spooky fall feel.
Creative Ways to Present
Once, I set the cake on a bed of dry ice for a fog effect — it was a total hit! You can also surround the cake with mini pumpkins, candy corn, or even leave little candle lanterns nearby for an immersive Halloween dessert table that’ll impress any crowd.
Make Ahead and Storage
Storing Leftovers
I wrap leftover cake tightly with plastic wrap and place it in an airtight container. Stored in the fridge, it stays moist for up to 3 days. Just remember to let it come to room temperature before slicing again for the best texture.
Freezing
This Halloween Witch Cake Recipe freezes beautifully! I wrap each cake layer individually in plastic wrap and then foil, freezing them for up to a month. When ready, thaw overnight in the fridge before frosting and assembling.
Reheating
While you don’t really reheat cake, I do let frozen slices sit at room temperature for at least 30 minutes before serving. For frosting that’s a little firm from chilling, just soften it slightly by letting the cake warm gently — no microwave needed.
FAQs
-
Can I use a different chocolate instead of semisweet?
Absolutely! You can swap semisweet chocolate for bittersweet or even milk chocolate, but keep in mind the flavor and sweetness will change. Bittersweet gives a richer, less sweet cake, while milk chocolate makes it sweeter and creamier. Just adjust sugar if needed!
-
What if I don’t have gel food coloring?
Gel food coloring is best because it doesn’t thin the frosting, but if you only have liquid color, use it sparingly to avoid overly soft frosting. Another fun trick: you can use natural dyes like matcha powder for green or activated charcoal for black, but results vary.
-
Can I make the witch hats without candy coating disks?
If you don’t have candy coating disks, good-quality dark chocolate chips can work—just add a little vegetable oil to help with melting and smoothness. Be careful not to overheat—to maintain a glossy finish—and pipe quickly before it hardens.
-
How do I avoid a dry Halloween Witch Cake?
I learned that measuring flour correctly (spoon it in and level with a knife) and not overbaking are your best bets. Also, the sour cream in this recipe is a lifesaver for moisture, so be sure not to skip it!
Final Thoughts
This Halloween Witch Cake Recipe holds such a special place in my heart—it’s my go-to when I want something both delicious and delightfully festive. Baking it always brings the family together, whether for taste-testing those tricky little witch hats or simply enjoying a slice with apple cider. If you want to create a memorable Halloween treat that tastes as great as it looks, I can’t recommend this one enough. Happy baking, and may your Halloween be just a little bit sweeter!
Print
Halloween Witch Cake Recipe
- Prep Time: 1 hour 15 minutes
- Cook Time: 40 minutes
- Total Time: 1 hour 55 minutes
- Yield: 16 servings
- Category: Dessert
- Method: Baking
- Cuisine: American
Description
Celebrate Halloween with this spooky and delicious Halloween Witch Cake. Featuring moist layers of chocolate cake with a luscious green-tinted vanilla frosting, decorated with whimsical witch hats and sprinkles, this festive cake is perfect for holiday parties and gatherings. The rich chocolate flavor combined with creamy sour cream ensures a tender crumb, while the vibrant frosting and creative decorations bring a fun, magical touch to your dessert table.
Ingredients
Cake:
- 3/4 cup butter, softened
- 2-1/2 cups packed brown sugar
- 4 large eggs, room temperature
- 6 ounces semisweet chocolate, melted and cooled
- 3 teaspoons vanilla extract
- 3 cups all-purpose flour
- 3 teaspoons baking soda
- 1 teaspoon salt
- 1-1/2 cups sour cream
- 1-1/2 cups water
Frosting:
- 1-1/4 cups butter, softened
- 10 cups confectioners’ sugar
- 3 teaspoons vanilla extract
- 1/4 teaspoon salt
- 1/2 to 2/3 cup 2% milk
- Green gel food coloring
- Black gel food coloring
Decoration:
- 4 ounces black candy coating disks, melted
- Assorted black sprinkles
- Sanding sugar
- Pearls
Instructions
- Preheat and Prepare Pans: Preheat your oven to 350°F. Grease the bottoms of three 8-inch round baking pans and line each with parchment paper. Grease the parchment to prevent sticking.
- Cream Butter and Sugar: In a large bowl, cream together the softened butter and packed brown sugar until the mixture is light and fluffy, about 5 to 7 minutes. This step incorporates air into the batter for a tender cake.
- Add Eggs: Add eggs one at a time to the butter and sugar mixture, beating well after each addition to ensure a smooth batter.
- Incorporate Chocolate and Vanilla: Beat in the melted and cooled semisweet chocolate along with the vanilla extract until thoroughly combined.
- Combine Dry Ingredients: In a separate bowl, mix together the all-purpose flour, baking soda, and salt.
- Alternate Adding Dry Ingredients and Sour Cream: Gradually add the flour mixture to the creamed mixture, alternating with sour cream. Beat well after each addition to ensure even mixing and moistness.
- Add Water: Slowly beat in the water until the batter is smooth and well combined.
- Bake the Cake Layers: Divide the batter evenly among the prepared pans. Bake for 40 to 45 minutes, or until a toothpick inserted into the center comes out clean. Allow to cool in the pans for 10 minutes before transferring to wire racks to cool completely.
- Prepare the Frosting: In a large bowl, beat the softened butter until smooth. Gradually add confectioners’ sugar, vanilla extract, salt, and enough 2% milk to achieve a spreadable consistency. Remove 1-1/2 cups of frosting and set aside.
- Tint the Frosting: Tint the majority of the frosting with green gel food coloring to your desired shade. Tint the reserved 1-1/2 cups frosting with black gel food coloring for decoration.
- Level the Cake Layers: If the cake layers have rounded tops, carefully trim them with a serrated knife to create level surfaces for stacking.
- Assemble the Cake: Place one cake layer on a serving plate and spread 2/3 cup of green frosting evenly over it. Repeat with the next layer(s), stacking them as you go. Frost the top and sides of the assembled cake with the remaining green frosting.
- Create Witch Hat Decorations: Place melted black candy coating in a piping bag fitted with a small round tip. Pipe witch hat shapes onto waxed paper and allow them to set until firm.
- Decorate the Cake: Top the cake with assorted black sprinkles, sanding sugar, and pearls. Use the black tinted frosting in a piping bag fitted with a large star tip to pipe decorative stars on top of the cake.
- Final Assembly: Just before serving, gently stand one witch hat on top of the cake. Adhere the other witch hats and black pearls to the sides of the cake by gently pressing them into the frosting for a festive look.
Notes
- To ensure even baking, rotate the pans halfway through baking if your oven has hot spots.
- Use room temperature eggs and butter for better mixing and texture.
- Allow the cake layers to cool completely before frosting to prevent melting.
- For a deeper chocolate flavor, consider using Dutch-processed cocoa powder along with melted chocolate.
- If desired, substitute 2% milk in the frosting with heavy cream for a richer texture.
- The witch hats can be prepared a day in advance and stored in an airtight container at room temperature.
Nutrition
- Serving Size: 1 slice (1/16 of cake)
- Calories: 450
- Sugar: 35g
- Sodium: 300mg
- Fat: 22g
- Saturated Fat: 13g
- Unsaturated Fat: 8g
- Trans Fat: 0.5g
- Carbohydrates: 58g
- Fiber: 2g
- Protein: 5g
- Cholesterol: 85mg

