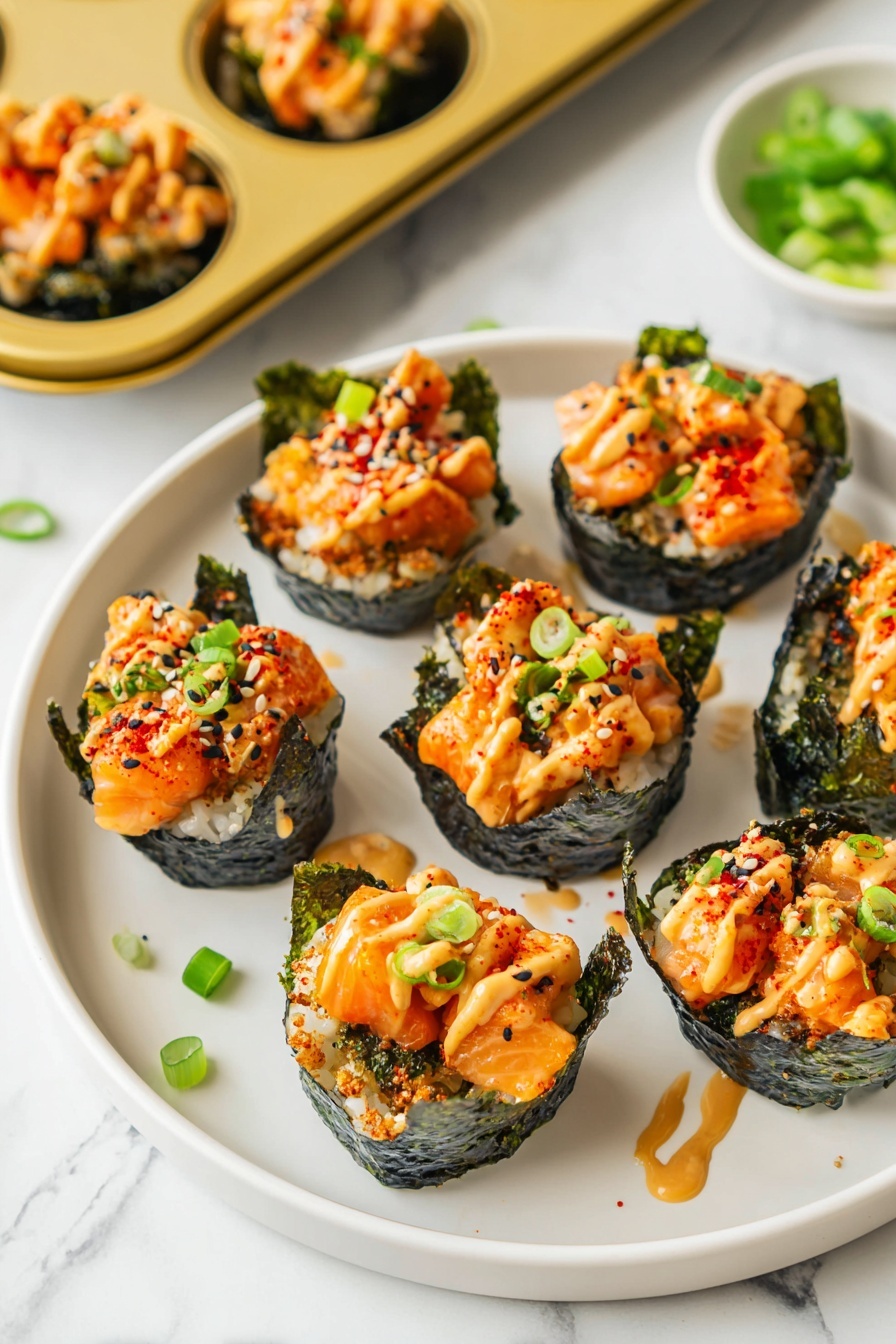
If you love sushi but want something a bit easier and more hands-on to make at home, you’re going to be obsessed with this Baked Salmon Sushi Cups Recipe. It’s the perfect blend of sushi flavors baked into cute, bite-sized cups that are fun to make and even better to eat. Trust me, once you try this, you’ll want to keep these on repeat for parties, snacks, or a quick weeknight treat.
Why You’ll Love This Recipe
- Simple Yet Impressive: It looks fancy but comes together quickly with everyday ingredients.
- Kid-Friendly & Crowd-Pleasing: My family goes crazy for these little sushi cups—they’re a great way to get picky eaters to enjoy salmon.
- Customizable Experience: You can easily tweak the spice level or swap ingredients based on what you have on hand.
- Hands-On & Fun to Assemble: Kids and adults alike love the interactive part of shaping their own sushi cups.

Ingredients You’ll Need
These ingredients work beautifully together to create the perfect balance of savory salmon, tangy sushi rice, and that umami hit from the nori and toppings. When shopping, try to find good quality salmon and authentic Japanese staples like Kewpie mayo for the best flavor.

- Salmon: Fresh, cubed salmon gives you tender, flavorful bites, and if you can, get sushi-grade for the best texture.
- Light soy sauce: Adds that salty depth without overwhelming the delicate salmon.
- Kewpie mayo: This Japanese mayo is creamier and a little sweeter than regular mayo—totally worth seeking out.
- Sriracha: Brings just the right spicy kick; you can adjust based on your heat tolerance.
- Sesame oil: A small amount adds nutty richness that elevates the salmon mix.
- Sushi rice: Short-grain rice is key here for that sticky texture that holds your cups together.
- Rice vinegar: Makes your sushi rice tangy and slightly sweet when combined with sugar.
- White sugar: Balances the acidity of the vinegar in the rice.
- Nori sheets: Cut into squares, these seaweed sheets serve as the crispy wrapper for your cups.
- Furikake: This Japanese seasoning adds a pop of flavor and texture as a garnish.
- Green onion: Freshly chopped for color and a mild onion crunch.
- Cooking spray: To lightly grease the muffin tin so your sushi cups come out cleanly.
Variations
I love experimenting with this recipe depending on what mood I’m in or who I’m cooking for. Feel free to mix it up and make it your own!
- Spicy Level Swap: If you’re not into heat, just reduce or skip the Sriracha and use more Kewpie mayo for creaminess instead — my kids prefer it this way!
- Seafood Variety: Sometimes I substitute the salmon with cooked shrimp or even canned crab for a different spin that’s just as tasty.
- Veggie Boost: Add diced avocado or cucumber on top after baking for a fresh crunch and creaminess.
- Gluten-Free Option: Be sure to use gluten-free soy sauce if you need to keep this recipe gluten-free — no noticeable difference in flavor.
How to Make Baked Salmon Sushi Cups Recipe
Step 1: Perfect Your Sushi Rice
Cook your sushi rice according to the package instructions—this is super important because sticky rice is the glue that holds your sushi cups together. While it’s still warm, mix in the rice vinegar and sugar combo that you microwaved until dissolved. I discovered this trick of warming the vinegar mixture helps it absorb better without making the rice soggy. Set the rice aside and let it cool just a bit while you prep everything else.
Step 2: Mix Up That Salmon Magic
In a bowl, combine the cubed salmon with light soy sauce, Kewpie mayo, Sriracha, and sesame oil. Mixing all these together gives you a creamy, spicy, and savory salmon topping that’s out of this world. I like to let it sit a few minutes while I prep the nori to let those flavors meld.
Step 3: Assemble Your Sushi Cups
Cut your nori sheets into 4 squares each—just the right size to fit neatly into your muffin tin. Spray your muffin tin lightly with cooking spray so the cups won’t stick (this tip saved me multiple times!). Then place a nori square into each muffin well and press a spoonful of sushi rice firmly into the base. Layer the salmon mixture on top of the rice, getting it into little mounds. Your cups are now ready for the oven!
Step 4: Bake to Perfection
Bake at 400℉ for about 15 minutes until the salmon is cooked through and the tops get a slight golden color. I always peek in around 12 minutes just to make sure nothing’s drying out. Let your sushi cups cool a few minutes before removing them from the tin.
Step 5: Garnish and Serve
Drizzle a bit more Sriracha or spicy mayo (my family loves this extra kick!). Sprinkle on furikake seasoning and some freshly chopped green onions for color and texture. Serve immediately while still warm and watch how everyone fights over the last cup!
Pro Tips for Making Baked Salmon Sushi Cups Recipe
- Rice Texture Is Key: Make sure your sushi rice is sticky but not mushy—rinsing rice before cooking helps with this balance.
- Don’t Overfill: Keep the salmon layer just enough so it cooks evenly without spilling over the muffin tin edges.
- Use Fresh Salmon: Freshness makes a huge difference in flavor and texture—try to get sushi-grade salmon whenever possible.
- Grease the Muffin Tin Well: This simple step prevents sticking and keeps your sushi cups intact when you remove them.
How to Serve Baked Salmon Sushi Cups Recipe

Garnishes
I always top my sushi cups with furikake and green onions because they add that perfect pop of flavor and crunch. Sometimes I add a tiny dollop of extra spicy mayo or a quick drizzle of soy sauce right before serving. It really amps up the umami!
Side Dishes
These cups pair beautifully with a simple seaweed salad, pickled ginger, or a crisp cucumber salad. I love keeping it light on the side so the sushi cups stay the star of the show.
Creative Ways to Present
For special occasions, I’ve served these on a wooden sushi platter lined with bamboo leaves. Adding small bowls of soy sauce, extra spicy mayo, and wasabi around the platter makes it feel like you’re at a sushi bar. Kids especially love assembling their own toppings when presented this way!
Make Ahead and Storage
Storing Leftovers
You can store leftover baked salmon sushi cups in an airtight container in the fridge for up to 2 days. I recommend reheating them gently in the oven or toaster oven to keep the nori crisp—microwaving sometimes makes it soggy.
Freezing
Freezing isn’t my favorite for this recipe because the texture of the rice and salmon can change. However, if you must, freeze the assembled but uncooked cups on a tray first, then transfer to a freezer bag. Thaw overnight in the fridge before baking.
Reheating
To reheat leftovers, I warm them in a 350℉ oven for about 8 minutes. This keeps the salmon juicy and the nori nice and crisp. Avoid the microwave unless you’re in a rush, but it may soften the nori.
FAQs
-
Can I use a different type of fish for this recipe?
Absolutely! While salmon is fantastic because of its rich flavor and texture, you can substitute with shrimp, crab, or even cooked white fish. Just be mindful of cooking times and make sure the fish you choose holds up well in the oven.
-
Do I need sushi-grade salmon for baking?
For this baked version, you don’t absolutely need sushi-grade salmon since it’s cooked through in the oven. However, using high-quality fresh salmon will always improve flavor and texture, so it’s what I recommend.
-
Can I make these ahead for a party?
You can assemble the sushi cups ahead of time and keep them covered in the fridge for a few hours before baking. Bake right before serving to keep the nori crisp and the salmon fresh-tasting.
-
What’s the best way to reheat leftovers?
Reheating in a 350℉ oven or toaster oven for about 8 minutes keeps the texture intact—crispy nori and moist salmon. Microwaving can make the nori soggy, so it’s a last resort.
Final Thoughts
This Baked Salmon Sushi Cups Recipe is one of those delightful finds that blend the joy of sushi with the ease of baking. I love how approachable it makes sushi-style eating, and my family always asks for seconds. If you want a fun, tasty dish that’s visually impressive and bursting with flavors, you really can’t go wrong giving these a try. So grab your muffin tins, and let’s get baking — your new favorite sushi snack awaits!
Print
Baked Salmon Sushi Cups Recipe
- Prep Time: 15 minutes
- Cook Time: 15 minutes
- Total Time: 30 minutes
- Yield: 12 sushi cups
- Category: Appetizer
- Method: Baking
- Cuisine: Japanese
Description
Easy Baked Salmon Sushi Cups are a creative twist on traditional sushi, combining flavorful marinated salmon with perfectly seasoned sushi rice, all baked in crispy nori cups. These bite-sized treats are topped with spicy mayo and garnished with furikake and green onions, making them a delightful appetizer or snack that’s simple to prepare and packed with umami goodness.
Ingredients
Salmon Mixture
- 1 lb salmon, cubed
- 1 tbsp light soy sauce
- 1 tbsp Kewpie Mayo
- 1 tbsp Sriracha
- 1 tsp sesame oil
Sushi Rice
- 1 1/2 cup uncooked sushi rice
- 1 tablespoon rice vinegar
- 2 teaspoon white sugar
Assembly & Garnish
- 3 large nori sheets
- furikake, for garnish
- 1 green onion, chopped, for garnish
- cooking spray
Instructions
- Cook the Sushi Rice: Prepare the sushi rice according to the package instructions, ensuring it is fully cooked and sticky for proper assembly.
- Season the Rice: In a microwave-safe bowl, combine rice vinegar and sugar. Microwave for about 30 seconds until the sugar dissolves. Pour this mixture over the cooked sushi rice and stir gently to combine. Set aside.
- Preheat the Oven: Heat your oven to 400℉ (200℃) to get ready for baking the sushi cups.
- Prepare Salmon Mixture: In a bowl, mix cubed salmon with light soy sauce, Kewpie mayo, sriracha, and sesame oil until well combined. Set aside.
- Cut Nori Sheets: Slice the nori sheets into 4 rectangles or squares each, sized to fit into your muffin tin cups.
- Assemble Sushi Cups: Lightly grease a muffin tin with cooking spray. Place a nori square into each muffin cup. Add a spoonful of seasoned sushi rice, pressing lightly to form a base. Top rice with a layer of the salmon mixture.
- Bake: Bake the assembled sushi cups in the preheated oven at 400℉ for 15 minutes, until the salmon is cooked through and the tops are slightly golden.
- Garnish and Serve: Remove cups from the oven and allow them to cool slightly. Drizzle more sriracha or spicy mayo on top, then garnish with furikake and chopped green onions. Serve immediately.
Notes
- Use fresh, high-quality salmon suitable for cooking.
- Adjust the amount of sriracha for your preferred spice level.
- For extra crispiness, you can lightly toast the nori squares before assembling.
- These sushi cups are best enjoyed fresh but can be refrigerated for up to 1 day.
- Rice vinegar and sugar seasoning gives sushi rice the classic tangy flavor—don’t skip this step.
Nutrition
- Serving Size: 1 sushi cup
- Calories: 140
- Sugar: 2 g
- Sodium: 320 mg
- Fat: 6 g
- Saturated Fat: 1 g
- Unsaturated Fat: 3 g
- Trans Fat: 0 g
- Carbohydrates: 15 g
- Fiber: 1 g
- Protein: 9 g
- Cholesterol: 35 mg


