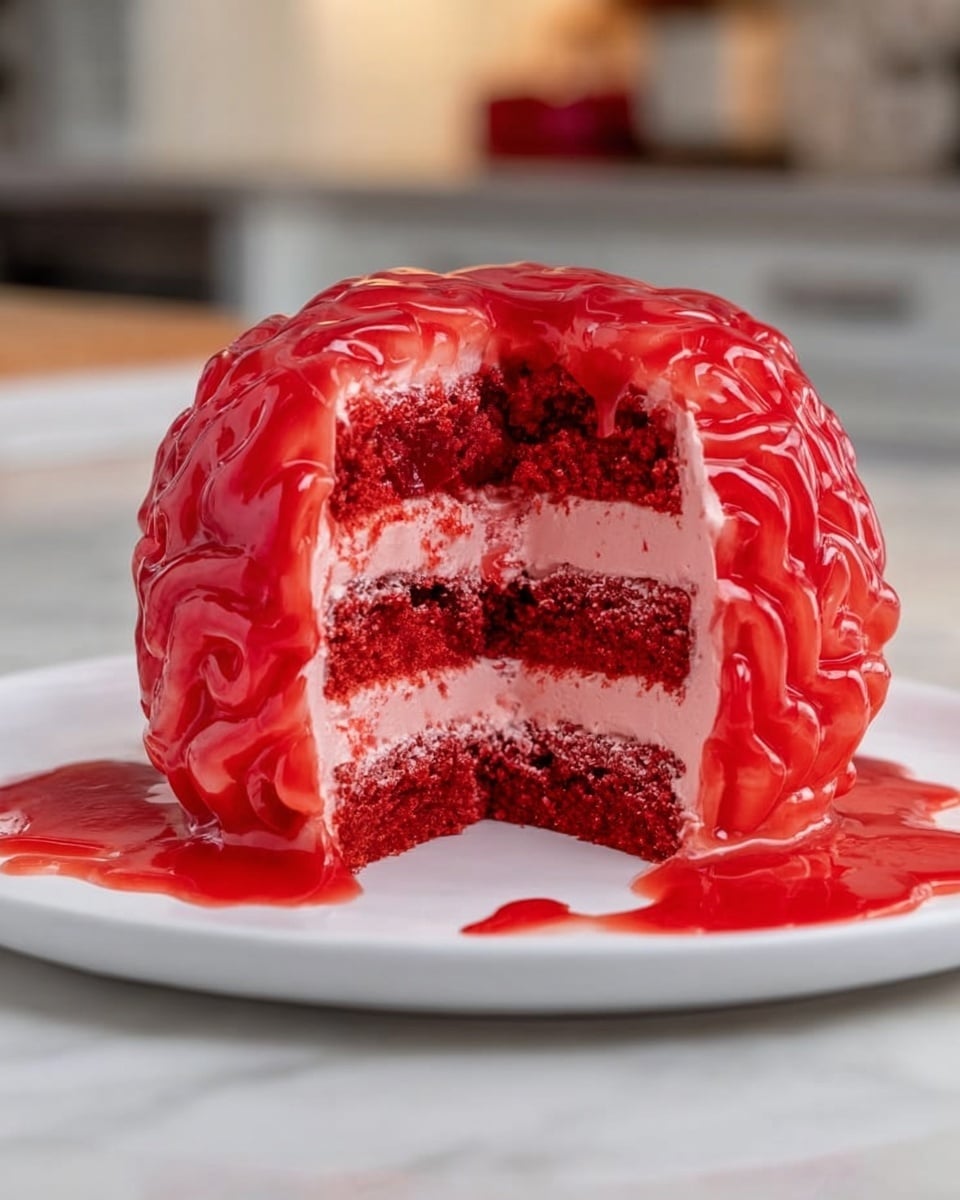
If you’re looking for a showstopper dessert that’s as thrilling as it is delicious, you’ve just found it — my Brain Cake with Red Velvet Layers and Blood-Infused Buttercream Recipe is the perfect blend of spooky and scrumptious. I absolutely love how this cake turns out every time: stunningly realistic brain layers, vibrant red velvet flavor, and a sinisterly sweet blood-like jam that makes it perfect for Halloween, horror-themed parties, or just surprising your friends and family. Trust me, once you try this, you’ll be hooked; it’s easier to make than it looks and genuinely a crowd-pleaser!
Why You’ll Love This Recipe
- Visually Striking: The brain-shaped design with realistic red velvet layers and blood-infused buttercream is guaranteed to turn heads and spark conversations.
- Flavorful but Balanced: You get the rich cocoa and tangy buttermilk notes in the red velvet cake paired with creamy, subtly sweet cream cheese buttercream that’s colored perfectly with blood-red hues.
- Make-Ahead Friendly: The cake layers and frosting freeze beautifully, making prep flexible and stress-free—something I always appreciate for big occasions.
- Fun to Decorate: Piping the squiggle lines that mimic brain folds is surprisingly easy and oddly satisfying, especially knowing that the edible fake blood makes it all look eerily authentic.

Ingredients You’ll Need
Every ingredient here works together to deliver that classic red velvet flavor with a perfect crumb, while the cream cheese buttercream frosting gets an exciting twist with blood-inspired coloring. Don’t skip the edible “blood” jam — it’s what really takes this cake to another level! Here are my notes to help you pick the best components.
- Cake Flour: Use cake flour over all-purpose for that tender, soft crumb that red velvet is famous for.
- Unsweetened Cocoa Powder: Adds just the right hint of chocolate to deepen the red velvet flavor without overwhelming.
- Baking Soda and Vinegar: These react to give the cake a nice rise and subtle tang, essential for red velvet’s signature taste.
- Unsalted Butter: Room temperature is key for smooth creaming; it also helps the cake stay moist.
- Buttermilk: If you don’t have any, a mix of milk and vinegar or lemon juice works—this brings in the tang and tenderizes the crumb.
- Red Gel Food Coloring: Avoid liquid food coloring if you can — gel is more concentrated and won’t thin your batter or frostings.
- Cream Cheese: Full-fat cream cheese does wonders here, lending tang and richness to the buttercream without making it too heavy.
- Powdered Sugar: Use sifted for smooth frosting — it helps avoid lumps which can trip you up during piping.
- Seedless Raspberry or Strawberry Jam: This jam is what makes your blood-infused buttercream look disturbingly real — plus adds a sweet, fruity layer to balance the richness.
Variations
I love making this cake as-is, but I’ve also played around with a few tweaks depending on the occasion — feel free to make it your own! Personalizing this brain cake is a fun way to tailor it to your taste or dietary needs.
- Dairy-Free Version: I swapped out buttermilk for almond milk with lemon juice and replaced butter and cream cheese with vegan alternatives—turns out just as moist and delicious, perfect for vegan friends!
- Intensified Chocolate: For more chocolate lovers, try adding an extra tablespoon of cocoa powder or a handful of mini chocolate chips between layers.
- Flavor Twist: A splash of coffee in the batter deepens the red velvet flavor even more, and I sometimes add a pinch of cinnamon to the frosting for a subtle warmth.
- Different Sizes: You can easily scale this recipe for a two-tier cake or cupcakes using my cake batter calculator — the taste stays sensational at any size.
How to Make Brain Cake with Red Velvet Layers and Blood-Infused Buttercream Recipe
Step 1: Prep Your Pans and Ingredients
Start by preheating your oven to 350°F (175°C). Grease three 8-inch or 7-inch round cake pans with non-stick spray and line them with parchment paper. This little trick ensures your layers slide out perfectly without any sticky disasters. Meanwhile, sift the dry ingredients—cake flour, cocoa powder, baking soda, and salt—together so everything’s evenly distributed.
Step 2: Cream Butter and Sugar, Then Add Eggs
Using a stand mixer or hand mixer, beat the softened butter and granulated sugar together on medium-high until fluffy and pale—about 1-2 minutes. This step is crucial because creaming incorporates air, giving you a lighter texture. Then, add the eggs one at a time, mixing well between each addition. Don’t rush this part — well-incorporated eggs help prevent a dense crumb.
Step 3: Mix Wet Ingredients and Add Dry Ingredients
Now, stir in the buttermilk, oil, vanilla, vinegar, and your vibrant red gel food coloring. The batter might sour a bit here and look slightly broken—don’t panic, I’ve been there! That’s normal. Slowly add in your sifted dry ingredients in two portions, mixing just until you don’t see any flour streaks. Overmixing here will make your cake tough, so a light touch is best.
Step 4: Bake and Shape Your Brain Layers
Divide the batter evenly between your pans (I weigh mine for accuracy—about 415g per pan). Bake for around 24-28 minutes or until a toothpick inserted in the center comes out with just a few moist crumbs. When done, let the cakes cool in their pans for 10 minutes, then invert onto wire racks to cool completely. To create the brain shape, trim 1-inch off two opposite sides to form an oval and gently round the tops using a sharp small knife. If your cakes seem fragile or crumbly while cutting, pop them in the freezer for 20 minutes — this tip saved me many times!
Step 5: Make the Blood-Infused Cream Cheese Buttercream
Beat together the butter and cream cheese on medium speed until smooth, then add vanilla and salt. Gradually add the powdered sugar and heavy cream, mixing on low to keep that sugar dust contained (cover your mixer if you want to avoid a cloud of sugar in your kitchen). Adjust the texture as needed, adding more cream if it’s too thick or sugar if it’s too thin. Finally, mix in a splash of red food coloring until you get a soft pink hue that looks just right. Keep the frosting covered so it doesn’t dry out as you assemble your cake.
Step 6: Prepare Your Edible Fake Blood
Whisk together seedless raspberry or strawberry jam with water and optional red gel coloring until smooth and blood-like. This simple mixture adds that creepy realism to your brain cake and sharpens its flavor profile with a fruity tang.
Step 7: Assemble and Decorate the Brain Cake
Start by placing your first cake layer on a cake board and securing it with a little frosting. Spread a uniform layer of buttercream on top, then add the next layer. Repeat for all layers, then trim edges again if needed for that brain shape. Spread a thin crumb coat over the whole cake and smooth it out, chilling the cake until the frosting firms up. Fit your piping bag with a large round tip and pipe squiggly lines down the middle to mimic the brain’s hemispheres and sulci — don’t stress perfection, these lines are supposed to look organic! Chill again until firm. Finally, brush your edible fake blood into every nook and cranny over the frosting, letting it drip a little at the base for a dramatic gore effect.
Pro Tips for Making Brain Cake with Red Velvet Layers and Blood-Infused Buttercream Recipe
- Freeze for Easier Shaping: Freezing the cake layers for 20 minutes before trimming made shaping much neater and less crumbly — a real game-changer for me.
- Watch Your Frosting Consistency: I found that slightly thinner buttercream makes piping those brain squiggles smoother and easier to control.
- Use Gel Food Coloring: I learned using gel takes the color up a notch without thinning out the batter or frosting, which can affect texture.
- Don’t Stress the Imperfections: The edible blood jam covers small gaps in the piping, so focus on fun, organic patterns rather than precision.
How to Serve Brain Cake with Red Velvet Layers and Blood-Infused Buttercream Recipe

Garnishes
I usually keep garnishes simple—just a few fresh raspberries around the base complement the jam’s flavor and add a pop of natural color. Some edible silver beads or tiny red sugar crystals sprinkled sparingly give a subtle eerie glisten that really finishes the look without competing with the brain design.
Side Dishes
This cake is definitely the star of the show, but for a spooky dessert table, I love pairing it with dark chocolate truffles, tangy black cherry sorbet, or even a simple mint tea to balance all the sweetness.
Creative Ways to Present
For Halloween parties, placing this brain cake atop a cake stand surrounded by faux cobwebs, plastic spiders, or dry ice fog creates a chilling mood. I once decorated mine with “vein” piping in a contrasting red buttercream for an even more realistic, gruesome effect that guests couldn’t stop talking about. You could even slice it and serve pieces nestled inside a “skull” bowl for extra drama.
Make Ahead and Storage
Storing Leftovers
Leftover brain cake actually keeps really well when stored properly! I wrap it tightly with plastic wrap and store it in the fridge; it stays moist for up to a week thanks to the buttercream sealing in moisture. Be sure to cover cut edges with some extra frosting to prevent drying out.
Freezing
I freeze leftover cake slices wrapped individually in plastic and foil, which preserves flavor and texture for about a month. When I want to enjoy it again, I thaw it overnight in the fridge. The quality holds up surprisingly well!
Reheating
Since this is a buttercream-based cake, I avoid microwaving as it can melt the frosting. Instead, I let slices come to room temperature naturally, which usually takes about an hour, and that brings back the soft cake texture and creamy frosting experience perfectly.
FAQs
-
Can I make this Brain Cake with Red Velvet Layers and Blood-Infused Buttercream Recipe ahead of time?
Absolutely! I recommend baking the cake layers a day or two in advance and freezing them to make assembly easier. You can also prepare the frosting ahead and refrigerate it. The fully assembled and frosted cake can be stored in the fridge for up to a week or frozen for up to a month.
-
What’s the best way to get the brain shape for the cake?
After your layers have baked and cooled, I like trimming about an inch from two opposite sides to create an oval, then rounding the top edges carefully with a sharp knife. If you have any trouble, chilling or freezing the layers first makes cutting much easier and cleaner.
-
Can I substitute the cream cheese buttercream with a plain buttercream?
Yes! If you prefer, you can increase the butter in place of cream cheese for a classic buttercream. The cream cheese adds a nice tang and richness, but plain buttercream will still taste great and pipe well for the brain design.
-
How do I avoid the frosting looking too thin or runny?
Use gel food coloring instead of liquid to maintain the consistency, and adjust your frosting thickness by adding powdered sugar little by little if it feels too thin. Refrigerate the cake between piping sessions to keep the structure intact.
-
Is the edible fake blood recipe safe and tasty?
Definitely! The seedless jam combined with water and food coloring creates a sweet, tangy glaze that’s totally edible and adds real flavor, making the cake look spectacular without compromising taste or safety.
Final Thoughts
This Brain Cake with Red Velvet Layers and Blood-Infused Buttercream Recipe has become one of my absolute favorites to bake because it’s not just striking, it’s genuinely delicious and surprisingly manageable to make at home. Whether you’re aiming to impress guests at a spooky party or just want to try a fun baking project, this cake delivers on all fronts. Give it a shot—I promise you’ll love both the process and the jaw-dropping result. Plus, everyone loves a little dramatic flair on their dessert plate, right?
Print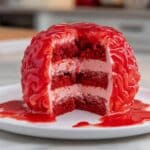
Brain Cake with Red Velvet Layers and Blood-Infused Buttercream Recipe
- Prep Time: 20 minutes
- Cook Time: 27 minutes
- Total Time: 1 hour 17 minutes
- Yield: 20 servings
- Category: Baking
- Method: Baking
- Cuisine: American
Description
This eye-catching Brain Cake is a spooky yet delicious dessert perfect for Halloween or themed parties. It features rich red velvet layers carved into a brain shape, frosted with smooth cream cheese buttercream tinted pink, and coated with a glossy edible ‘blood’ made from raspberry jam. The cake is moist, flavorful, and visually striking, combining classic red velvet flavors with creative decorating techniques to create a fun and memorable centerpiece.
Ingredients
Red Velvet Cake
- 2 1/2 cups cake flour (300g)
- 2 Tbsp unsweetened cocoa powder, sifted (10g)
- 1 tsp baking soda (6g)
- 1/2 tsp fine salt (3g)
- 1/2 cup (1 stick) unsalted butter, room temperature (113g)
- 1 3/4 cups granulated sugar (350g)
- 2 large eggs, room temperature (112g)
- 1 1/4 cups buttermilk, room temperature (300g)
- 1/2 cup vegetable or canola oil (120g)
- 2 tsp vanilla extract or vanilla bean paste (8g)
- 1 tsp white vinegar (4g)
- 1 tsp red gel food coloring or 1 Tbsp liquid food coloring
Cream Cheese Buttercream Frosting
- 1 1/2 cups (3 sticks) unsalted butter, room temperature (339g)
- 1 cup (8 oz) full-fat cream cheese, room temperature (226g)
- 1 Tbsp vanilla extract or vanilla bean paste (12g)
- 1 tsp fine salt (6g)
- 7 cups powdered sugar (904g) or a 2lb. bag
- 3 Tbsp heavy whipping cream, room temperature (45g)
- small squirt of red gel food coloring or 1 tsp liquid food coloring
Edible Fake Blood
- 1/2 cup seedless raspberry or strawberry jam
- 3 Tbsp water (45g)
- 1/4 tsp red gel food coloring or 1 tsp liquid food coloring (optional)
Instructions
- Preheat and Prepare Pans: Preheat your oven to 350°F (175°C). Grease three 8-inch or three 7-inch cake pans with non-stick baking spray and line them with parchment paper to prevent sticking. Set aside.
- Mix Dry Ingredients: In a medium bowl, sift together the cake flour, cocoa powder, baking soda, and salt. This ensures an even distribution of ingredients and a smooth batter.
- Cream Butter and Sugar: In a large bowl or stand mixer bowl fitted with a whisk attachment, cream the butter and granulated sugar on medium-high speed for 1-2 minutes until lighter in color. Scrape the sides and bottom of the bowl as necessary to ensure even mixing.
- Add Eggs: Beat in the eggs one at a time on medium speed until fully incorporated, creating a smooth base for the batter.
- Incorporate Wet Ingredients: Mix in the buttermilk, vegetable oil, vanilla extract, white vinegar, and red gel food coloring on low speed. The mixture may look broken but will come together with the addition of dry ingredients.
- Combine Dry and Wet Ingredients: Gradually add the sifted dry mixture in two additions. Mix on low speed until just combined, avoiding overmixing to keep the cake tender.
- Divide and Bake: Evenly divide the batter between the prepared pans, roughly 415 grams per pan. Bake in the preheated oven for 24-28 minutes or until a toothpick inserted into the center comes out with a few moist crumbs.
- Cool Cake Layers: Remove the cakes from the oven and allow them to cool in their pans for 10 minutes. Run a small offset spatula around the edges, then carefully invert the cakes onto wire racks to cool completely. Optionally, do not level the layers as they bake flat enough.
- Shape the Brain: Stack the cooled layers and trim about 1 inch off two sides to create an oval, brain-like shape. Use a small, sharp knife to round the top for a realistic look. If needed, chill the layers in the freezer for 20 minutes to make cutting easier. You may also wrap and freeze the layers at this stage if preparing ahead.
- Prepare the Cream Cheese Buttercream: Beat together the butter and cream cheese on medium speed with a paddle attachment until smooth, about 30 seconds. Add vanilla extract and salt, beating on low until incorporated.
- Add Sugar and Cream: Slowly add powdered sugar and heavy cream on low speed. Cover the mixer bowl with a towel to prevent sugar dusting. Scrape often to combine. Adjust thickness by adding more cream or powdered sugar if necessary. Mix in red food coloring to achieve a light pink tint.
- Make Edible Fake Blood: Whisk raspberry jam, water, and optional red gel food coloring until smooth and thin. Cover and set aside.
- Assemble the Cake: Place a small dab of frosting on a greaseproof cake board to secure the first layer. Spread frosting evenly between layers. After stacking, trim the cake to refine the brain shape as needed.
- Crumb Coat and Chill: Apply a thin frosting coat around the entire cake to seal crumbs and smooth the surface with an offset spatula or acetate sheet. Chill in the refrigerator for 20 minutes or freezer for 5 minutes until firm.
- Pipe Brain Details: Fit a large piping bag with a round tip (like Ateco 805) and pipe squiggly, brain-like lines over the cake surface, dividing it down the middle to mimic hemispheres. Imperfections are fine as jam will cover any gaps.
- Firm and Final Blood Coat: Chill the cake again until the frosting is firm to the touch (30 minutes in fridge or 10 minutes freezer). Use a pastry brush to generously coat the piped frosting with the jam blood, making sure to fill all crevices and place some around the cake base for a dramatic effect.
- Serve and Enjoy: Allow the cake to come to room temperature before slicing for best flavor and texture.
Notes
- The cake feeds about 20 people due to trimming and shaping.
- For different cake sizes or tiers, use a cake batter calculator to adjust quantities.
- Make cake layers ahead and freeze for convenience; frosting can also be made in advance and stored.
- Frosted cake lasts up to 1 week in the fridge or 1 month frozen.
- Bring refrigerated cake to room temperature 1-2 hours before serving.
- Store leftover frosting sealed in fridge up to 1 month or freezer up to 3 months; stir well after thawing.
- Measure flour properly by spooning into the cup or use a kitchen scale for accuracy.
- Use room temperature ingredients for better mixing and texture.
- Chill cake layers before assembly to improve stability during stacking and frosting.
- Use gel food coloring to prevent altering texture or flavor bitterness.
- Make a vegan or dairy-free version with alternative milk, vegan butter, and egg replacer.
- Leftover trimmed cake can be repurposed into cake pops, snacks, or ice cream topping; keep airtight for up to 3 days.
Nutrition
- Serving Size: 1 slice (1/20th of cake)
- Calories: 480
- Sugar: 42g
- Sodium: 320mg
- Fat: 28g
- Saturated Fat: 16g
- Unsaturated Fat: 10g
- Trans Fat: 0g
- Carbohydrates: 55g
- Fiber: 1g
- Protein: 5g
- Cholesterol: 90mg
