Description
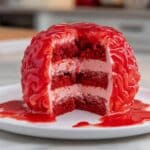
This eye-catching Brain Cake is a spooky yet delicious dessert perfect for Halloween or themed parties. It features rich red velvet layers carved into a brain shape, frosted with smooth cream cheese buttercream tinted pink, and coated with a glossy edible ‘blood’ made from raspberry jam. The cake is moist, flavorful, and visually striking, combining classic red velvet flavors with creative decorating techniques to create a fun and memorable centerpiece.
Ingredients
Scale
Red Velvet Cake
- 2 1/2 cups cake flour (300g)
- 2 Tbsp unsweetened cocoa powder, sifted (10g)
- 1 tsp baking soda (6g)
- 1/2 tsp fine salt (3g)
- 1/2 cup (1 stick) unsalted butter, room temperature (113g)
- 1 3/4 cups granulated sugar (350g)
- 2 large eggs, room temperature (112g)
- 1 1/4 cups buttermilk, room temperature (300g)
- 1/2 cup vegetable or canola oil (120g)
- 2 tsp vanilla extract or vanilla bean paste (8g)
- 1 tsp white vinegar (4g)
- 1 tsp red gel food coloring or 1 Tbsp liquid food coloring
Cream Cheese Buttercream Frosting
- 1 1/2 cups (3 sticks) unsalted butter, room temperature (339g)
- 1 cup (8 oz) full-fat cream cheese, room temperature (226g)
- 1 Tbsp vanilla extract or vanilla bean paste (12g)
- 1 tsp fine salt (6g)
- 7 cups powdered sugar (904g) or a 2lb. bag
- 3 Tbsp heavy whipping cream, room temperature (45g)
- small squirt of red gel food coloring or 1 tsp liquid food coloring
Edible Fake Blood
- 1/2 cup seedless raspberry or strawberry jam
- 3 Tbsp water (45g)
- 1/4 tsp red gel food coloring or 1 tsp liquid food coloring (optional)
Instructions
- Preheat and Prepare Pans: Preheat your oven to 350°F (175°C). Grease three 8-inch or three 7-inch cake pans with non-stick baking spray and line them with parchment paper to prevent sticking. Set aside.
- Mix Dry Ingredients: In a medium bowl, sift together the cake flour, cocoa powder, baking soda, and salt. This ensures an even distribution of ingredients and a smooth batter.
- Cream Butter and Sugar: In a large bowl or stand mixer bowl fitted with a whisk attachment, cream the butter and granulated sugar on medium-high speed for 1-2 minutes until lighter in color. Scrape the sides and bottom of the bowl as necessary to ensure even mixing.
- Add Eggs: Beat in the eggs one at a time on medium speed until fully incorporated, creating a smooth base for the batter.
- Incorporate Wet Ingredients: Mix in the buttermilk, vegetable oil, vanilla extract, white vinegar, and red gel food coloring on low speed. The mixture may look broken but will come together with the addition of dry ingredients.
- Combine Dry and Wet Ingredients: Gradually add the sifted dry mixture in two additions. Mix on low speed until just combined, avoiding overmixing to keep the cake tender.
- Divide and Bake: Evenly divide the batter between the prepared pans, roughly 415 grams per pan. Bake in the preheated oven for 24-28 minutes or until a toothpick inserted into the center comes out with a few moist crumbs.
- Cool Cake Layers: Remove the cakes from the oven and allow them to cool in their pans for 10 minutes. Run a small offset spatula around the edges, then carefully invert the cakes onto wire racks to cool completely. Optionally, do not level the layers as they bake flat enough.
- Shape the Brain: Stack the cooled layers and trim about 1 inch off two sides to create an oval, brain-like shape. Use a small, sharp knife to round the top for a realistic look. If needed, chill the layers in the freezer for 20 minutes to make cutting easier. You may also wrap and freeze the layers at this stage if preparing ahead.
- Prepare the Cream Cheese Buttercream: Beat together the butter and cream cheese on medium speed with a paddle attachment until smooth, about 30 seconds. Add vanilla extract and salt, beating on low until incorporated.
- Add Sugar and Cream: Slowly add powdered sugar and heavy cream on low speed. Cover the mixer bowl with a towel to prevent sugar dusting. Scrape often to combine. Adjust thickness by adding more cream or powdered sugar if necessary. Mix in red food coloring to achieve a light pink tint.
- Make Edible Fake Blood: Whisk raspberry jam, water, and optional red gel food coloring until smooth and thin. Cover and set aside.
- Assemble the Cake: Place a small dab of frosting on a greaseproof cake board to secure the first layer. Spread frosting evenly between layers. After stacking, trim the cake to refine the brain shape as needed.
- Crumb Coat and Chill: Apply a thin frosting coat around the entire cake to seal crumbs and smooth the surface with an offset spatula or acetate sheet. Chill in the refrigerator for 20 minutes or freezer for 5 minutes until firm.
- Pipe Brain Details: Fit a large piping bag with a round tip (like Ateco 805) and pipe squiggly, brain-like lines over the cake surface, dividing it down the middle to mimic hemispheres. Imperfections are fine as jam will cover any gaps.
- Firm and Final Blood Coat: Chill the cake again until the frosting is firm to the touch (30 minutes in fridge or 10 minutes freezer). Use a pastry brush to generously coat the piped frosting with the jam blood, making sure to fill all crevices and place some around the cake base for a dramatic effect.
- Serve and Enjoy: Allow the cake to come to room temperature before slicing for best flavor and texture.
Notes
- The cake feeds about 20 people due to trimming and shaping.
- For different cake sizes or tiers, use a cake batter calculator to adjust quantities.
- Make cake layers ahead and freeze for convenience; frosting can also be made in advance and stored.
- Frosted cake lasts up to 1 week in the fridge or 1 month frozen.
- Bring refrigerated cake to room temperature 1-2 hours before serving.
- Store leftover frosting sealed in fridge up to 1 month or freezer up to 3 months; stir well after thawing.
- Measure flour properly by spooning into the cup or use a kitchen scale for accuracy.
- Use room temperature ingredients for better mixing and texture.
- Chill cake layers before assembly to improve stability during stacking and frosting.
- Use gel food coloring to prevent altering texture or flavor bitterness.
- Make a vegan or dairy-free version with alternative milk, vegan butter, and egg replacer.
- Leftover trimmed cake can be repurposed into cake pops, snacks, or ice cream topping; keep airtight for up to 3 days.
Nutrition
- Serving Size: 1 slice (1/20th of cake)
- Calories: 480
- Sugar: 42g
- Sodium: 320mg
- Fat: 28g
- Saturated Fat: 16g
- Unsaturated Fat: 10g
- Trans Fat: 0g
- Carbohydrates: 55g
- Fiber: 1g
- Protein: 5g
- Cholesterol: 90mg