If you’re craving a crunchy, tangy, and just the right amount of sweet pickle, this Bread and Butter Pickles Recipe is going to be your new go-to. I absolutely love how these pickles balance that classic savory pickled flavor with a touch of sugar and spice—it’s like biting into a perfect summer day preserved in a jar. Whether you’re topping sandwiches, serving alongside burgers, or just nibbling straight from the jar, these pickles bring that nostalgic charm everyone adores.
When I first tried making bread and butter pickles at home, I was surprised by how hands-on yet straightforward the process is, and how rewarding it feels to taste them fresh or after they’ve had a day or two to soak up all those bold flavors. This Bread and Butter Pickles Recipe works especially well if you enjoy your pickles with a little extra crunch and a vibrant, homemade zing that store-bought versions just can’t match. It’s a gratifying kitchen project that pays off with jars of pure delight!
Why You’ll Love This Recipe
- Perfect Balance of Flavors: Sweet, tangy, and slightly spicy all at once, capturing that classic bread and butter pickle taste.
- Crunchy Texture: Thanks to the salting and chilling step, the cucumbers stay delightfully crisp.
- Flexible Storage Options: Can be canned safely for pantry storage or refrigerated for quick enjoyment.
- Homemade Satisfaction: Personalize your pickling spices and sugar level for your perfect jar every time.

Ingredients You’ll Need
Each ingredient in this Bread and Butter Pickles Recipe plays a special role—fresh cucumbers provide that crispness, while the combination of vinegars and spices create the perfect pickling syrup. Use good-quality vinegars for the best flavor, and don’t skip the pickling salt; it really helps maintain texture and flavor.
- Pickling cucumbers: Fresh and firm cucumbers ensure your pickles stay crunchy and not soggy.
- Pickling salt: Unlike table salt, this has no additives that cloud the brine; crucial for crispness.
- White or yellow onions: Thinly sliced for sweetness and a mild bite that complements the cucumber perfectly.
- White distilled vinegar: A clean, sharp acidity that’s essential for preserving and flavor balance.
- Apple cider vinegar: Adds a subtle fruity undertone to deepen the flavor profile.
- Sugar: Sweetens the brine and balances the tang, giving that trademark bread and butter sweetness.
- Mustard seeds: Adds a gentle, nutty heat that’s classic in bread and butter pickles.
- Crushed red pepper flakes: A little spicy kick that wakes up your taste buds without overpowering.
- Celery seeds: Provide a clean, peppery note that blends beautifully with the other spices.
- Cinnamon stick: Brings warm, subtle sweetness and aromatic depth.
- Allspice berries and ground allspice: Adds a comforting, slightly peppery warmth.
- Whole cloves and ground cloves: For that unmistakable warm, aromatic spice that ties everything together.
- Ground turmeric: Imparts a beautiful golden color and a hint of earthiness.
Variations
I love giving recipes my own twist, and the Bread and Butter Pickles Recipe is no exception. Feel free to adjust the level of sweetness, spice, or try adding your own favorite herbs to really make it your own. It’s a forgiving recipe that invites your creativity!
- Lower Sugar Version: I once cut back the sugar by about a third, and it still turned out deliciously tangy with less sweetness—great for those watching sugar intake.
- Extra Spicy: Adding an extra teaspoon of crushed red pepper flakes gave the pickles a wonderful heat that my family couldn’t stop munching on.
- Herbal Twist: Tossing in fresh dill or thyme sprigs during the syrup boil adds an herbal complexity that’s really fun to experiment with.
- Vinegar Swap: I’ve used just apple cider vinegar alone for a fruitier, mellower flavor when I wanted to skip the harsher bite.
How to Make Bread and Butter Pickles Recipe
Step 1: Prepare and Slice Fresh Cucumbers
Start by giving your cucumbers a good rinse to remove any dirt, especially in the crevices of their ribs. I like to slice off just a thin strip from both ends before slicing them into 1/4-inch thick rounds—this keeps every piece consistent and perfect for pickling. Having uniform slices is something I learned early on makes the pickles cure evenly and taste balanced throughout.
Step 2: Salt, Chill, and Drain for Crispiness
Next, mix your cucumber slices together with the thinly sliced onions and pickling salt in a large bowl. I discovered this trick years ago: layering a clean towel over the bowl, then adding a few inches of ice on top really firms up the veggies. Pop it all into the fridge for about 4 hours to draw out excess moisture and preserve that satisfying crunch. Just make sure you rinse off all the salt properly afterward to avoid overly salty pickles.
Step 3: Prepare Your Jars and Pickling Syrup
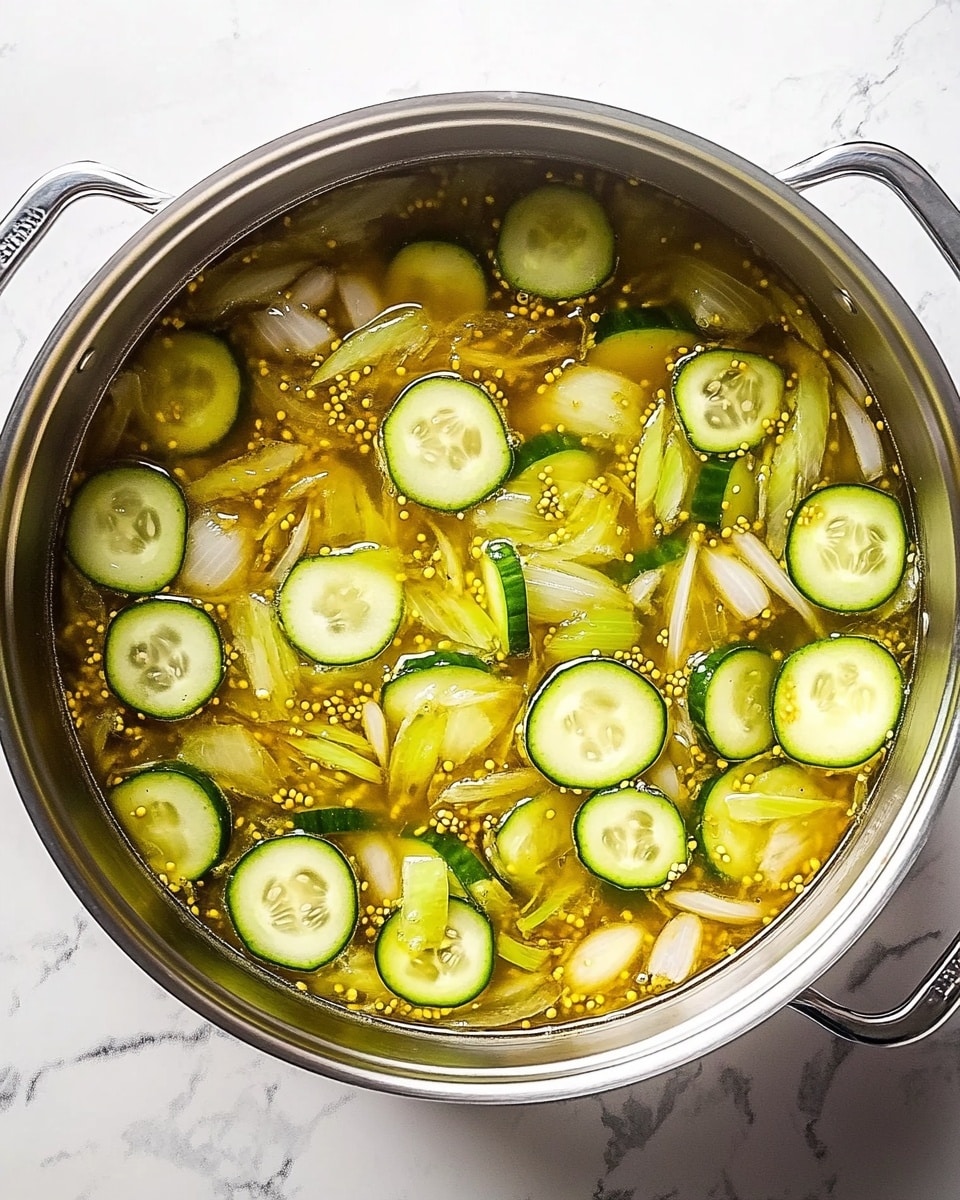
While the cucumbers chill, clean your jars thoroughly but don’t worry about pre-sterilizing since they’ll go through a hot water bath later. I usually set mine in hot water on a rack, keeping them warm and ready—this helps avoid thermal shock when you pour the hot syrup in. Meanwhile, bring your vinegars, sugar, and all pickling spices to a boil in a large pot, letting the sugar dissolve fully before adding your veggies back in to heat through the syrup.
Step 4: Pack Jars and Add Hot Syrup
Using a slotted spoon, fill your hot jars tightly with the warm cucumbers and onions, leaving about an inch of space at the top. Pour the boiling vinegar syrup over the veggies, almost to the rim but with enough headspace to allow for expansion. Give the rims a quick wipe to ensure a clean seal, then cap with properly cleaned lids and metal screw bands. At this point, you’re halfway to pickle perfection!
Step 5: Hot Water Bath for Safety and Shelf-Life
If you want to store your pickles on the shelf without refrigeration, place the filled jars back in your canning pot with water at least an inch above the jar tops. Boil them hard for 15 minutes, then remove with a jar lifter and cool on a towel or rack. You’ll hear a satisfying “pop” as the lids seal—that’s the sound of your pickles safely preserved. If you’re planning to eat them soon, you can skip this step and just keep your pickles refrigerated.
Step 6: Cool and Store for Ultimate Flavor
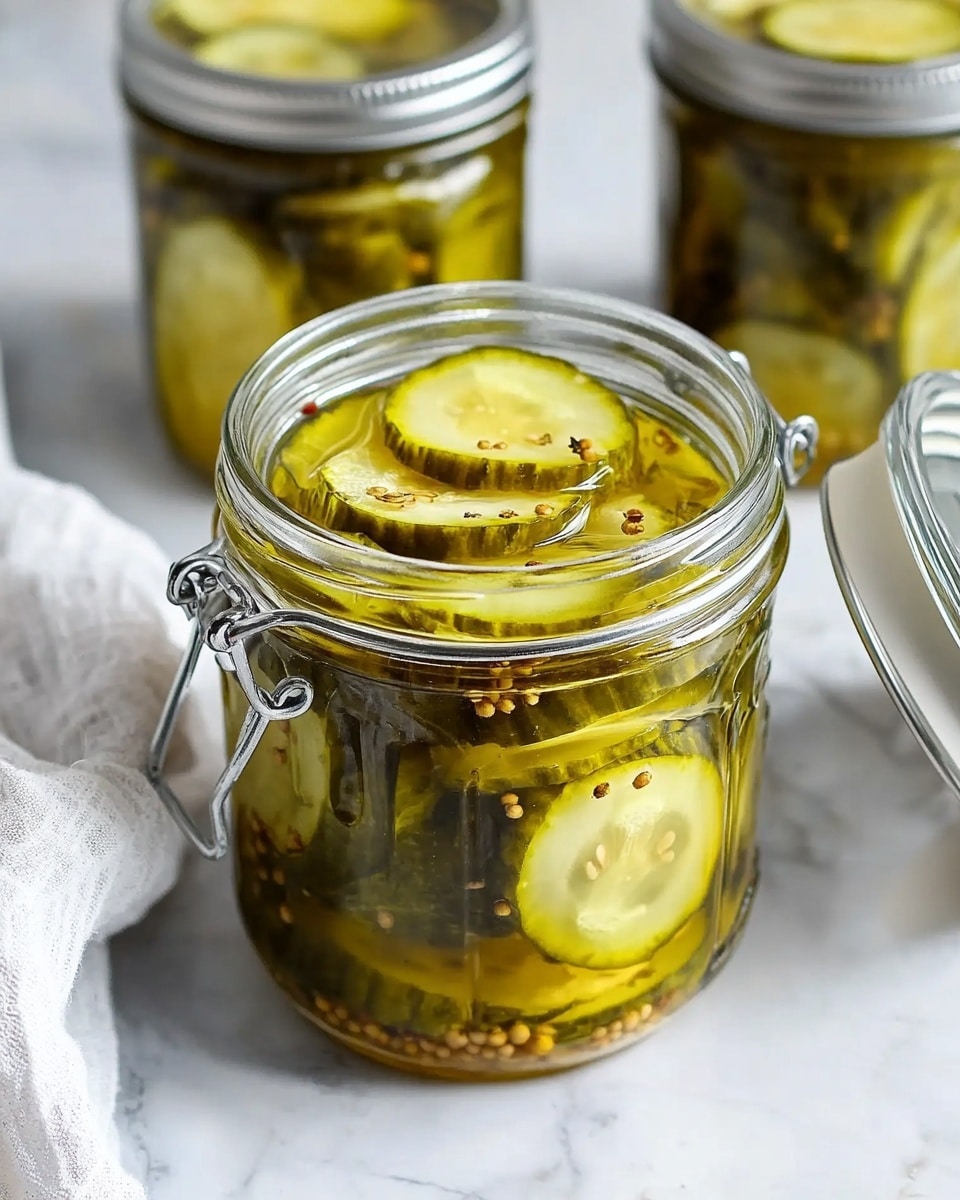
Once cooled, your bread and butter pickles are ready to be admired and enjoyed. The flavors develop even more after a day or two, but honestly, I’ve been known to sneak a taste right away because they’re that good. Store sealed jars in a cool, dark place for up to a year, or keep them refrigerated and enjoy within three months for fresher taste.
Pro Tips for Making Bread and Butter Pickles Recipe
- Don’t Skip the Salting Step: It’s essential for crispness and draws out water so your pickles don’t turn soggy.
- Use Fresh, Firm Cucumbers: I learned the hard way that overripe or soft cukes lead to limp pickles.
- Keep Jars Hot Before Filling: This prevents cracking and helps create a better seal when pouring in hot syrup.
- Cool On a Towel, Not Metal: This avoids sudden temperature shocks that can break your jars—trust me, I’ve spilled more than a few pickles!
How to Serve Bread and Butter Pickles Recipe
Garnishes
When I’m serving these pickles, I like to add a few fresh dill sprigs or thin slices of raw onion on the side for an extra pop of color and fresh aroma. Sometimes a pinch of cracked black pepper on top really livens up the presentation and adds subtle heat without altering the overall flavor.
Side Dishes
These pickles are a match made in heaven with classic barbecue fare—think smoky ribs or pulled pork sandwiches. I also love pairing them with creamy potato salad, grilled cheese sandwiches, or simply alongside burgers and hot dogs for a cool, crunchy contrast.
Creative Ways to Present
For parties, I’ve showcased these pickles beautifully layered in clear jars or small bowls with colorful toothpicks for easy snacking. They also make a charming homemade gift—just tie a ribbon around the jar and write a little note about how you made them yourself!
Make Ahead and Storage
Storing Leftovers
After opening your jar, I recommend storing leftovers in the fridge where they’ll stay bright and crisp for at least three months. I keep the pickles submerged in their syrup, which keeps them flavorful and helps prevent drying out.
Freezing
Freezing bread and butter pickles isn’t really ideal because cold tends to break down their texture and can make them mushy. I usually avoid freezing and instead focus on making smaller batches to finish fresh.
Reheating
Since these pickles are best served cold or at room temperature, I usually don’t reheat them. If you want to bring out the flavors, just let them sit a bit at room temperature before serving, which helps open up their aroma.
FAQs
-
Can I use regular table salt instead of pickling salt for bread and butter pickles?
While you technically can use table salt, I don’t recommend it because it contains additives like iodine and anti-caking agents that can cloud your brine and affect the crispness of the pickles. Pickling salt dissolves cleanly and helps keep your cucumbers firm and the syrup clear.
-
How long do bread and butter pickles last once canned?
Properly canned and sealed bread and butter pickles can be stored in a cool, dark pantry for up to one year. Once opened, keep them refrigerated and consume within three months for best flavor and texture.
-
Why do I need to salt and chill the cucumbers before pickling?
Salting and chilling draws out excess water from the cucumbers, which helps maintain a crisp texture and prevents your pickles from becoming soggy. It also allows the flavors to penetrate more deeply during the pickling process.
-
Can I skip the hot water bath and just refrigerate the pickles?
Yes! If you plan to eat your bread and butter pickles within a few months and keep them refrigerated at all times, you can skip the hot water bath. Just make sure your jars and utensils are very clean to avoid spoilage.
Final Thoughts
This Bread and Butter Pickles Recipe has been a kitchen favorite for me ever since I first mastered the salty-sweet-spicy balance that makes homemade pickles so addictive. It’s a simple pleasure that brightens up everyday meals and brings back fond memories of summer afternoons. I honestly encourage you to give it a try—you’ll enjoy the process and end up with jars of happiness that your family and friends will go crazy for!
Print
Bread and Butter Pickles Recipe
- Prep Time: 20 mins
- Cook Time: 30 mins
- Total Time: 4 hrs 50 mins
- Yield: 3 to 5 Pints
- Category: Pickles and Preserves
- Method: Water Bath Canning
- Cuisine: American
- Diet: Low Fat
Description
Classic Bread and Butter Pickles featuring crisp cucumber slices and onions soaked in a sweet and tangy vinegar syrup spiced with mustard seeds, cinnamon, and cloves. These pickles are perfect to enjoy immediately stored in the fridge or preserved long-term through water bath canning.
Ingredients
Vegetables
- 2 1/2 pounds pickling cucumbers, fresh from the market
- 1 pound white or yellow onions, thinly sliced
Salting
- 1/4 cup pickling salt
Pickling Syrup
- 1 1/4 cups white distilled vinegar (5% acidity)
- 1 cup apple cider vinegar (5% acidity)
- 2 1/4 cups sugar
Pickling Spices
- 1 tablespoon mustard seeds
- 1 teaspoon crushed red pepper flakes
- 3/4 teaspoon celery seeds
- 1 inch cinnamon stick
- 6 allspice berries plus a pinch of ground allspice
- 6 whole cloves plus a pinch of ground cloves
- 1/2 teaspoon ground turmeric
Instructions
- Rinse and Slice Cucumbers: Carefully rinse the cucumbers with water, scrubbing away any dirt especially from the ribs. Slice off 1/8 inch from each end and discard. Cut cucumbers into 1/4-inch thick slices and place in a large bowl.
- Salt, Chill, and Drain Cucumbers: Add the sliced onions and all of the pickling salt to the cucumbers. Stir thoroughly to distribute the salt evenly. Cover the mixture with a clean thin tea towel and top with a couple inches of ice. Refrigerate for 4 hours to draw out moisture. Afterward, discard the ice, rinse the cucumber and onion slices thoroughly twice, and drain well.
- Heat Jars: If you intend to store pickles outside the refrigerator, prepare canning jars by placing them on a metal rack in a large 16-quart pot. Fill the pot with warm water to cover jars by at least 1 inch, bring to a boil, then reduce heat to keep jars hot. Wash lids in hot soapy water. If refrigerating only, this step can be skipped.
- Make Pickling Syrup: In a large 4- or 6-quart pot, combine both vinegars, sugar, and all pickling spices (except salt). Bring the mixture to a boil, stirring until sugar dissolves completely. Add the drained cucumber and onion slices; bring the syrup back to a boil.
- Pack Jars and Add Syrup: Using a slotted spoon, pack the hot cucumbers and onions into the prepared jars leaving 1 inch of headspace. Pour the hot pickling syrup over the contents to within 1/2 inch from the rim. Wipe jar rims clean with a paper towel, place dry lids on top, and secure with screw bands. Repeat for all jars.
- Process in Hot Water Bath: For shelf-stable storage, return filled jars to the boiling water in the canning pot, ensuring water covers jars by at least 1 inch. Boil vigorously for 15 minutes, then remove jars carefully using tongs or jar lifters.
- Cool and Store: Allow jars to cool at room temperature until lids make a popping sound indicating proper seal. If any jar does not seal properly, refrigerate and consume within 3 months. Shelled jars kept in a cool, dark pantry can last up to one year. If water bath canning was skipped, store pickles in the refrigerator and consume within 3 months.
Notes
- Use pickling cucumbers for best texture and flavor.
- If you don’t plan to store pickles at room temperature, skip the hot water bath and refrigerate immediately.
- Ensure jars rest on a rack during water bath to avoid direct contact with pot bottom and prevent breakage.
- Discard ice from salt soak after 4 hours to avoid diluting flavors.
- Always wipe jar rims clean before sealing to ensure a proper seal.
- Process jars promptly after packing to keep contents hot and safe for preservation.
Nutrition
- Serving Size: 1/24th of recipe (approx. 1 jarred serving)
- Calories: 95
- Sugar: 20g
- Sodium: 633mg
- Fat: 0g
- Saturated Fat: 0g
- Unsaturated Fat: 0g
- Trans Fat: 0g
- Carbohydrates: 23g
- Fiber: 1g
- Protein: 1g
- Cholesterol: 0mg

