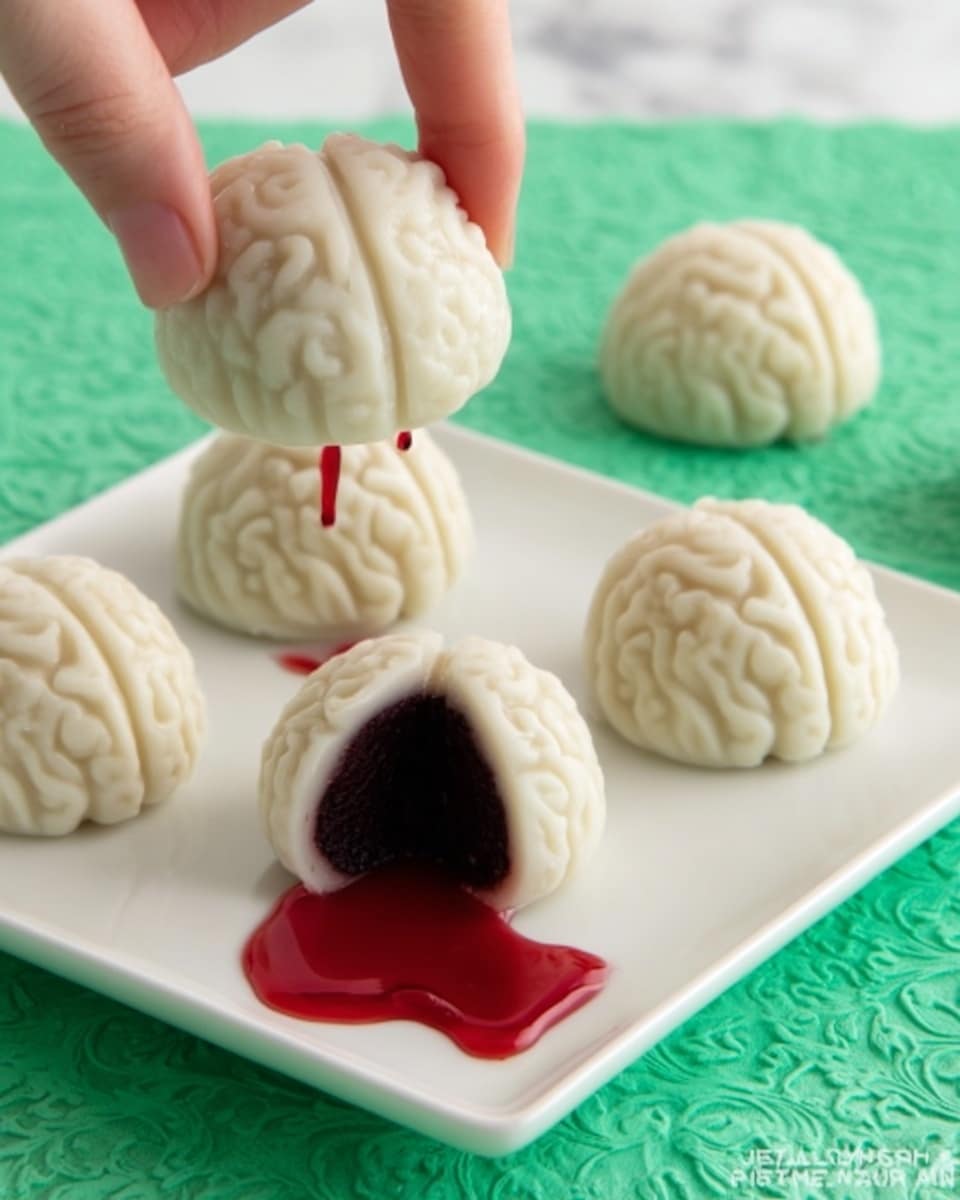
If you’re looking for a twistedly fun treat to wow your friends this Halloween or any spooky gathering, I’ve got you covered with my absolutely fan-freaking-tastic Cake Ball Brains Recipe. This recipe turns simple chocolate cake and white candy melts into creepy, detailed candy brains that taste just as amazing as they look. Trust me, once you try these brainy little bites, they’ll be the star of your dessert spread and a serious crowd-pleaser!
Why You’ll Love This Recipe
- Deliciously Sweet and Fruity: The fruit preserves inside give a surprise burst of flavor with every bite.
- Perfect for Parties: These brain-shaped cake balls are unique conversation starters and super fun to eat.
- Easy to Customize: You can tweak the colors and flavors to match your vibe or occasion.
- Make-Ahead Friendly: Prepare them in advance and store them neatly for hassle-free entertaining.

Ingredients You’ll Need
The ingredients for this Cake Ball Brains Recipe come together beautifully, combining moist chocolate cake with sweet frosting and smooth white candy coating. I always recommend fresh cake and high-quality melts or chocolate for the best results.
- Chocolate cake: Use a freshly baked cake for moist results; I prefer homemade or a quality store-bought option.
- Vanilla frosting: Choose a creamy one that’s not too stiff—it helps bind the cake crumbs perfectly.
- White candy melts or white chocolate: High-quality melts give a nice smooth coating—if you use tempered white chocolate, the shine is amazing.
- Oil-based candy coloring (optional): I use this to tint the white chocolate for a creepy effect—just a drop or two goes a long way.
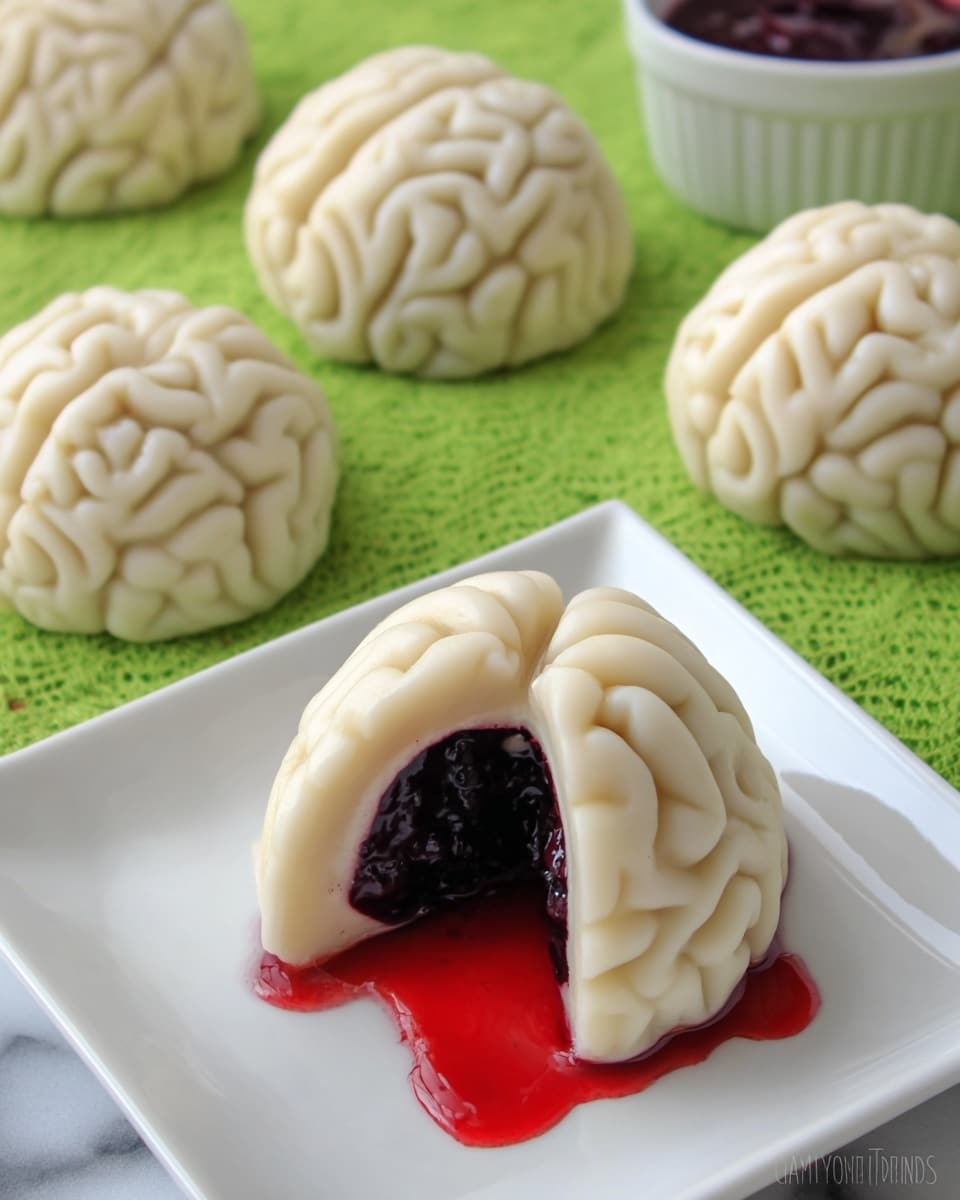
- Fruit preserves or dessert sauce: Cherry, raspberry, or strawberry work great for that bloody center.
- Red liquid food coloring: Mix it into your fruit preserves for a scary realistic look and vibrant color.
Variations
One of the things I love most about the Cake Ball Brains Recipe is how flexible it is. You can easily swap flavors and colors to fit your taste or theme—perfect if you want to get creative or accommodate dietary needs.
- Variation: I’ve experimented with swapping the fruit preserves for a chocolate ganache center—it’s insanely rich and feels like a real treat.
- Dairy-free version: Use dairy-free frosting and chocolate melts to make this allergy-friendly without losing any flavor.
- Halloween colors: I once tinted the white coating with pale green and pink for an extra eerie glow at a haunted party.
- Mini cake balls: Make them bite-sized for easy snacking at kids’ parties—they’re way too cute and kid-friendly this way.
How to Make Cake Ball Brains Recipe
Step 1: Prepare the Cake Base
Start by trimming the edges off your baked chocolate cake—trust me, the edges can be a bit dry and wonky for this project. Then crumble the cake into a large bowl or your mixer’s bowl until you get fine crumbs. I like using my hands here; it helps avoid clumps. Add about ¼ cup of vanilla frosting and mix until the crumbs hold together when you squeeze them. If it’s not sticky enough, add frosting a little at a time. You’re aiming for a soft ball that’s easy to mold but not too wet.
Step 2: Prepare Your Candy Coating
While you work on the cake mixture, melt your white candy melts or tempered white chocolate. I use a microwave in short bursts or a double boiler, stirring constantly for a smooth, shiny coating. If you want to add some spooky coloring, fold in a few drops of oil-based candy coloring now—this is where I get creative, sometimes going for an off-white pinkish tint or ghostly green.
Step 3: Coat the Brain Molds
Spoon melted chocolate into each cavity of your brain mold. Use the back of a spoon or your finger to coat the sides evenly with a nice thin layer. This shell keeps your brain balls from crumbling and gives a crisp bite. Once coated, wipe off any excess chocolate from the edges to avoid messy seams. Then pop the molds into the freezer for 5 minutes if you’re using candy melts or 15 minutes if you’re using pure white chocolate. Cooling sets the shell perfectly!
Step 4: Fill with Fruity ‘Blood’
While the molds chill, stir red liquid food coloring into your fruit preserves—this is the secret to those creepy, vivid bloody centers I’m obsessed with. I strain out seeds or chunks for smooth filling that looks amazing. Use about ¾ teaspoon of this mixture to fill each brain cavity on top of the hardened chocolate shell.
Step 5: Add the Cake Mixture and Seal
Next, scoop about 2 tablespoons of your cake and frosting mixture and firmly press it into the mold over the preserves, but don’t fill it all the way — you want space on top for another layer of candy coating. Spoon some melted coating over the top to seal everything in, smoothing it out carefully. Wipe any stray coating from the edges before chilling again for 5-10 minutes, depending on your coating type.
Step 6: Unmold and Enjoy
Once fully firmed up, carefully pop your cake ball brains out of the molds. I love how satisfying it feels to reveal those creepy, detailed confections after all that work. Store them in an airtight container and watch how quickly they disappear!
Pro Tips for Making Cake Ball Brains Recipe
- Perfect Cake Texture: Don’t skip trimming the cake edges—they can make your cake balls crumbly or dry.
- Frosting Balance: Add frosting gradually so your mix isn’t too wet and doesn’t fall apart inside the mold.
- Coloring Candy Coating: Oil-based coloring works best with candy melts to avoid seizing or streaking.
- Cleaning Mold Edges: Always wipe edges between layers to ensure neat, crisp brain shapes without messy seals.
How to Serve Cake Ball Brains Recipe
Garnishes
I like to dust my cake ball brains with just a little edible shimmer powder or cocoa powder to give them some depth and a bit of an eerie shine. Sometimes I add thin red gel lines for extra “veiny” effect, which really sells the spooky look.
Side Dishes
Pair these brain-shaped treats with a dark chocolate mousse or rich coffee for an indulgent dessert pairing. They also go surprisingly well alongside a fresh fruit platter to balance the sweetness.
Creative Ways to Present
For Halloween parties, I have served mine arranged on a platter designed to look like a lab table, sprinkled with crushed cookie “dirt” and fake spiders for extra creep factor. Another fun way is to put each brain in a small clear treat cup with a “specimen” label for a quirky scientific vibe.
Make Ahead and Storage
Storing Leftovers
Keep leftover Cake Ball Brains in an airtight container, placed in the refrigerator. I’ve found they stay fresh and moist for up to a week like this, which is perfect if you want to prep ahead and enjoy them gradually.
Freezing
These freeze beautifully! Wrap them individually in parchment or plastic wrap and place them in a freezer-safe container. When I’ve frozen them overnight, they come out just as delicious—just remember to thaw them in the fridge so the coating doesn’t sweat.
Reheating
I usually don’t reheat these because they’re perfect cold, but if you want to soften the cake filling a bit, let them sit at room temperature for 15-20 minutes before serving. That way, the texture is lovely without melting the candy shell.
FAQs
-
Can I use store-bought cake for this Cake Ball Brains Recipe?
Absolutely! I’ve used both homemade and store-bought chocolate cakes with great success. Just make sure the cake isn’t overly moist or too dry—if it feels crumbly, add a bit more frosting to achieve the right consistency for forming balls.
-
What’s the best way to color the white candy coating?
I recommend oil-based candy colors to mix into your melted white candy coating or chocolate. Water-based colors can cause the candy to seize or look streaky. Start with just a drop or two, because a little coloring goes a long way!
-
Can I make these Cake Ball Brains ahead of time?
Definitely! These are perfect make-ahead treats. Store them in an airtight container in the fridge for up to a week or freeze them for longer storage. Just bring them to room temperature before serving for best flavor and texture.
-
How do I prevent my cake balls from falling apart inside the mold?
Make sure your cake and frosting mixture is well combined and sticky enough to hold its shape, but not soggy. Add frosting a teaspoon at a time until it feels like soft dough. Also, pressing the mixture firmly into the mold cavities helps them hold together when coated.
Final Thoughts
I honestly can’t say enough good things about the Cake Ball Brains Recipe — it’s a total showstopper that’s as fun to make as it is to eat. I love surprising my family and friends with these creepy, delicious treats that look way more complicated than they actually are. If you want a dessert that’s unique, delicious, and a little bit spooky, I wholeheartedly recommend giving this recipe a try—you’ll be so proud of your creepy culinary creation!
Print
Cake Ball Brains Recipe
- Prep Time: 1 hr
- Cook Time: 0 mins
- Total Time: 1 hr
- Yield: 32 cake ball brains
- Category: Dessert
- Method: No-Cook
- Cuisine: American
Description
These spooky Cake Ball Brains are a fun and creepy treat perfect for Halloween or any themed party. Made from moist chocolate cake mixed with vanilla frosting and encased in a thin, colorful shell of white candy coating, each brain is filled with a fruity preserve for an eerie, gooey center. Crafted using brain-shaped molds, these treats are both visually impressive and deliciously indulgent.
Ingredients
Cake Ball Mixture
- 1 baked chocolate cake (9 x 13-inch sheet cake or two 8-inch round cakes)
- ¼ – ½ cup vanilla frosting
Candy Coating and Decoration
- 30-38 ounces melted white candy melts or melted and tempered pure white chocolate
- Optional: black, pink, or green oil-based candy coloring
Filling
- ⅔ cup cherry, raspberry, or strawberry preserves or dessert sauce (about ¾ teaspoon per brain)
- Red liquid food coloring
Instructions
- Prepare the cake mixture: Cut off the edges of the chocolate cake and discard them. Break the center of the cake into small pieces in a bowl or the bowl of a stand mixer. Add ¼ cup of vanilla frosting and mix until the mixture holds together into a soft ball. Add more frosting as needed to achieve the right consistency. Set aside this cake ball mixture.
- Color the candy coating: If desired, stir drops of oil-based candy coloring into the melted white candy coating to tint it for your brain molds.
- Create the candy shell: Spoon melted white candy coating into each cavity of the brain mold. Spread around the coating evenly to form a thin shell. Wipe away any excess coating around the mold edges. Freeze molds for 5 minutes (if using candy melts) or refrigerate for 15 minutes (if using tempered white chocolate) until firm.
- Prepare the filling: Mix red liquid food coloring into the fruit preserves. Strain the preserves to remove any seeds or fruit pieces to create a smooth filling.
- Fill the molds: Spoon approximately ¾ teaspoon of the colored fruit preserve into each candy-coated brain cavity.
- Add the cake ball mixture: Scoop about 2 tablespoons of the cake ball mixture and press it gently into each brain mold cavity on top of the fruit filling, leaving enough space for a final candy coating layer.
- Seal the brains: Spoon more white candy coating over the cake ball mixture in each mold and smooth out the surface. Wipe off any excess coating on the mold edges to ensure clean unmolding.
- Set the final coating: Freeze for 5 minutes if you used candy melts or refrigerate for about 10 minutes if you used tempered white chocolate until fully set.
- Unmold and serve: Carefully remove the cake ball brains from the molds. Store in an airtight container for up to one week.
Notes
- Use oil-based candy coloring to tint the candy melts; water-based colorings may cause the coating to seize.
- Straining the fruit preserves ensures a smooth and realistic ‘gooey’ filling without seeds or lumps.
- Adjust the amount of frosting to get the ideal cake ball consistency—too dry will crumble and too wet will be sticky.
- Store the cake ball brains in an airtight container in a cool place or refrigerator for up to one week.
- Tempering the white chocolate leads to a shinier finish and better snap, but candy melts are easier to handle for beginners.
Nutrition
- Serving Size: 1 cake ball brain (approx. 35 g)
- Calories: 160
- Sugar: 18g
- Sodium: 90mg
- Fat: 7g
- Saturated Fat: 4g
- Unsaturated Fat: 2g
- Trans Fat: 0g
- Carbohydrates: 23g
- Fiber: 1g
- Protein: 1.5g
- Cholesterol: 15mg

