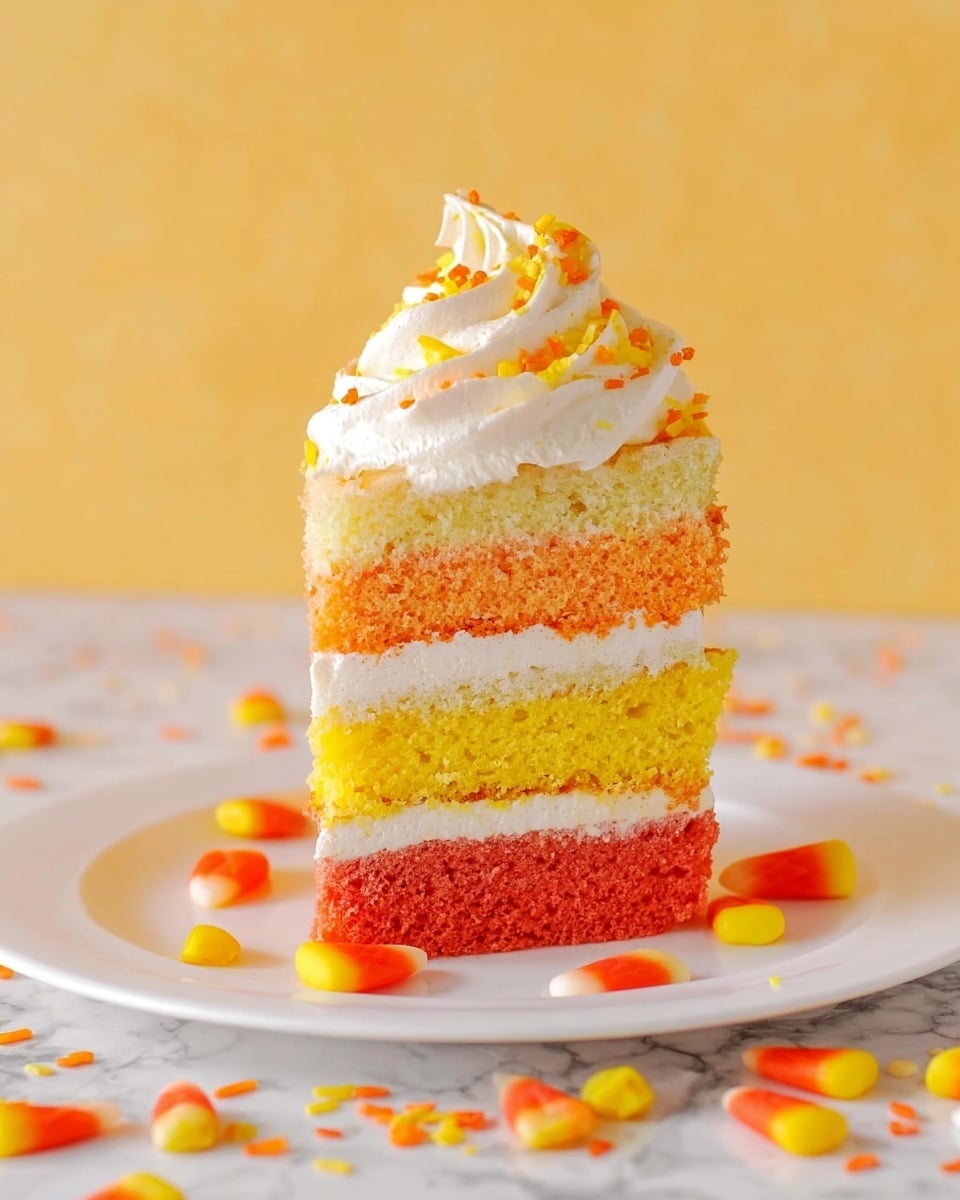
If you’re craving a fun and festive treat that’s as charming to look at as it is delicious, then you’re in for a real delight. I’m excited to share my Candy Corn Cakes and Cake Tutorial Recipe with you—these mini cakes are a perfect little Halloween party showstopper that’s bound to impress. Imagine a tiny cake tower layered in the classic candy corn colors—white, yellow, and orange—each bite bringing a sweet, buttery vanilla flavor combined with the fluffiest cake and smoothest frosting. Trust me, once you try this recipe, you’ll want to make them all season long!
Why You’ll Love This Recipe
- Festive and Fun: These cakes look just like candy corn, making them perfect for Halloween or any fun gathering.
- Easy to Customize: You can tweak colors or frosting consistency to suit your style and taste effortlessly.
- Soft, Moist Cake Layers: Using a white cake mix as base ensures reliably tender and fluffy cakes every time.
- Impressive Yet Simple: The tutorial breaks it down so even if you’re new to cake decorating, you’ll nail it.

Ingredients You’ll Need
The magic of these Candy Corn Cakes starts with a simple white cake mix, but what really makes the difference is the layering and coloring that bring the candy corn vibe alive. I always recommend using good quality butter and pure vanilla to elevate the flavors, and don’t underestimate the power of thinning your frosting just right—it makes spreading so much easier.
- White cake mix: This is your base for tender, moist cake layers; I prefer brands with simple ingredients for the best flavor.
- Yellow and red food coloring: These create that candy corn tri-color effect—be sure to use gel colors for vibrant results without thinning your batter.
- Butter (softened): Using softened butter makes your frosting creamy and easier to spread—don’t skip softening it first!
- Powdered sugar: For a smooth, sweet frosting that holds up well between cake layers.
- Pure vanilla extract: Adds depth and warmth to your frosting’s flavor—quality matters here.
- Whipping cream or half and half: Just enough to thin the frosting so it spreads easily without being runny.
Variations
One thing I love about the Candy Corn Cakes and Cake Tutorial Recipe is how easy it is to make it your own. I often experiment with alternative colors or add a little extra flavor punch to the frosting—feel free to play around and have fun with it!
- Flavor Variations: Try adding a bit of almond extract to your frosting instead of vanilla for a subtle twist my family adored last time.
- Color Play: You don’t have to stick with the traditional candy corn colors; pastel shades work wonderfully for a springtime version.
- Dietary Adjustments: Using dairy-free butter and milk substitute works well for those with dietary needs, and the cake still holds up beautifully.
- Frosting Styles: If you prefer a lighter frosting, whipping cream only (without powdered sugar) makes a lovely, less-sweet alternative.
How to Make Candy Corn Cakes and Cake Tutorial Recipe
Step 1: Mix the Cake Batter
Start by following the directions on the back of your white cake mix box to prepare the batter—this ensures your cakes will have those perfect textures I love. Once mixed, divide the batter evenly into four bowls. Set one aside to remain white, then add yellow food coloring to another and red to a third. For the orange color (which is a mix of red and yellow), combine the two colors gradually until you get that candy corn orange hue just right. You’ll find that using gel food coloring gives these vibrant colors without messing with your batter consistency.
Step 2: Bake the Layers Partially
Grease, flour, and line four cake pans with wax paper—this helps you easily remove your cakes without breaking them. Pour each colored batter into a separate pan. Here’s the trick I learned: bake each cake for only half the time recommended on the box. Since these layers will be thin, overbaking them is a common mistake that leads to dry cakes. Take them out when they’re just set and lightly springy to the touch, then cool them on a rack.
Step 3: Cut Your Cake Circles
Once cooled, use a biscuit cutter or the bottom of a glass to cut neat circles from each cake layer—these will form the perfect candy corn towers. If any layers didn’t bake quite flat, lightly even them out with a serrated knife. Trust me, taking the time here will make stacking these layers a breeze and give your final product a polished look.
Step 4: Make the Frosting
For the frosting, beat softened butter until creamy. Slowly add powdered sugar while mixing, then stir in pure vanilla extract. Add whipping cream or half and half little by little to thin the frosting until it spreads easily but still holds its shape. This balance is key—I usually test a small dollop on a spoon to check consistency.
Step 5: Assemble Your Candy Corn Cakes
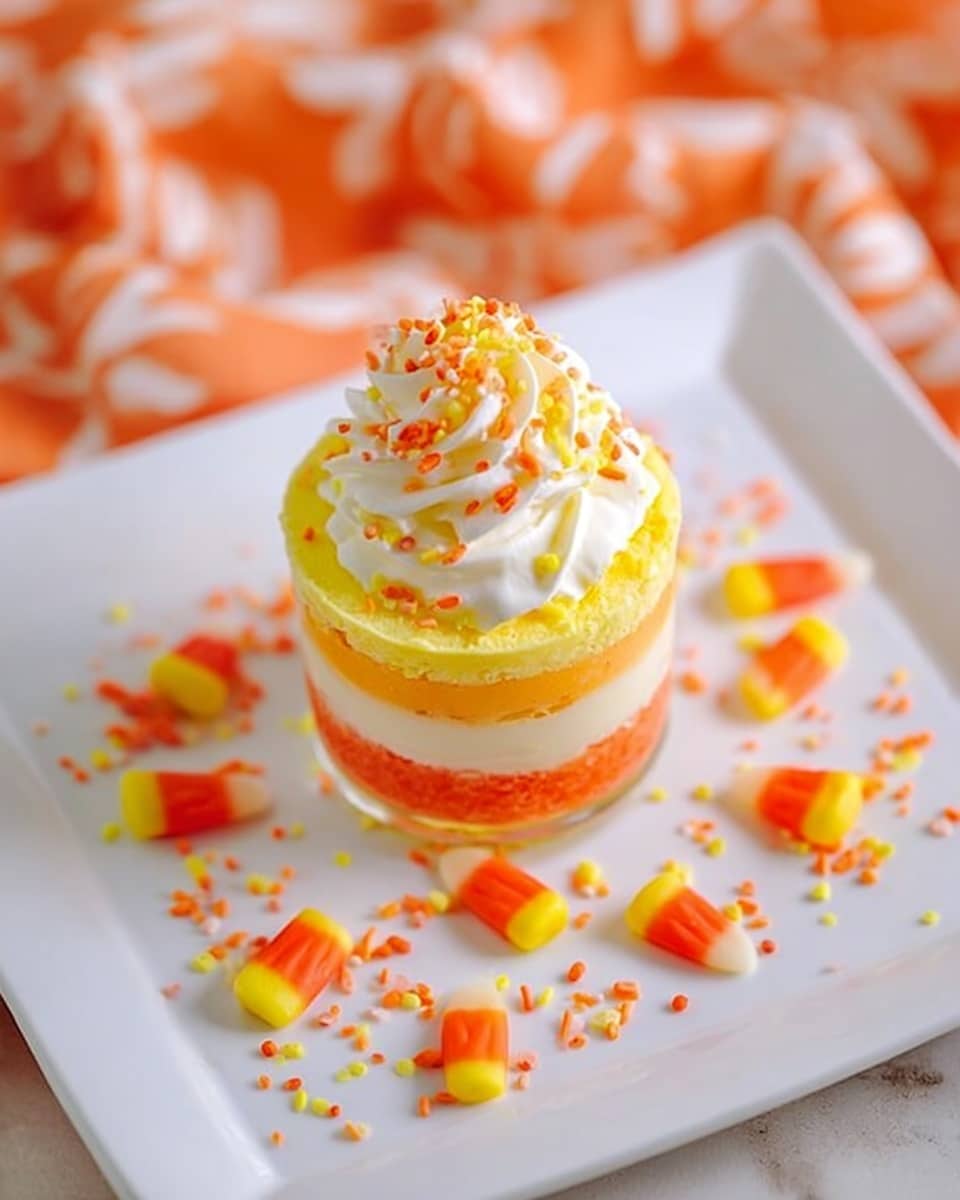
Now, stack your circles starting from the bottom with the red (or orange) layer, then yellow, then white. Spread a thin layer of frosting between each to help the layers stick and to keep the cake moist. The mini towers you create are utterly adorable and perfect for individual servings. If you want to get creative, finish with a little frosting swirl on top!
Pro Tips for Making Candy Corn Cakes and Cake Tutorial Recipe
- Use Gel Food Coloring: It creates more vibrant colors without watering down your batter, which happens often with liquid food color.
- Bake for Half the Time: Keeping an eye on baking time prevents dry thin layers—check your cakes early and often!
- Soften Butter Before Frosting: It’s worth the wait—softened butter turns your frosting creamy and spreads like a dream.
- Cut Even Layers: Taking a moment to even out your cake layers with a serrated knife gives your cakes a clean, professional look that really impresses.
How to Serve Candy Corn Cakes and Cake Tutorial Recipe
Garnishes
I usually keep garnishes simple to let the candy corn colors shine—sometimes just a light dusting of powdered sugar or a tiny edible gold star on top adds a festive touch. If you want extra texture, crushed candy corn pieces sprinkled around the serving plate is a sweet idea that guests love exploring.
Side Dishes
I like to pair these cakes with a cup of hot apple cider or pumpkin-spiced coffee to really get that cozy fall feeling going. Fresh whipped cream on the side also works beautifully if you want to add an extra creamy bite.
Creative Ways to Present
For parties, I’ve arranged these mini cakes on tiered dessert stands, which makes a dramatic, playful centerpiece. Another fun idea is placing each cake in a small cupcake liner for easy individual servings. During Halloween, adding tiny paper flags or themed picks on top makes them irresistibly cute!
Make Ahead and Storage
Storing Leftovers
I store leftover Candy Corn Cakes in an airtight container in the fridge—they keep wonderfully fresh for up to 3 days. To prevent the frosting from drying, I place a piece of parchment paper between layers if stacking leftovers.
Freezing
Freezing these cakes is a bit trickier because of the frosting, but it’s doable. I recommend freezing just the plain cake circles before assembly, wrapped tightly in plastic wrap and then foil. When you’re ready to enjoy, thaw them overnight in the fridge and then frost fresh. This keeps the texture and flavor spot on.
Reheating
Since these are frosted cakes, I don’t recommend reheating once assembled. If you’ve stored leftover unfrosted cake layers, you can warm them briefly in a microwave or oven before frosting for that just-baked feel.
FAQs
-
Can I use a homemade white cake recipe instead of a cake mix?
Absolutely! While I find cake mix super convenient and reliable for this recipe, any good white cake batter will work well. Just be sure to divide and color your batter evenly, and watch the baking time since your layers will be thinner than usual.
-
Why do you bake the cake layers for only half the time?
Since the layers are quite thin, baking fully would dry them out. Baking for half the time ensures the cake stays moist and tender, perfect for stacking in your candy corn towers.
-
Can I make these cakes ahead of time?
Definitely! You can bake the layers a day in advance and store them wrapped tightly to keep fresh. Assemble and frost on the day you plan to serve for the best texture and taste.
-
What type of frosting works best for the Candy Corn Cakes?
I recommend a vanilla buttercream made from softened butter, powdered sugar, and a splash of cream to get that smooth, spreadable consistency that holds your layers together without sliding.
-
How do I prevent the colors from bleeding during baking?
Using gel food coloring and mixing the colors well into the batter helps a lot. Also, avoid overmixing—stir just until combined to keep your colors vibrant and neat.
Final Thoughts
I absolutely love how these Candy Corn Cakes and Cake Tutorial Recipe turn out each time. They bring back such fun memories of Halloween parties and cozy autumn afternoons spent baking with family. If you’re looking for a way to wow your guests with something both playful and delicious, these little cake towers are just the ticket. Give them a try—you just might find a new seasonal tradition in the making!
Print
Candy Corn Cakes and Cake Tutorial Recipe
- Prep Time: 20 minutes
- Cook Time: 20 minutes
- Total Time: 70 minutes
- Yield: 5 cakes, 5 servings
- Category: Dessert
- Method: Baking
- Cuisine: American
Description
Candy Corn Cakes are a whimsical and festive Halloween treat featuring layers of cake in candy corn colors—white, yellow, and red—stacked to resemble the iconic candy corn shape. This recipe uses a simple white cake mix, customized with food coloring, and is frosted with a smooth buttercream that’s thinned to the perfect consistency for layering. These mini cake towers are perfect for parties and celebrations.
Ingredients
Cake Layers
- 1 white cake mix and ingredients listed on back of box
- Yellow food coloring
- Red food coloring
Frosting
- 1 1/2 sticks butter (softened)
- 1 lb powdered sugar
- 1 tsp pure vanilla extract
- Whipping cream or half-and-half – enough to thin frosting to desired consistency
Instructions
- Prepare Cake Batter: Mix together the white cake mix according to the directions on the back of the box until smooth and well combined.
- Divide and Color Batter: Divide the batter evenly into four separate bowls. Leave one bowl of batter plain white, then tint the remaining three bowls using yellow and red food coloring, following the food coloring chart to achieve the desired candy corn shades.
- Prepare Cake Pans: Grease, flour, and line four cake pans with wax paper to prevent sticking and ensure easy removal of the cake layers.
- Bake the Cake Layers: Pour the different colored batters into the prepared pans and bake for half the time specified on the back of the cake mix box to avoid over-baking since these layers will be cut and stacked.
- Cool and Level Layers: Remove the cake pans from the oven and allow the cakes to cool completely on a wire rack. Use a serrated knife to level the cake layers if they are uneven to ensure neat stacking.
- Cut Cake Circles: Using a biscuit cutter or the bottom of a drinking glass, cut out circles from the cake layers to form uniform mini cake rounds for stacking.
- Make Frosting: In a mixing bowl, beat the softened butter until creamy. Gradually add the powdered sugar and vanilla extract, mixing well. Add whipping cream or half-and-half a little at a time until the frosting reaches a spreadable, thin consistency perfect for layering the cake circles.
- Assemble the Candy Corn Cakes: Stack the cake circles in the order of candy corn colors—white on top, then yellow, then orange/red at the bottom—spreading the frosting evenly between each layer to create mini layered cake towers that resemble candy corn.
Notes
- Candy Corn Cakes are a perfect Halloween party treat, resembling the classic candy corn in a delicious mini cake form.
- To keep the cake layers neat and uniform, make sure to level them carefully before cutting out the circles.
- The frosting can be adjusted in thickness by adding more or less cream or half-and-half, depending on preference.
- These cakes can be stored in an airtight container in the refrigerator for up to 3 days.
- For added decoration, consider piping additional frosting or using sprinkles to enhance the festive look.
Nutrition
- Serving Size: 1 cake
- Calories: 742 kcal
- Sugar: 132 g
- Sodium: 721 mg
- Fat: 4 g
- Saturated Fat: 2 g
- Unsaturated Fat: 2 g
- Trans Fat: 1 g
- Carbohydrates: 175 g
- Fiber: 1 g
- Protein: 4 g
- Cholesterol: 1 mg


