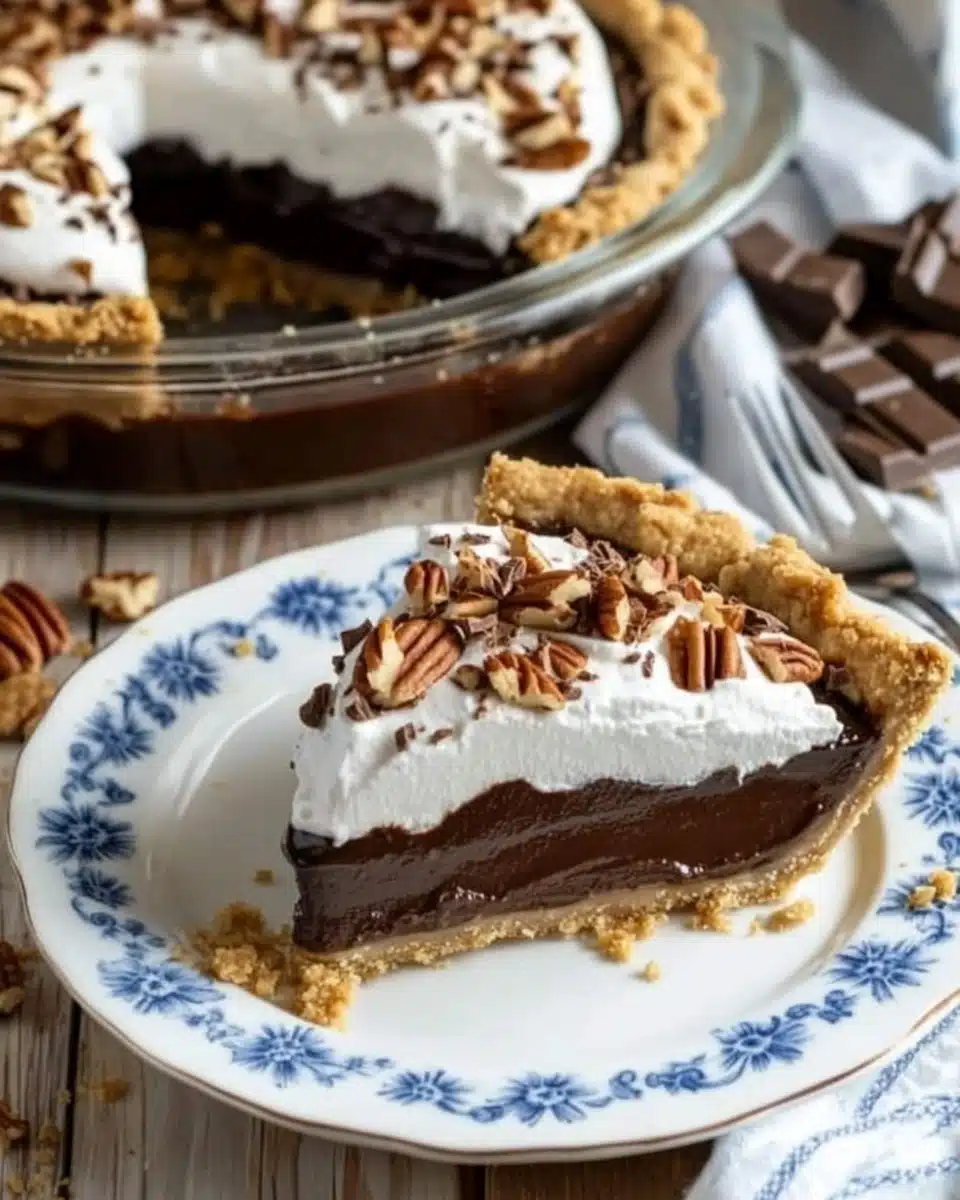
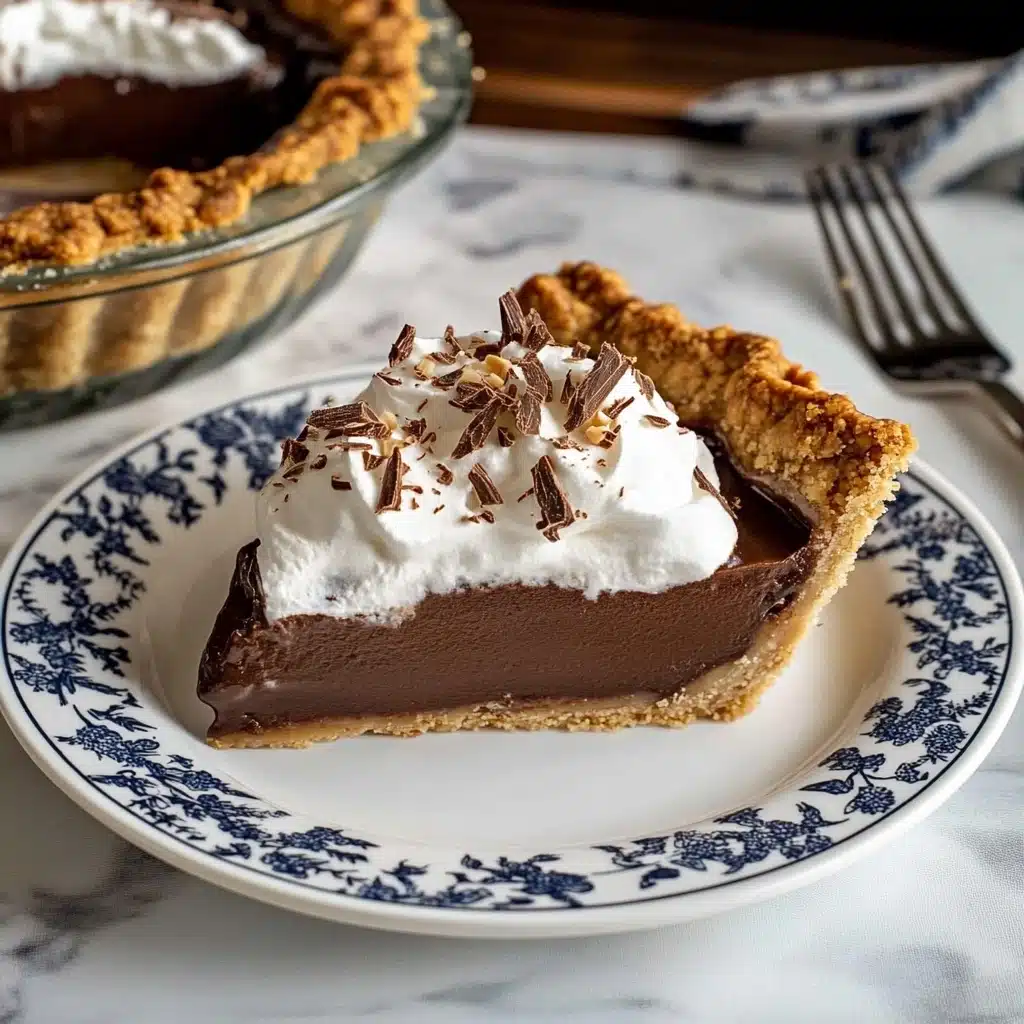
Creamy, dreamy, and deeply chocolatey, Chocolate Icebox Pie is the ultimate summertime dessert that everyone craves. With a luscious chocolate-marshmallow custard nestled inside a buttery graham cracker crust and finished with a cloud of whipped cream—this no-fuss classic always disappears in a flash!
Why You’ll Love This Recipe
- No-Bake Magic: Chill your way to dessert bliss—most of this dreamy pie sets up in the fridge, making it almost effortless.
- Irresistibly Creamy: Thanks to a marshmallow-custard filling and a generous crown of whipped cream, every bite melts on your tongue.
- Chocolatey & Nostalgic: The rich, old-fashioned chocolate filling tugs at the heartstrings—it’s just like the desserts Grandma made, but better!
- Customizable for Any Occasion: Dress it up or down with garnishes or flavor twists to suit birthdays, backyard BBQs, or holiday tables.

Ingredients You’ll Need
Every classic Chocolate Icebox Pie begins with simple pantry staples that become so much more together. Each ingredient plays a starring role—whether it’s the deep cocoa notes, the buttery crust, or the pillowy whipped cream that makes every slice irresistible.
- Graham cracker crumbs: The foundation of the crust! Graham cracker crumbs provide the sweet, slightly nutty base that holds up beautifully under the creamy filling.
- Unsalted butter: Soft, creamy butter binds the crumbs for that signature golden crust and adds rich flavor throughout.
- Granulated sugar: A little sugar enhances both the crust and the filling, keeping everything nimbly sweet but never cloying.
- Flour: Adds lush stability to the chocolate custard, ensuring just the right set.
- Unsweetened chocolate squares: The heart and soul of the filling! These bring deep, bittersweet intensity you can’t get from cocoa powder alone.
- Evaporated milk or heavy whipping cream: Pick your favorite! Either will make the filling smooth and decadent—the cream is extra-luxurious, while evaporated milk is classic and light.
- Egg yolks: For custardy richness and that beautiful, satiny consistency.
- Small marshmallows: The secret twist! They melt right in, thickening the filling and adding that hint of vanilla sweetness.
- Pecans and semisweet chocolate (for topping): A little crunch and extra chocolate to finish things off with a flourish.
- Heavy whipping cream (for whipped topping): Whipped to soft, snowy peaks, this cream is the crowning glory of the pie.
Variations
This Chocolate Icebox Pie invites customization—don’t be afraid to put your own spin on it! Quick tweaks can lean it toward the flavors you love most or help it fit different diets and celebrations.
- Use a Chocolate Cookie Crust: Swap graham crackers for chocolate wafer cookies or Oreos to double down on the chocolate decadence.
- Go Dairy-Free: Opt for coconut cream and vegan butter for both the filling and whipped topping, creating a luscious, plant-based pie.
- Nutty Add-Ins: Fold toasted coconut or almonds into the topping for extra crunch and flavor.
- Salted Caramel Finish: Drizzle warm salted caramel over the whipped cream for a salted-sweet twist that takes this pie to the next level.
How to Make Chocolate Icebox Pie
Step 1: Make the Graham Cracker Crust
Begin by preheating your oven to 375°F. In a small mixing bowl, stir together the graham cracker crumbs, softened butter, and sugar until everything looks evenly moistened and resembles wet sand. Pat this gorgeous mixture firmly into your pie plate, pressing up the sides for good coverage. Pop in the oven for just 8 minutes until golden and set—then let it cool completely as you move on to the filling.
Step 2: Whisk Together the Custard Filling
In a small saucepan, combine 2/3 cup sugar, salt, and flour. Melt your chocolate squares in the microwave (in a microwave-safe bowl, short 20-second bursts) or a double boiler; stir until smooth. Whisk the melted chocolate into your dry mixture along with the evaporated milk or heavy cream. Add 1 cup water and lightly beaten egg yolks, whisking again—then place over medium-low heat.
Step 3: Cook and Thicken the Custard
This is the “cozy kitchen” part: Cook the mixture, whisking gently but constantly, for 10-15 minutes. Watch as it gradually thickens and transforms into a rich, glossy chocolate custard. When the mixture becomes thick enough to coat your whisk—and you see tiny lumps starting to form—it’s ready. Remove it from the heat immediately so it doesn’t scorch.
Step 4: Enrich with Marshmallows & Butter
Stir in the remaining butter and toss in the marshmallows. As you fold them in, they’ll gently melt into the custard, adding body and a heavenly hint of vanilla. Let the mixture return to room temperature so it’s easy to pour and spread in your crust.
Step 5: Fill, Chill, and Set
Pour the cooled chocolate filling into your prepared graham cracker crust. Set the entire pie—uncovered—in the refrigerator for at least 6 hours, or preferably overnight. This patience is well worth it: your Chocolate Icebox Pie will slice cleanly and beautifully once set.
Step 6: Top with Whipped Cream & Garnishes
About 1 ½ hours before serving, whip together heavy cream and sugar to soft, fluffy peaks. Spread (or pipe, if you’re feeling fancy) an even layer over your pie. Finish with a scatter of chocolate shavings and chopped pecans—then refrigerate one hour longer so everything melds together perfectly before slicing and serving.
Pro Tips for Making Chocolate Icebox Pie
- Custard Success: Keep whisking the filling continuously as it cooks—don’t walk away! This prevents lumps and gives you the dreamiest, smoothest texture.
- Perfect Marshmallow Melt: Add your marshmallows to the hot custard and give them a good stir; they’ll melt cleanly for a silky filling, or leave a few partially intact for a fun “rocky road” bite.
- Nail the Whipped Cream: Chill both your mixing bowl and beaters before whipping the cream—this little trick helps it thicken up quickly and hold shape when spread or piped.
- Slice Smart: Run a sharp knife under hot water before slicing your Chocolate Icebox Pie for bakery-perfect wedges every single time.
How to Serve Chocolate Icebox Pie
Garnishes
Your Chocolate Icebox Pie already has a show-stopping whipped cream crown, but that doesn’t mean you can’t get playful! Add extra chocolate shavings, a few whole pecans, or a dusting of cocoa powder for added flair. If you love a burst of color, fresh berries or even edible flowers take things over the top in the prettiest way.
Side Dishes
This pie is a star all on its own, but it’s also right at home alongside a cup of strong coffee or a tall glass of cold milk. On warm days, a scoop of vanilla bean ice cream on the side is a classic pairing—and if you’re feeding a crowd, a colorful fruit salad alongside compliments the richness perfectly.
Creative Ways to Present
Who says pie has to be round? Try making Chocolate Icebox Pie as mini tartlets in a muffin tin for adorable single-serve treats. Or, layer the filling and whipped topping into small jars or parfait glasses for a playful, portable version—perfect for picnics and parties. A drizzle of caramel or chocolate sauce right before serving can take even a humble slice to new heights.
Make Ahead and Storage
Storing Leftovers
To keep your Chocolate Icebox Pie slices as fresh as possible, store them (or the whole pie) in the refrigerator, covered loosely with foil or plastic wrap. It’ll stay delicious for up to 4 days—though let’s be honest, it rarely lasts that long!
Freezing
You can absolutely freeze Chocolate Icebox Pie! Wrap the (unwhipped) pie tightly in plastic and foil. Thaw overnight in the refrigerator, then add fresh whipped cream and toppings before serving for best taste and texture.
Reheating
This pie is meant to be enjoyed chilled—no reheating needed! In fact, serving it cold is what defines an icebox pie. If you prefer a slightly softer filling, let the pie sit at room temperature for 10 minutes before slicing.
FAQs
-
Can I use ready-made pie crust instead of homemade?
Absolutely! A store-bought graham cracker or chocolate cookie crust saves time and still delivers fantastic results. Just be sure to let it cool completely before adding your filling, and you’re good to go.
-
Is it safe to use raw eggs in the filling?
This Chocolate Icebox Pie filling is cooked gently on the stovetop, so the eggs are safely cooked into the custard. Just be sure to follow the timing and keep whisking for a smooth, safe result.
-
Can I make Chocolate Icebox Pie ahead of time?
Yes—this dessert practically begs to be made in advance! You can assemble the crust and filling a day or two ahead and keep covered in the fridge. Add the whipped cream and toppings shortly before serving for the freshest taste.
-
What’s the best way to slice the pie cleanly?
For neat bakery-style wedges, use a very sharp knife that’s been dipped in hot water (and wiped dry). Clean the blade between slices to keep every piece picture-perfect.
Final Thoughts
If you’re searching for a showstopping, nostalgic treat that’s as easy as it is delicious, Chocolate Icebox Pie is pure happiness on a plate. Gather your supplies, invite a friend or two to help, and get ready for rave reviews—few desserts deliver so much joy for so little effort. Can’t wait to see how you make it your own!
Print
Chocolate Icebox Pie Recipe
- Prep Time: 15 minutes
- Cook Time: 8 hours
- Total Time: 8 hours 15 minutes
- Yield: 10 servings
- Category: Baking
- Method: Oven
Description
Indulge in this decadent Chocolate Icebox Pie, a rich and creamy dessert with a graham cracker crust and a luscious chocolate filling topped with whipped cream, chocolate shavings, and pecans.
Ingredients
Crust
- 1 1/3 cups graham cracker crumbs
- 5 tablespoons unsalted butter, room temperature
- 1/4 cup granulated sugar
Filling
- 2/3 cup + 2 tablespoons granulated sugar, divided
- 1/8 teaspoon salt
- 5 tablespoons flour
- 1 3/4 squares unsweetened chocolate
- 12 ounces evaporated milk or 1/2 cup heavy whipping cream (1 can)
- 2 large egg yolks, lightly beaten
- 2 cups small marshmallows
- 1/4 cup unsalted butter
- 1 cup heavy whipping cream
- Semisweet chocolate for grating
- 2 tablespoons chopped pecans
Instructions
- Make Crust – Preheat oven to 375 degrees F. Combine graham cracker crumbs, butter, and sugar. Press into a pie dish and bake for 8 minutes. Cool.
- Make Filling – Combine sugar, salt, flour, and melted chocolate in a saucepan. Add milk/cream, water, and egg yolks. Cook until thickened. Stir in butter and marshmallows. Fill crust and chill.
- Whip Cream – Whip cream with sugar until fluffy. Spread on pie. Top with chocolate shavings and pecans. Chill before serving.
Notes
- You will also need: small and medium mixing bowls, 9-inch pie plate or dish, small saucepan, whisk, electric mixer, spatula, grater
- Recipe tested with regular and kosher marshmallows, both yielding delicious results.
Nutrition
- Serving Size: 1 slice
- Calories: 380
- Sugar: 25g
- Sodium: 180mg
- Fat: 24g
- Saturated Fat: 14g
- Unsaturated Fat: 8g
- Trans Fat: 0g
- Carbohydrates: 40g
- Fiber: 2g
- Protein: 5g
- Cholesterol: 85mg


