
If you’re looking to add a whimsical, festive treat to your holiday table, the Christmas Meringue Trees Recipe is absolutely fan-freaking-tastic! I love how these delicate, light-as-air meringue trees look like little snowy Christmas wonders, and they’re surprisingly simple to make. Once you try this recipe, you’ll find that not only do they taste delightful, but they also make an impressive centerpiece dessert or party favor that’ll have your guests asking for your secret!
Why You’ll Love This Recipe
- Simple Ingredients: Uses basic pantry staples, so no special shopping trips needed.
- Impressive Presentation: These trees look stunning on the table and really wow guests.
- Light & Airy Texture: Perfectly crisp outside and melt-in-your-mouth inside every time.
- Great for Holiday Traditions: A fun activity to do with family or friends that also makes a delicious treat.

Ingredients You’ll Need
Each ingredient in this Christmas Meringue Trees Recipe plays a key role to ensure those meringues achieve that perfect, glossy, sturdy finish — plus the green gel gives it that charming holiday vibe. I always recommend using room temperature eggs because they whip up into stiff peaks easier and faster, saving you some precious prep time during the busy season.

- Egg whites: Make sure they’re at room temperature for better volume and stability.
- Cream of tartar: This little acid stabilizes the egg whites, helping them hold their shape beautifully.
- Granulated sugar: Slowly adding sugar is key for a smooth, glossy meringue without graininess.
- Green gel food colouring: Gel works best because it adds vibrant color without thinning the mixture.
- Sprinkles: Pick festive shapes and colors to add that perfect Christmas finishing touch.
Variations
I love how versatile this Christmas Meringue Trees Recipe is, so don’t hesitate to customize it based on your style or dietary preferences — that’s the fun of holiday baking! Play around with colors, flavors, or even toppings to make these your own.
- Color Variations: I’ve tried bright red or icy blue meringue trees, which look magical and fit different holiday themes perfectly.
- Flavor Twists: Adding a drop of peppermint or almond extract to the meringue makes them smell as good as they look; my family goes crazy for the peppermint twist!
- Dietary Modifications: Since it’s naturally gluten-free, it works great for guests with sensitivities — just check your sprinkles to keep them allergy-friendly.
- Mini vs. Large: You can pipe smaller trees for bite-sized treats or make single large meringue “trees” for a dramatic centerpiece.
How to Make Christmas Meringue Trees Recipe
Step 1: Whip the Egg Whites to Frothy Perfection
Start by preheating your oven to 200°F and lining your baking sheet with parchment paper — this makes a big difference for easy removal later. In a clean, large bowl, beat the room temperature egg whites with cream of tartar on medium speed until it’s frothy and looks like cappuccino foam. When I first tried this, I skipped the cream of tartar and realized the peaks weren’t as stable, so don’t skip this step if you want success!
Step 2: Gradually Add Sugar and Beat to Stiff Peaks
Slowly add the sugar, one spoonful at a time, beating well after each addition. This prevents sugar from weighing down the whites and helps achieve that glossy texture. Keep mixing until stiff peaks form — when you lift the whisk, the meringue should stand tall without drooping. If you see any graininess, keep beating a bit longer until fully dissolved.
Step 3: Add Green Food Coloring and Pipe Your Trees
Add a few drops of green gel coloring and mix gently but thoroughly until you get an even color. Transfer the meringue to a piping bag fitted with a large star tip — this tip helps create the tree’s lovely textured layers. Pipe three dollops on top of each other for each tree, starting with the largest dollop at the bottom and getting smaller toward the top, resembling a fir tree. Don’t forget to add sprinkles right away so they stick!
Step 4: Bake Low and Slow, Then Cool
Bake your meringue trees for about 45-50 minutes until the sides are dry and the bottoms lift cleanly from the parchment. I discovered this trick when one batch stuck terribly — that peel-away test is your friend! Once baked, turn off the oven and either leave the meringues inside overnight or crack the door open and cool for an hour. This slow cooling prevents cracks and keeps them crisp.
Pro Tips for Making Christmas Meringue Trees Recipe
- Use Fresh Eggs: Fresher eggs whip better with more volume — it really does make a difference! I learned this after struggling with flat meringues once.
- Avoid Any Yolk Contamination: Even a tiny bit of yolk will prevent egg whites from whipping properly, so separate carefully.
- Don’t Skip Slow Sugar Addition: Adding sugar too fast or all at once creates a grainy texture; slow and steady wins the fluffy, smooth meringue.
- Cool Slowly Inside Oven: Rapid cooling causes cracks — I always leave them overnight inside the turned-off oven, and it’s a game changer.
How to Serve Christmas Meringue Trees Recipe

Garnishes
I love to add a variety of sprinkles—red and white nonpareils, tiny edible pearls, or silver dragées—to each tree for a festive sparkle. Sometimes, I dust them lightly with powdered sugar right before serving for a freshly fallen snow effect. It brings the magic of the holidays right onto my dessert plate!
Side Dishes
Since these meringue trees are crisp and sweet, I like to serve them alongside a rich hot chocolate or a warm cup of mulled wine to balance the flavors. They also pair beautifully with fresh berries or a scoop of vanilla ice cream for a fun holiday contrast.
Creative Ways to Present
For our Christmas parties, I’ve arranged multiple meringue trees on a festive platter layered with edible greenery or even placed them atop frosted cupcakes to turn them into little tree toppers. I also love tying a set of three with a holiday ribbon and gifting them as charming homemade presents.
Make Ahead and Storage
Storing Leftovers
Once completely cooled, I store leftover meringue trees in an airtight container at room temperature — this keeps them crisp for up to a week. Avoid the fridge as moisture ruins their texture.
Freezing
If you want to make these ahead of time (and who wouldn’t?), meringues freeze beautifully. I wrap them individually in parchment paper and store them in a freezer-safe container. When ready to serve, I thaw them at room temperature and they keep that perfect crunch.
Reheating
Generally, these meringue trees don’t need reheating. If they lose a bit of their crispness, pop them in a cool oven (around 200°F) for 5-10 minutes to refresh their texture without melting them — trust me, it works wonders!
FAQs
-
Can I use powdered sugar instead of granulated sugar in this Christmas Meringue Trees Recipe?
While granulated sugar is traditional and creates the best stability and texture, you can substitute superfine or caster sugar, which dissolves more easily. Powdered sugar contains cornstarch and may affect the texture, potentially making the meringues less crisp, so I wouldn’t recommend it if you want a classic finish.
-
Why is my meringue weeping or sticky after baking?
If your meringue is sticky, it usually means it wasn’t baked long enough or the oven temperature was too high. Bake low and slow, and make sure they dry out fully. Also, avoid humidity when making and storing meringues — I always check the weather before planning to bake them!
-
Can I use a different color for these meringue trees?
Absolutely! While green is traditional for Christmas trees, you can get creative with red, white, blue, or even gold. Just be sure to use gel food coloring to keep the meringue’s consistency intact.
-
What type of piping tip should I use for the best tree shape?
I recommend a large star tip — it creates beautiful ridges and texture that resemble pine needles. It also helps the layers stick together nicely when piping the stacked dollops.
Final Thoughts
This Christmas Meringue Trees Recipe is one of those delightful discoveries that combines simplicity with a wow factor. I love how it turns out so beautifully every time, and I hope you’ll enjoy baking (and eating!) them as much as I do. Whether you’re new to meringue or a seasoned pro, this recipe brings a festive sparkle to your holiday baking that feels like a warm kitchen hug. Trust me, once you make these cute little trees, they’ll become an annual tradition you can’t wait to share with loved ones.
Print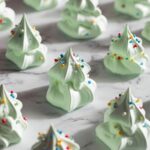
Christmas Meringue Trees Recipe
- Prep Time: 30 minutes
- Cook Time: 50 minutes
- Total Time: 2 hours 20 minutes
- Yield: 30 meringues
- Category: Dessert
- Method: Baking
- Cuisine: Western
- Diet: Vegetarian
Description
These festive Meringue Christmas Trees are light, airy, and perfectly sweet treats to celebrate the holiday season. Whipped egg whites are transformed into fluffy, green-colored meringue dollops stacked to resemble Christmas trees, topped with colorful sprinkles. Baked low and slow to achieve a crisp exterior and melt-in-your-mouth texture, these delightful meringues are a charming addition to any holiday dessert table.
Ingredients
For the Meringue
- 2 large egg whites, room temperature
- ¼ teaspoon cream of tartar
- 100 g granulated sugar
- Green gel food colouring (few drops)
- Sprinkles for decoration
Instructions
- Preheat Oven and Prepare Baking Sheet: Preheat your oven to 200°F (93°C) and line a baking sheet with parchment paper to prevent sticking and ensure even baking.
- Beat Egg Whites: In a large mixing bowl, use an electric hand mixer or a stand mixer fitted with a whisk attachment to beat the egg whites and cream of tartar on medium speed until the mixture becomes frothy and resembles cappuccino foam. This initial aeration step is crucial for volume.
- Add Sugar Gradually: Add the granulated sugar one tablespoon at a time, beating well after each addition. Continue this process until all the sugar is incorporated and the mixture forms stiff, glossy peaks that hold their shape firmly.
- Color the Meringue: Add a few drops of green gel food colouring and gently mix until the color is evenly distributed throughout the meringue without deflating it.
- Pipe the Meringue Trees: Transfer the colored meringue into a piping bag fitted with a large star tip. Pipe three dollops on top of each other on the prepared baking sheet, starting with the largest dollop at the base and progressively smaller dollops on top, creating a tree shape. Decorate each dollop with sprinkles while the meringue is still soft.
- Bake and Dry the Meringues: Bake for 45-50 minutes or until the sides of the meringues are dry and the bottoms lift cleanly off the parchment paper. This slow baking at a low temperature helps the meringue dry out without browning.
- Cool the Meringues: After baking, turn off the oven. You can either leave the meringues inside to cool overnight with the oven door closed or crack the oven door open and let them cool for about 1 hour. Make sure they are completely cooled before storing to maintain their crisp texture.
Notes
- Ensure egg whites are at room temperature to maximize volume when whipping.
- Adding sugar gradually is essential for achieving stiff peaks and a glossy finish.
- Use gel food coloring to avoid adding excess liquid which could destabilize the meringue.
- Cooling meringues slowly helps prevent cracking and maintains crispness.
- Store meringues in an airtight container to keep them crisp for several days.
- Feel free to customize decorations with edible glitter or colored sugar instead of sprinkles.
Nutrition
- Serving Size: 1 meringue
- Calories: 18
- Sugar: 4.5 g
- Sodium: 5 mg
- Fat: 0 g
- Saturated Fat: 0 g
- Unsaturated Fat: 0 g
- Trans Fat: 0 g
- Carbohydrates: 4.5 g
- Fiber: 0 g
- Protein: 0.3 g
- Cholesterol: 0 mg

