
If you’re looking for the ultimate holiday treat, you’ve got to try this Christmas Sugar Cookies with Easy Icing Recipe. I absolutely love how these cookies come out perfectly crisp on the edges but soft and tender in the center—just the way a sugar cookie should be. Pair that with a smooth, glossy icing that’s as simple to make as it is delicious, and you’ve got yourself a festive classic everyone will go crazy for. Keep reading because I’m sharing all my tips to help you nail these every time!
Why You’ll Love This Recipe
- Perfect Texture: Crisp edges with soft centers make these cookies irresistible.
- Easy Icing: The simple icing recipe is foolproof and dries beautifully for decorating.
- Make-Ahead Friendly: Dough chills well and cookies keep fresh for days.
- Customizable: Add almond extract or color your icing to match your holiday vibe.

Ingredients You’ll Need
The magic of these Christmas sugar cookies starts with simple pantry staples that blend together to create that perfect dough. Each ingredient plays a key role—from tenderizing the dough to giving it flavor and structure. Let me walk you through what I like to use and why.
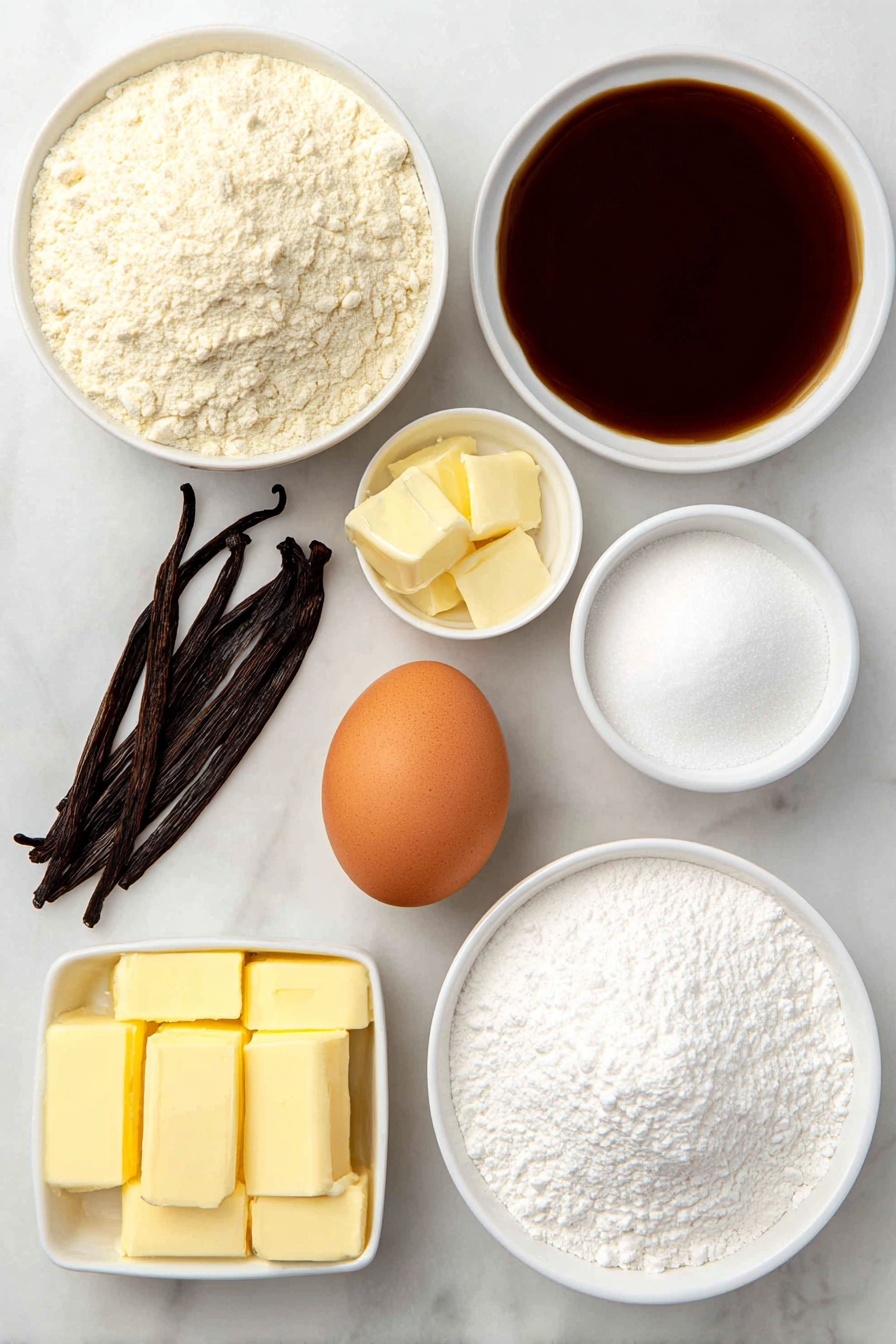
- All-purpose flour: The base of the dough; spooned and leveled ensures you don’t accidentally add too much.
- Baking powder: Gives a slight lift for a soft center without being cakey.
- Salt: Just a pinch to balance sweetness and enhance flavor.
- Unsalted butter: Softened to room temperature for easy creaming and rich taste.
- Granulated sugar: Sweetens and helps create those iconic cookie edges.
- Large egg: Binds ingredients and adds moisture; room temp egg blends better.
- Pure vanilla extract: Classic flavor boost, absolutely essential.
- Almond extract (optional): I discovered this trick adding just a bit makes the flavor outstanding and festive.
- Confectioners’ sugar: For silky smooth icing that’s easy to pipe or dip.
- Light corn syrup: Adds shine and prevents icing from cracking.
- Water: Helps reach the perfect icing consistency.
- Salt (for icing): Optional pinch enhances the sweetness and balances flavors.
- Gel food coloring & sprinkles: For fun decorating—go bold or subtle, it’s up to you!
Variations
I love personalizing this Christmas Sugar Cookies with Easy Icing Recipe to suit different occasions or moods. It’s simple to tweak based on what you have in your pantry or your family’s favorites, so don’t be shy about experimenting!
- Almond Extract Swap: I often swap almond extract for orange or lemon extract to add a bright twist—it changes the whole cookie vibe.
- Gluten-Free Version: Replace all-purpose flour with a 1:1 gluten-free blend; just be mindful the texture might be a little different but still delish.
- Vegan Adaptation: Use vegan butter and a flax egg in place of the large egg, then proceed as usual.
- Decorating Styles: Try leaving cookies plain for a rustic look or go all out with multiple icing colors and festive sprinkles.
How to Make Christmas Sugar Cookies with Easy Icing Recipe
Step 1: Cream Butter and Sugar Until Dreamy
Start by beating the softened butter and granulated sugar on high speed for about 3 minutes until the mixture is silky and smooth. I like to scrape down the bowl halfway through to make sure everything blends evenly—this creaming step is key to light, tender cookies. If you’ve never creamed butter and sugar before, think of it as whipping tiny air bubbles into the fat, which makes for a fluffier cookie.
Step 2: Mix in Eggs and Extracts
Next, add your egg along with vanilla and that optional almond extract. Beat it well—about a minute—until the mixture is uniform and luscious. I love the almond extract here; it adds a subtle but festive depth that I swear makes these cookies unforgettable.
Step 3: Combine Dry Ingredients and Chill the Dough
Whisk your flour, baking powder, and salt in a separate bowl, then slowly mix them into your wet ingredients on low speed. The dough will be a bit soft but manageable. If it feels too sticky to roll out, sprinkle in another tablespoon of flour—just enough so it behaves without drying it out.
Divide the dough into two discs, roll each between lightly floured parchment sheets to 1/4-inch thickness, stack them with parchment to prevent sticking, then chill for at least 1-2 hours. Here’s what I learned: chilling isn’t just about flavor; it helps with clean cookie cuts and prevents excessive spreading in the oven.
Step 4: Cut and Bake Your Cookie Shapes
When chilled, preheat your oven to 350°F (177°C). Use your favorite cookie cutters to shape the dough, then bake about 11-12 minutes or until the edges are just starting to turn golden. Pro tip: if your oven has hot spots like mine, rotate the pans halfway for even baking. Once out of the oven, let them rest on the baking sheet for 5 minutes before moving to a wire rack—this step keeps them from breaking and helps avoid undercooked middles.
Step 5: Whip Up the Easy Icing
While your cookies cool completely, make the icing by mixing sifted confectioners’ sugar with vanilla (or water for super white icing), corn syrup, water, and a pinch of salt. It starts outrageously thick, so whisk in small amounts of water until you get a drizzly but still pipeable consistency—you’ll know it’s perfect when the icing falls in ribbons and holds shape momentarily.
If you plan to decorate with colors, add gel food coloring sparingly—1 or 2 drops at a time—because the color deepens as it dries. You can do a simple dip, use squeeze bottles, or pipe outlines and fill them in. If you’re going for sprinkles, add them while the icing is still wet.
Pro Tips for Making Christmas Sugar Cookies with Easy Icing Recipe
- Butter Temperature Matters: Make sure your butter is soft but not melted; it creams better and yields the best texture.
- Don’t Skip Chilling: I learned the hard way that unchilled dough spreads too much and loses those pretty shapes.
- Icing Consistency Check: Use the ribbon test—lift your whisk; icing should drip slowly and hold shape a moment.
- Store Properly: Avoid stacking decorated cookies until icing fully dries, or they’ll stick and smudge.
How to Serve Christmas Sugar Cookies with Easy Icing Recipe

Garnishes
I like to keep it classic with colored sugar, festive sprinkles, and sometimes edible glitter for a little sparkle. It’s amazing how a sprinkle or two can elevate homemade cookies into a holiday showstopper. My family particularly loves multi-colored nonpareils—they add crunch and a pop of color.
Side Dishes
These sugar cookies go wonderfully alongside a cozy cup of hot cocoa or spiced apple cider. I often serve them on dessert trays with a variety of chocolates and nuts, making the whole spread feel festive and inviting.
Creative Ways to Present
One year, I arranged these cookies in a wreath shape on a platter lined with fresh pine branches and holly—instantly festive and perfect for the coffee table. Another idea is packaging them in clear cellophane bags tied with red ribbon for easy gift-giving that shows off your beautiful icing work.
Make Ahead and Storage
Storing Leftovers
After my first batch, I realized storing these cookies at room temperature, in an airtight container layered with parchment, keeps them fresh and soft for up to 5 days. If you want them a little firmer, refrigerate up to 10 days—just let them come back to room temp before enjoying.
Freezing
I’ve frozen both unbaked dough discs and fully decorated cookies. For dough, wrap tightly and freeze up to 3 months—let thaw overnight in the fridge before rolling. Decorated cookies freeze best after the icing has fully set; just layer well with parchment and thaw at room temperature to avoid condensation messing with your icing.
Reheating
I usually let cookies sit at room temperature, but if you want a warm cookie experience, a quick 10-second zap in the microwave does the trick—just enough to soften without melting the icing.
FAQs
-
Can I make the cookie dough ahead of time?
Absolutely! In fact, chilling the dough for at least 1-2 hours or up to 2 days helps the cookies hold their shape and deepens the flavor. Just keep it tightly wrapped in the fridge.
-
How do I know when the icing is the right consistency?
Use the ribbon test: lift your whisk after mixing the icing; it should drip slowly and form a ribbon that holds its shape for a few seconds before blending back in. If it’s too thick, add a tiny bit more water; if too thin, add more confectioners’ sugar.
-
Can I use other extracts besides almond?
Yes! I love swapping almond for lemon, orange, or even peppermint extract for different flavor profiles. Just use sparingly as extracts can be strong.
-
How long does the icing take to fully dry?
It usually takes about 24 hours for the icing to harden completely. You can speed this up slightly by refrigerating the decorated cookies on a baking sheet, but don’t cover them while drying or condensation can affect the finish.
Final Thoughts
I used to struggle with sugar cookie recipes that either spread too much or left me with dry, flat cookies, but this Christmas Sugar Cookies with Easy Icing Recipe changed everything for me. It’s approachable, reliable, and the icing is just the right balance of sweet and shiny without any fuss. Whether you’re baking with kids or prepping a batch for friends, this recipe is a winner that spreads holiday cheer one bite at a time. I can’t wait for you to try it and make these cookies your new holiday tradition!
Print
Christmas Sugar Cookies with Easy Icing Recipe
- Prep Time: 2 hr
- Cook Time: 12 min
- Total Time: 2 hr 10 min
- Yield: 24 cookies (3-inch size) and 1.5 cups icing
- Category: Dessert
- Method: Baking
- Cuisine: American
- Diet: Vegetarian
Description
This Christmas Sugar Cookies recipe features classic cut-out cookies with crisp edges and soft centers, perfect for holiday decorating. The easy icing is simple to make and sets beautifully, allowing for vibrant colors and festive designs. Ideal for gifting or holiday parties, these cookies combine buttery, vanilla-scented dough with a smooth, sweet glaze that hardens to a professional finish.
Ingredients
Cookie Dough
- 2 and 1/4 cups (281g) all-purpose flour (spooned and leveled), plus more as needed for rolling and work surface
- 1/2 teaspoon baking powder
- 1/4 teaspoon salt
- 3/4 cup (12 Tbsp; 170g) unsalted butter, softened to room temperature
- 3/4 cup (150g) granulated sugar
- 1 large egg, at room temperature
- 2 teaspoons pure vanilla extract
- 1/4 or 1/2 teaspoon almond extract (optional, but makes the flavor outstanding)
Easy Icing
- 3 cups (360g) confectioners’ sugar
- 1/2 teaspoon pure vanilla extract (omit and replace with water for stark white icing)
- 2 teaspoons light corn syrup
- 4.5–5 Tablespoons (67–75ml) room temperature water
- Pinch salt (optional)
- Optional: gel food coloring & sprinkles for decorating
Instructions
- Prepare the Dry Ingredients: Whisk the flour, baking powder, and salt together in a medium bowl and set aside to mix the base for the cookie dough.
- Cream Butter and Sugar: In a large bowl, using a handheld or stand mixer fitted with a paddle attachment, beat the softened butter and granulated sugar on high speed until completely smooth and creamy, about 3 minutes, ensuring a light and fluffy texture.
- Add Wet Ingredients: Beat in the egg, vanilla extract, and optional almond extract on high speed for about 1 minute. Scrape the bowl sides and bottom to incorporate all ingredients evenly.
- Combine Wet and Dry Ingredients: Gradually mix the dry ingredients into the wet mixture on low speed until just combined. The dough will be soft; add an extra tablespoon of flour if it is too sticky for rolling.
- Divide and Roll Dough: Split the dough into two equal parts. Roll each portion out on lightly floured parchment or silicone mats to an even 1/4-inch thickness, ensuring ease in cookie cutting.
- Stack and Chill: Dust one rolled dough lightly with flour, cover with parchment, then place the second rolled dough on top. Cover with plastic wrap or foil and refrigerate for 1–2 hours or up to 2 days to firm up the dough for cleaner cuts.
- Preheat Oven and Prepare Baking Sheets: Heat your oven to 350°F (177°C). Line baking sheets with parchment paper or silicone mats to prevent sticking.
- Cut and Arrange Cookies: Remove the top dough from the fridge, carefully separate if stuck, and cut into shapes with cookie cutters. Re-roll scraps as needed. Place cookies about 3 inches apart on baking sheets.
- Bake: Bake cookies for 11–12 minutes or until edges are just lightly browned. Rotate sheets halfway if your oven has hot spots. Cool cookies on the sheets for 5 minutes, then transfer to wire racks to cool completely.
- Make the Icing: In a medium bowl, fork-stir confectioners’ sugar, vanilla extract, corn syrup, 4.5 Tbsp water, and optional salt. Whisk in additional 0.5 Tbsp water if too thick until the icing ribbons slightly when drizzled, indicating the right consistency.
- Color and Decorate: Add gel food coloring a drop at a time to tint icing. Decorate cookies using dipping, squeeze bottles, or piping bags, outlining first then filling in. Add sprinkles immediately after icing application if desired.
- Set and Store: Allow icing to dry completely for 24 hours for best finish. Decorated cookies can be stored covered at room temperature for up to 5 days or refrigerated up to 10 days.
Notes
- Cookies have crisp edges with soft, tender centers, ideal for cut-outs.
- The almond extract in the dough enhances the flavor but is optional.
- Icing sets solid in about 24 hours, perfect for gifting and stacking.
- Decorating tips: outline cookies with icing first and then flood for a smooth finish.
- Refrigerate decorated cookies on a baking sheet to speed up icing setting.
Nutrition
- Serving Size: 1 cookie with icing (approx. 40g)
- Calories: 150
- Sugar: 14g
- Sodium: 60mg
- Fat: 7g
- Saturated Fat: 4.5g
- Unsaturated Fat: 2g
- Trans Fat: 0g
- Carbohydrates: 21g
- Fiber: 0.5g
- Protein: 1.5g
- Cholesterol: 25mg


