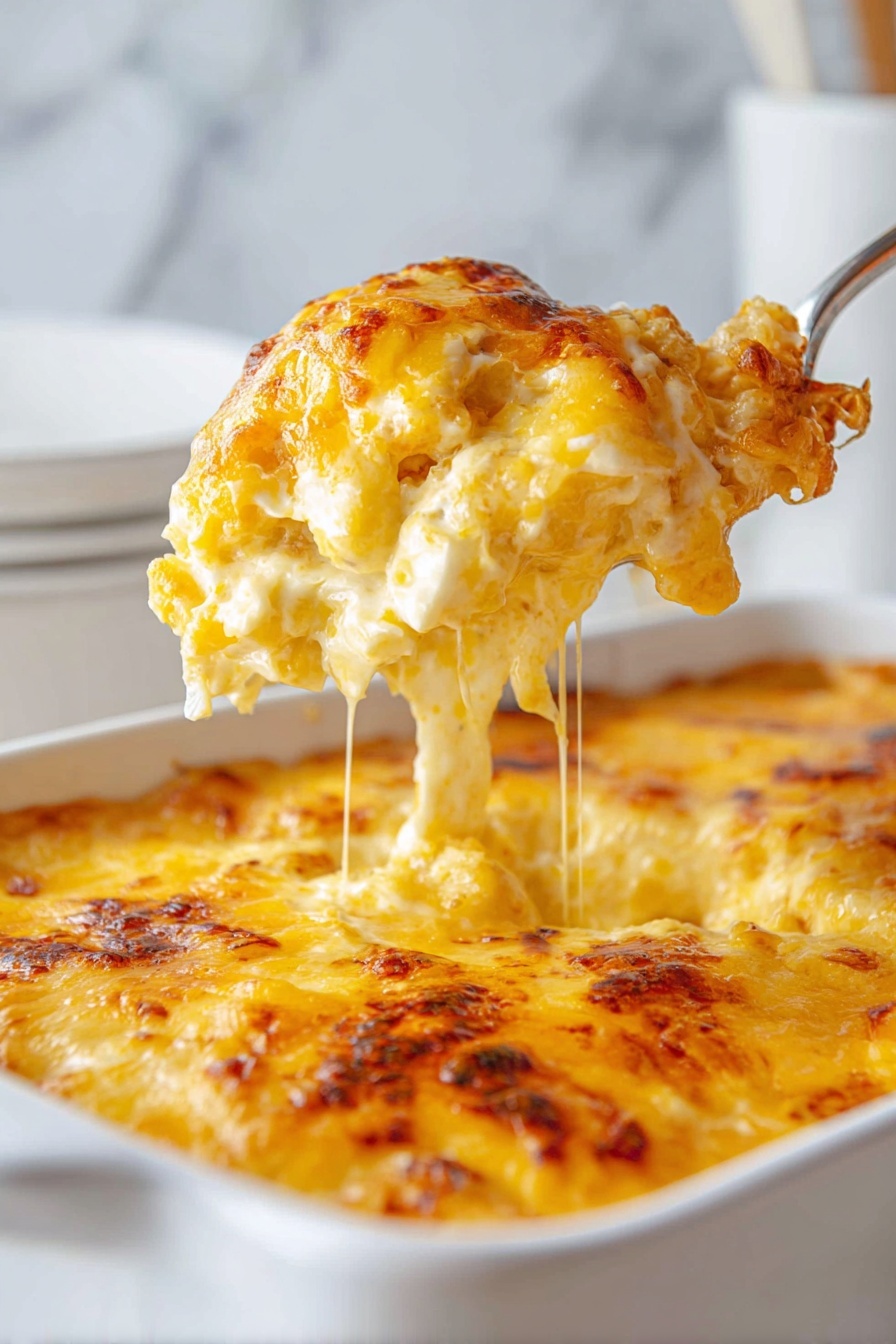
If you’re craving that warm, gooey, soul-comforting dish that just feels like a big, cheesy hug, then you’re in the right place. This Classic Baked Macaroni and Cheese Recipe is exactly that — a fan-freaking-tastic blend of creamy, cheesy goodness baked to golden perfection. I love this recipe because it hits all the nostalgic notes, but with a richness and depth you’ll find hard to resist. Trust me, once you make it, you’ll understand why it’s one of my go-to dishes for gatherings, cozy nights, or when you just need some serious comfort food.
Why You’ll Love This Recipe
- Rich Cheese Blend: Combines Velveeta, Colby, Monterey Jack, and sharp cheddar for a melty, flavorful bite every time.
- Creamy Custard Base: Using evaporated milk, heavy cream, and sour cream creates a luscious texture that sets this apart.
- Perfectly Baked Finish: The golden brown top with bubbling cheese underneath is pure comfort and crowd-pleaser magic.
- Easy to Make: A straightforward recipe with simple steps that anyone can master, even if you’ve never baked mac and cheese before.

Ingredients You’ll Need
Each ingredient here works together to give you that classic creamy, cheesy flavor with a hint of spice in the background. When shopping, try to get the freshest cheeses you can, and don’t skip the Velveeta — it provides a smooth melt you can’t beat.
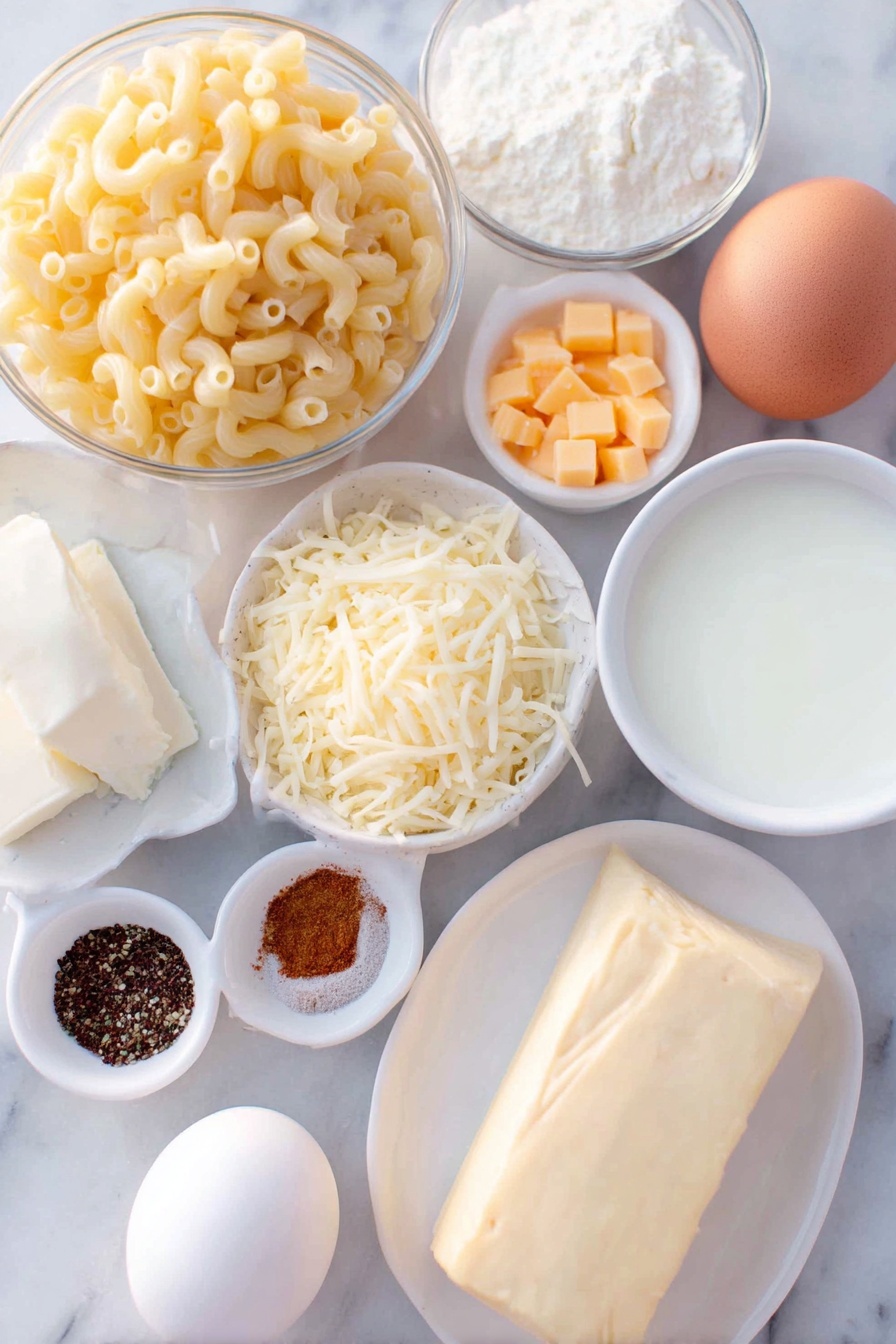
- Elbow macaroni: The traditional pasta choice—perfect shape for holding sauce.
- Large egg: Helps thicken the custard and bind everything beautifully.
- Evaporated milk: Adds creamy richness without watering down the sauce.
- Velveeta: Cubed for smooth melting and that classic creamy texture.
- Colby cheese: Mild and melts well, balancing sharper cheeses.
- Monterey Jack cheese: Adds buttery, slightly tangy flavor.
- Sharp cheddar cheese: For that unforgettable bite and color.
- Heavy cream: Elevates the custard to next-level creaminess.
- Salted butter: Adds richness and helps with even melting.
- Sour cream: Brings a subtle tang and velvety texture.
- Seasonings (cracked black pepper, seasoned salt, cayenne, white pepper, garlic powder, ground mustard, onion powder, paprika, granulated sugar, nutmeg): This magical mix adds depth, warmth, and just the right amount of kick.
Variations
I’m all for making recipes your own, and this classic baked macaroni and cheese is no exception. I like to tweak it depending on what’s in the fridge or how much time I have, and you’ll find it’s super forgiving.
- Add Bacon or Ham: My family goes crazy when I toss in crispy bacon or diced ham—it adds that smoky surprise you didn’t know you needed.
- Spicy Kick: For a little fire, I sometimes increase the cayenne or add a pinch of smoked paprika, giving it extra warmth and complexity.
- Dairy-Free Version: I discovered that swapping cheeses for vegan shreds and using oat milk with a vegan butter works if you want to avoid dairy, though the flavor shifts a bit.
- Breadcrumb Topping: For texture, sprinkle buttered breadcrumbs on top before baking—crunchy edges are a nice contrast to the creamy inside.
How to Make Classic Baked Macaroni and Cheese Recipe
Step 1: Get Your Oven and Dish Ready
Preheat your oven to 350ºF and grease an 8×8-inch square baking dish well. This little extra step makes cleanup easier and keeps your mac from sticking—trust me, it saves frustration!
Step 2: Prep Your Cheeses and Butter
Grate the Colby, Monterey Jack, and sharp cheddar cheeses, then toss them together in a big bowl. Dice the Velveeta and butter into small cubes. Place half of your shredded cheese, the Velveeta, and butter cubes into the baking dish—you’ll build layers here that help with melty, creamy texture.
Step 3: Cook Your Macaroni to Al Dente
Boil the elbow macaroni in well-salted water, following package instructions, but be sure to cook it al dente (firm to the bite). I’ve learned that overcooked pasta turns mushy after baking, so keep an eye on it and taste as you go.
Step 4: Whisk Together the Custard
While your pasta cooks, whisk the evaporated milk, heavy cream, sour cream, the egg, sugar, and all the seasonings except paprika until completely combined with no streaks of egg showing. This custard is what holds everything together and gives the mac its creamy, luscious texture.
Step 5: Combine Pasta and Cheese Layers
Drain your pasta well and immediately dump the hot noodles into the prepared baking dish with the cheeses and butter. Stir gently so the heat starts melting those cheeses—this is my favorite part because you can see the magic beginning! Spread it evenly, then sprinkle on a thin layer of shredded cheese.
Step 6: Pour the Custard and Finish the Layers
Pour the custard mixture over the noodles carefully—you want it to come just to the top, soaking everything, but not drown it. Sprinkle on the remaining cheese and dust the top with paprika for that gorgeous color and subtle smoky flavor.
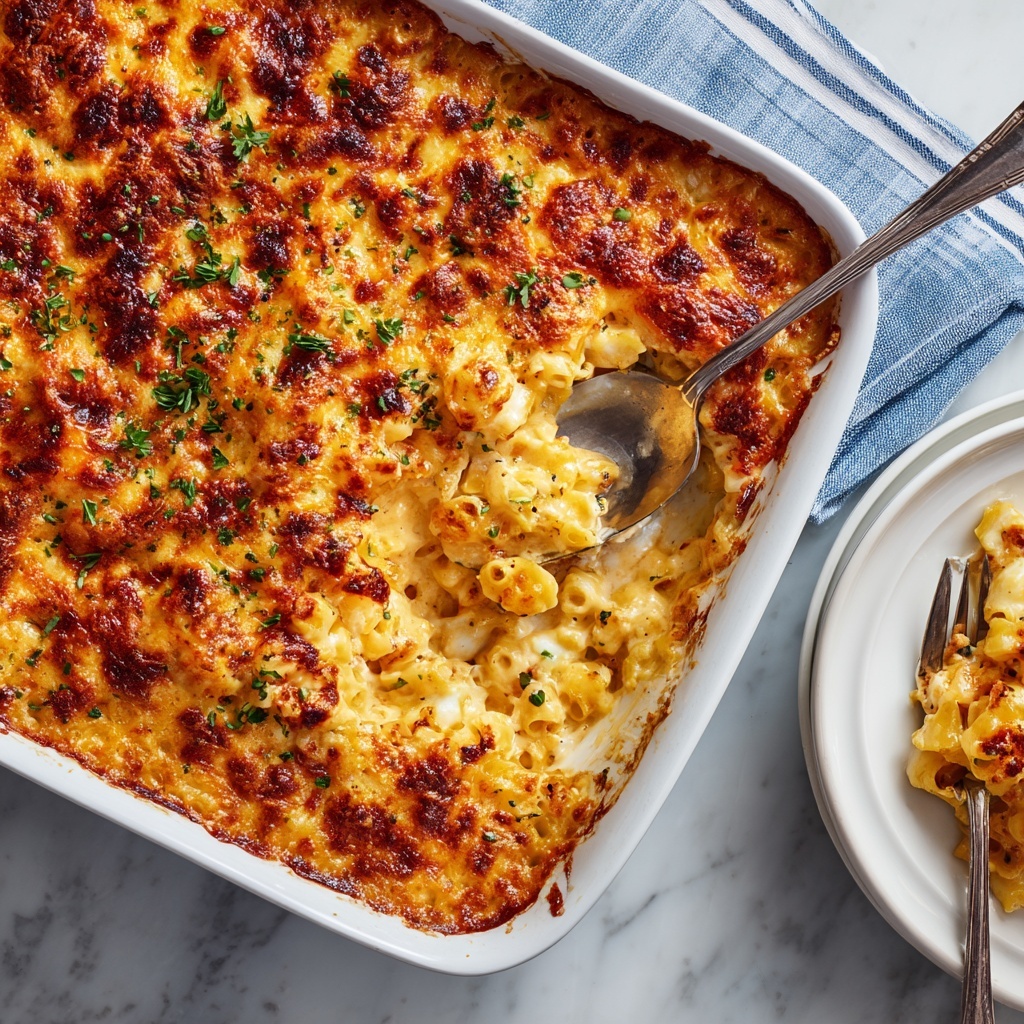
Step 7: Bake to Golden Perfection
Bake for 40 to 45 minutes until the mac and cheese is bubbling at the edges and beautifully golden on top. If after 45 minutes it’s not browned as you want, I switch the oven to broil for 2-3 minutes—just enough to crisp the top without burning. Be vigilant here; broilers work fast!
Step 8: Let It Rest—Seriously!
This step changed everything for me. Let it rest for at least 10 minutes before digging in. I know it’s tempting not to wait, but this cooling time lets everything set up so you get perfect slices and each bite melts right in your mouth rather than running off your plate.
Pro Tips for Making Classic Baked Macaroni and Cheese Recipe
- Cheese Prep: I like to grate and mix my cheeses ahead of time and keep them cold until ready—that way they melt evenly without clumping.
- Don’t Overcook Pasta: Par-cooking to al dente means your noodles won’t turn mushy after baking, keeping that delightful bite.
- Even Layers: Layering cheese under and over the noodles helps create pockets of gooey cheese throughout.
- Resting Time is Key: Resist the urge to dig in hot; rest time firms up the dish and improves texture dramatically.
How to Serve Classic Baked Macaroni and Cheese Recipe
Garnishes
I usually sprinkle a bit of fresh chopped parsley or green onions on top when serving. It adds a pop of color and freshness that balances the richness. Sometimes, a sprinkle of extra paprika or a dash of hot sauce on the side perks things up just right.
Side Dishes
I love pairing this mac and cheese with simple green beans, a crisp Caesar salad, or honey-glazed carrots—you want something fresh and crunchy to cut through all that creamy richness. It’s also fantastic alongside roasted chicken or barbecue ribs if you’re going all out.
Creative Ways to Present
For special occasions, I sometimes portion the mac and cheese into individual ramekins or mini cast iron skillets. It’s such a crowd-pleaser and looks impressive when you serve it straight from the oven with a bubbly crust on top. Plus, everyone gets their own personal cheese heaven—that’s a hit every time!
Make Ahead and Storage
Storing Leftovers
I tightly cover leftover mac and cheese and store it in the fridge for up to 3-4 days. I’ve found it keeps its flavor surprisingly well, though the texture thickens — which can be really comforting in its own way.
Freezing
This recipe freezes beautifully! I portion it out into airtight containers and freeze for up to 2 months. When you’re ready, thaw overnight in the fridge for best results.
Reheating
Reheat leftovers covered with foil in a 350ºF oven until warmed through to keep it from drying out. If you want to revive that crispy top, remove the foil at the end and broil for a couple of minutes—but watch it carefully!
FAQs
-
Can I use other types of pasta for this recipe?
Absolutely! Elbow macaroni is traditional, but penne, shells, or cavatappi also work well because their shapes hold the cheesy sauce nicely. Just be sure to adjust cooking times so your pasta is al dente before baking.
-
Why do I need to let the mac and cheese rest before serving?
Resting allows the custard to set so the dish firms up. This makes it easier to serve clean portions and improves the overall creamy texture, so it’s not runny or too loose.
-
Can I make this recipe ahead of time?
Yes! You can prepare it up to the baking step, cover it tightly, and refrigerate for a day before baking. Just increase the baking time slightly to make sure it’s heated through.
-
What’s the difference between this recipe and stovetop mac and cheese?
This recipe uses a custard base with evaporated milk and eggs and is baked, which gives a rich, creamy texture with a golden crust. Stovetop versions tend to be quicker and saucier but don’t develop that baked, crusty top layer.
Final Thoughts
I hope after trying this Classic Baked Macaroni and Cheese Recipe, you’ll feel as joyful making it as I do. It’s that perfect blend of creamy, cheesy, and comforting that feels like a warm kitchen hug on a plate. Whether it’s a weeknight dinner or a special gathering, it’s sure to bring smiles and happy bellies all around. Seriously, grab your baking dish and go for it—you’ll be so glad you did!
Print
Classic Baked Macaroni and Cheese Recipe
- Prep Time: 30 minutes
- Cook Time: 45 minutes
- Total Time: 1 hour 15 minutes
- Yield: 8 servings
- Category: Main Dish
- Method: Baking
- Cuisine: American
Description
This Ol’ School Macaroni and Cheese recipe is a comforting classic that blends multiple cheeses and a creamy custard for a rich, nostalgic dish. Baked to golden perfection with a flavorful seasoning blend, it’s reminiscent of homemade mac and cheese just like your grandmother might have made. Perfect for gatherings or a hearty family dinner.
Ingredients
Pasta
- ½ Lb elbow macaroni
Cheese
- 1 C Velveeta (diced)
- 1 C Colby cheese (shredded)
- 1 C Monterey jack cheese (shredded)
- 1 C sharp cheddar cheese (shredded)
Dairy and Butter
- 1 large egg
- 1 12-oz can evaporated milk
- ⅓ C heavy cream
- 4 Tbsp salted butter (diced)
- 2 Tbsp sour cream
Seasonings
- ½ Tbsp cracked black pepper
- ½ Tbsp seasoned salt (to taste)
- ¼ Tsp cayenne pepper
- 1 Tsp ground white pepper
- 1 Tsp garlic powder
- ½ Tsp ground mustard
- ½ Tsp onion powder
- ½ Tsp paprika
- ½ Tsp granulated sugar
- ⅛ Tsp ground nutmeg
Instructions
- Prepare Baking Dish and Oven: Grease an 8×8-inch square baking dish and preheat your oven to 350ºF (175ºC) to get it ready for baking.
- Combine Cheeses and Butter: Grate and mix the Colby, Monterey Jack, and sharp cheddar cheeses together in a large bowl. Cut the butter and Velveeta into small cubes. Place the butter, Velveeta, and half of the shredded cheeses into the prepared baking dish.
- Cook Pasta: On the stovetop, cook the elbow macaroni in salted boiling water just until al dente according to the package directions. Drain the pasta immediately after cooking.
- Make the Custard: While the pasta cooks, whisk together in a large bowl the evaporated milk, heavy cream, sour cream, egg, granulated sugar, cracked black pepper, seasoned salt, cayenne pepper, ground white pepper, garlic powder, ground mustard, onion powder, and nutmeg until fully combined and smooth with no streaks of egg.
- Mix Pasta with Cheese Layer: Immediately after draining, add the hot pasta to the baking dish with the cheeses and butter. Stir well to allow the residual heat to start melting the cheeses, mixing everything evenly.
- Layer Remaining Ingredients: Sprinkle a thin layer of the remaining shredded cheeses over the pasta. Pour the custard mixture gently over the cheese and noodles, ensuring the liquid reaches just to the top of the noodles. Then sprinkle the remaining shredded cheese on top, followed by a dusting of paprika.
- Bake: Place the baking dish in the preheated oven and bake for 40 to 45 minutes until the top is golden brown and bubbly around the edges.
- Broil for Extra Browning (Optional): If the top isn’t browned to your liking after 45 minutes, switch your oven to broil and broil for 2 to 3 minutes, watching closely to prevent burning.
- Rest Before Serving: Remove from the oven and let the macaroni and cheese rest in the dish for at least 10 minutes before serving to allow it to set and enhance the flavors. Do not cut or serve before this rest time.
Notes
- This recipe is a nostalgic homage to traditional homemade mac and cheese, capturing rich, layered flavors.
- Adapted from Sweetie Pie’s classic recipe, it’s meant to be creamy with just the right balance of cheeses and spices.
- Allowing the dish to rest after baking is crucial for the best texture and flavor.
- Use freshly shredded cheese for the best melting and taste.
- Adjust seasoning to your taste, especially the seasoned salt and pepper.
Nutrition
- Serving Size: 1 serving
- Calories: 450 kcal
- Sugar: 4 g
- Sodium: 1241 mg
- Fat: 28 g
- Saturated Fat: 17 g
- Unsaturated Fat: 8 g
- Trans Fat: 0.2 g
- Carbohydrates: 27 g
- Fiber: 1 g
- Protein: 21 g
- Cholesterol: 103 mg


