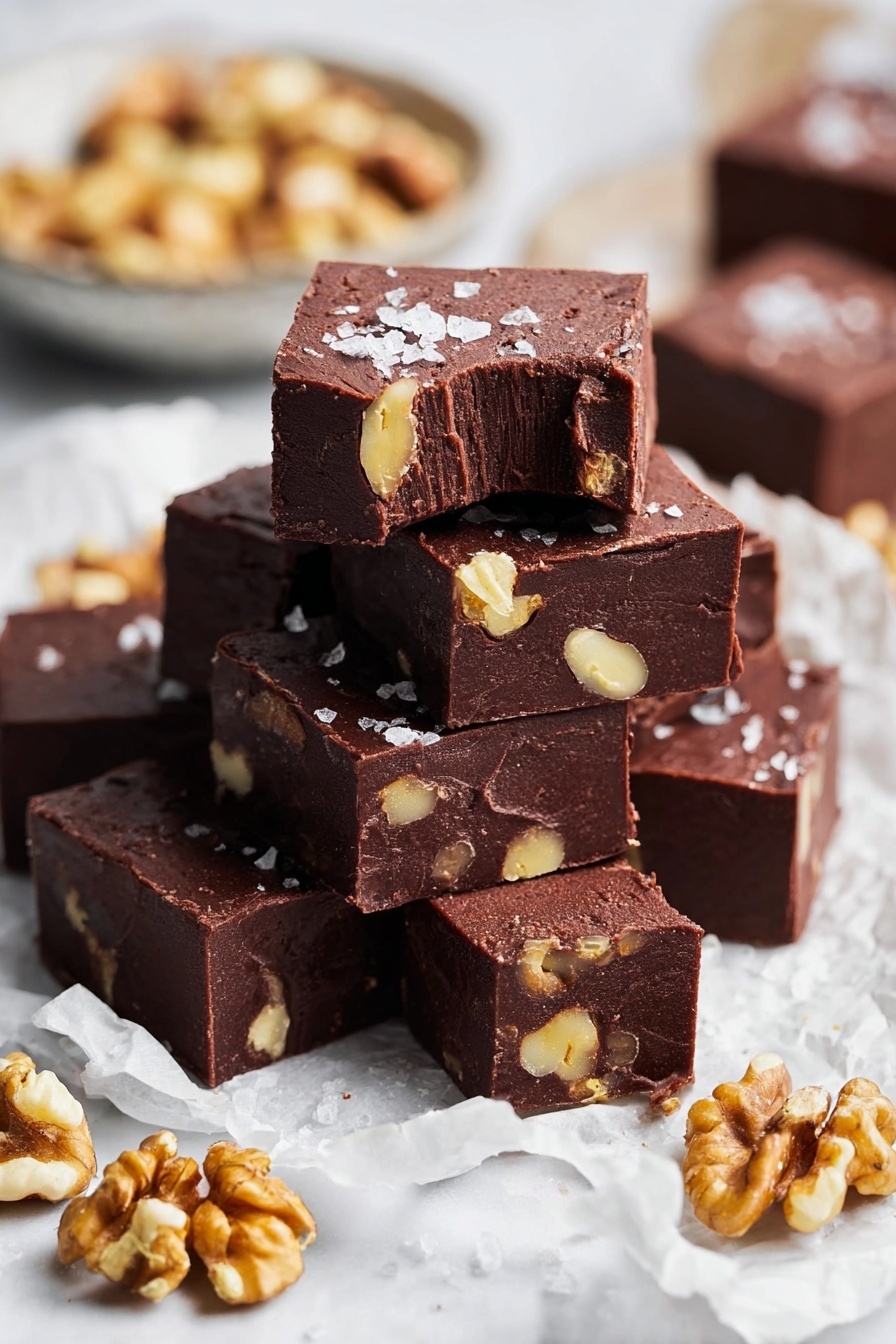
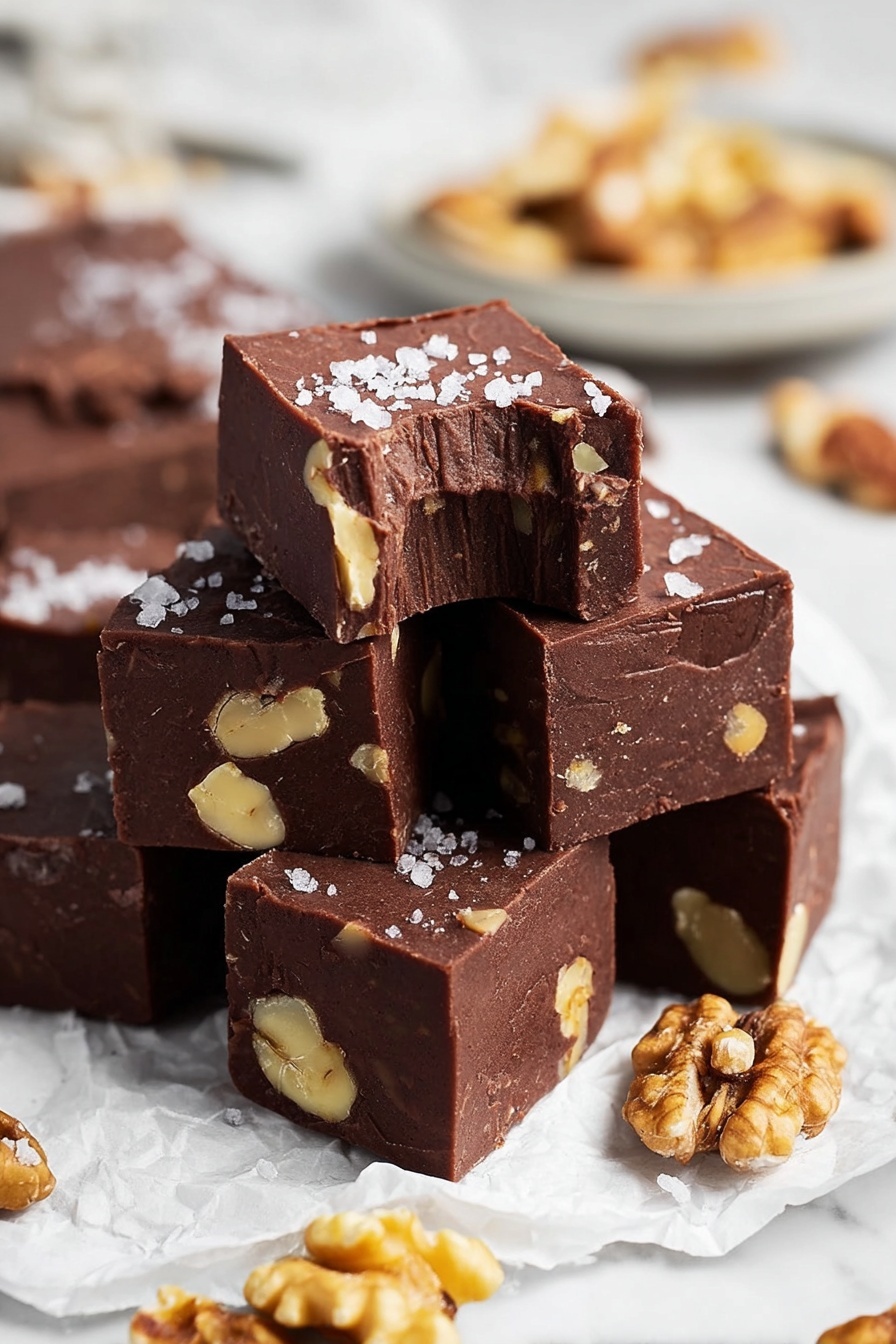
If you’ve ever wanted a rich, creamy chocolate treat that practically melts in your mouth without any stress, you’re in for a real treat. This Easy No-Fail Chocolate Fudge Recipe is exactly what I turn to when I want indulgence without complicated steps or mysterious ingredients. You’ll find that it’s super simple, incredibly delicious, and perfect for gifting or keeping all to yourself (which, I won’t judge!).
Why You’ll Love This Recipe
- Foolproof Technique: You’ll never have to worry about the fudge separating or turning grainy.
- Minimal Ingredients: Just a handful of pantry staples that come together effortlessly.
- Customizable: Add your favorite nuts, sea salt, or whatever mix-ins you love.
- Perfect Texture Every Time: Smooth, creamy, and melts in your mouth without being overly sweet.

Ingredients You’ll Need
The beauty of this Easy No-Fail Chocolate Fudge Recipe is how straightforward the ingredients are, yet they combine to create such a luscious treat. Using sweetened condensed milk is key—it’s the magic that gives the fudge that creamy, perfect texture without any guesswork.
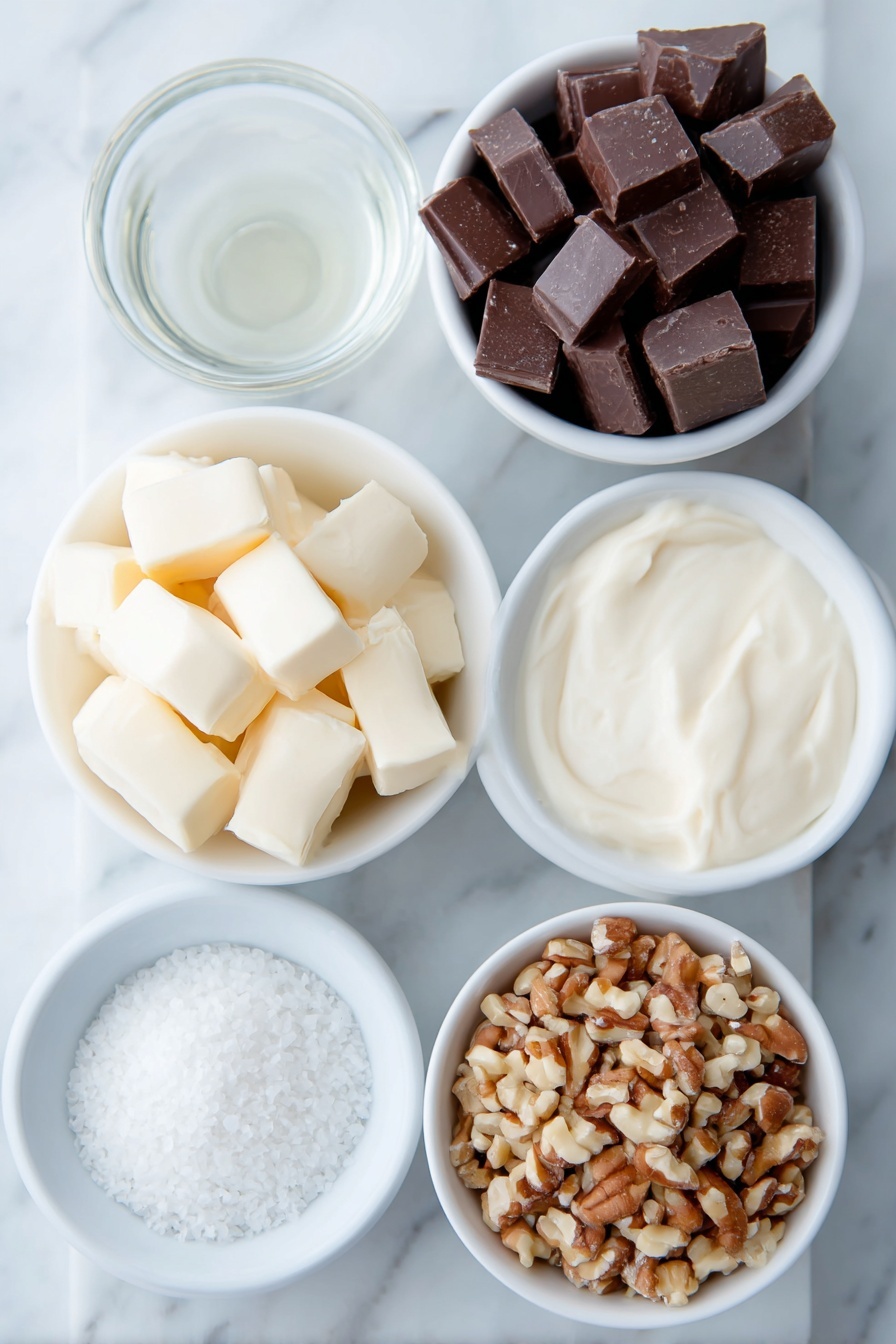
- Sweetened Condensed Milk: Make sure it’s sweetened, not evaporated; this adds the perfect creamy sweetness.
- Pure Vanilla Extract: Only a teaspoon but it brightens the whole flavor—don’t skip it!
- Semi-sweet Chocolate: Roughly chopped so it melts evenly; I prefer good quality chocolate for the best taste.
- Unsalted Butter: At room temperature, it blends smoothly without lumps.
- Flaky Sea Salt (optional): I love sprinkling a little on top for that perfect sweet-salty balance.
- Chopped Nuts or Crushed Candies (optional): Great for adding texture and a little fun twist.
Variations
What I love most about this Easy No-Fail Chocolate Fudge Recipe is how easy it is to tweak. I often toss in nuts or swap out the chocolate type depending on what I have on hand or what mood I’m in. Feel free to make it your own!
- Nutty Fudge: My family goes crazy when I stir in chopped pecans or walnuts for a crunchy surprise.
- Mint Chocolate: Add a few drops of peppermint extract for a fresh holiday twist.
- Dairy-Free Version: I once experimented with coconut butter and dairy-free chocolate – delicious and creamy!
- Spicy Kick: A pinch of cayenne or chili powder can give your fudge an unexpected, warming kick.
How to Make Easy No-Fail Chocolate Fudge Recipe
Step 1: Prep Your Pan Like a Pro
Start by lightly greasing an 8×8-inch pan, then line it with parchment paper or foil, leaving an overhang on the sides. This little trick makes it super easy to lift the fudge out once it’s set, and it prevents sticking—trust me, this step saves you from a sticky mess and frustration.
Step 2: Combine Your Ingredients Gently
In a large heatproof bowl, mix together your sweetened condensed milk, vanilla extract, chopped chocolate, and butter pieces. No stirring just yet! This is important because heating gently is what ensures the perfect fudge texture.
Step 3: Melt Using a Double Boiler
Bring about an inch of water to a boil in a saucepan, then reduce to a low simmer. Place your bowl with the ingredients over the pot (make sure the bowl isn’t touching the water). Stir gently with a rubber spatula as the chocolate begins to melt—about 4 minutes until most of the chocolate has melted but some small pieces remain. This trick is key because removing the bowl before the chocolate fully melts prevents the fudge from separating or getting greasy.
Step 4: Stir to Perfect Smoothness
Take the bowl off the heat and continue stirring for about 2 more minutes until everything is silky smooth. If you want to add nuts or candy pieces, mix them in now. Then scrape the fudge into your prepared pan and smooth out the top with your spatula.
Step 5: Chill and Cut
Pop your fudge in the fridge for about 2 hours until it’s firm. When it’s ready, gently run a butter knife around the edges to loosen it, then use the parchment overhang to lift it out whole. Peel off the paper and slice into squares. I like mine bite-sized because, well, fudge is rich and I want to savor it.
Pro Tips for Making Easy No-Fail Chocolate Fudge Recipe
- Use a Double Boiler Carefully: I learned that keeping the water at a simmer, not a boil, prevents scorching your chocolate and messing up the texture.
- Don’t Rush Melting: Stirring once the bowl is off the heat allows the fudge to reach silky smoothness without overheating.
- Quality Ingredients Matter: Using good chocolate makes a noticeable difference in flavor and richness.
- Loosen the Edges for Easy Removal: Running a knife around the pan before lifting out makes cutting neater and saves frustration.
How to Serve Easy No-Fail Chocolate Fudge Recipe
Garnishes
I often sprinkle flaky sea salt on top right before chilling—it adds that amazing contrast that really makes the chocolate pop. Toasted nuts or even a drizzle of caramel also make beautiful, tasty finishes if you want to get fancy.
Side Dishes
While fudge is usually a stand-alone treat, I love pairing it with fresh berries or a cup of strong coffee to balance the sweetness. It’s also fantastic alongside vanilla ice cream for a dessert that feels extra special.
Creative Ways to Present
For holidays or special occasions, I like to cut the fudge into mini shapes using cookie cutters or wrap individual squares in colorful parchment paper to create adorable little gifts. It always impresses and makes sharing feel extra thoughtful.
Make Ahead and Storage
Storing Leftovers
I keep leftover fudge in an airtight container in the fridge to maintain that creamy texture and keep it fresh for up to a month. Just make sure it’s well-covered so it doesn’t pick up fridge odors.
Freezing
Freezing works great if you want to stash fudge for later. I wrap pieces individually in plastic wrap, then place them in a freezer-safe container. They thaw quickly at room temperature and keep well for up to two months.
Reheating
I usually don’t reheat fudge because it’s perfect chilled, but if you want that melty texture, a quick zap in the microwave for 10-15 seconds does the trick. Just be careful not to overdo it or it might get grainy.
FAQs
-
Can I use milk chocolate instead of semi-sweet chocolate in this fudge?
Absolutely! Using milk chocolate will make your fudge sweeter and creamier. Just keep in mind it will be less intense in chocolate flavor, but still incredibly delicious. You might want to reduce any extra sweet add-ins if you prefer a less sugary fudge.
-
Why does my fudge sometimes turn out grainy?
Grainy fudge usually happens if the chocolate is overheated or if the sugar crystals weren’t dissolved properly. With this recipe’s method of melting over a gentle simmer, you minimize that risk. Also, don’t skip stirring after removing from heat—that smooths everything out perfectly.
-
Can I skip the nuts if I have an allergy?
Definitely! The nuts are optional and only add texture and crunch. The fudge still tastes decadent and smooth with just the basic ingredients.
-
How do I know when the fudge is set enough to cut?
I usually chill the fudge for at least 2 hours in the fridge. When it’s firm to the touch and easily lifts out of the pan without sticking, it’s ready! You can test by gently pressing the surface; if it springs back, it’s perfect for slicing.
Final Thoughts
This Easy No-Fail Chocolate Fudge Recipe has been my go-to comfort dessert for years. I love how accessible it is and that it never lets me down, no matter if I’m making it for a last-minute gift or a sweet treat to enjoy after dinner. If you’re someone who wants fudge without the fuss or wondering if it’s going to turn out right, this recipe is your new best friend. Give it a try—you’ll be so glad you did!
Print
Easy No-Fail Chocolate Fudge Recipe
- Prep Time: 10 minutes
- Cook Time: 10 minutes
- Total Time: 2 hours 20 minutes
- Yield: One 8×8-inch pan (about 24 small squares)
- Category: Dessert
- Method: Stovetop
- Cuisine: American
Description
This Foolproof Chocolate Fudge recipe delivers rich, creamy, and perfectly smooth fudge using simple ingredients like sweetened condensed milk, semi-sweet chocolate, and butter. Made using the gentle heat of a double boiler to prevent burning or separating, this classic homemade fudge is easy to prepare and customizable with optional nuts or sea salt for extra texture and flavor. Ideal for chocolate lovers looking for a reliable no-bake treat that sets firmly in the refrigerator.
Ingredients
Fudge Base
- 1 14-ounce can sweetened condensed milk (NOT evaporated milk)
- 1 teaspoon pure vanilla extract
- 20 ounces semi-sweet chocolate, roughly chopped
- 3 tablespoons unsalted butter, cut into 1/2-inch pieces, at room temperature
Optional Toppings
- Flaky sea salt, for sprinkling (optional)
- 1/2 cup chopped nuts or crushed candies (optional)
Instructions
- Prepare the Pan: Lightly grease an 8×8-inch baking pan and line it with parchment paper or aluminum foil, allowing the excess paper to overhang the sides. Set aside for easy removal of the fudge later.
- Combine Ingredients: In a large, heatproof bowl, combine the sweetened condensed milk, pure vanilla extract, roughly chopped semi-sweet chocolate, and room temperature unsalted butter pieces. Set the bowl aside.
- Set up the Double Boiler: Fill a saucepan with about 1/4 full of water and bring it to a boil. Once boiling, reduce the heat to a bare simmer. Position your heatproof bowl containing the fudge ingredients on top of the saucepan, ensuring the bowl does not touch the water.
- Melt the Chocolate Mixture: Stir the mixture continuously with a rubber spatula until the chocolate is almost fully melted with just a few small pieces remaining, about 4 minutes. Be careful to remove the bowl from heat before the chocolate is fully melted to prevent separation and greasiness.
- Finish Melting: Remove the bowl from heat and continue stirring until the mixture is completely smooth and all chocolate pieces have melted, about 2 more minutes.
- Add Mix-ins: If desired, fold in chopped nuts or crushed candies now for texture and flavor.
- Pour and Set: Scrape the smooth fudge mixture into the prepared pan and spread evenly with a spatula. Optionally, sprinkle flaky sea salt on top for a salty contrast.
- Refrigerate: Place the fudge in the refrigerator and chill until firmly set, approximately 2 hours.
- Cut and Serve: Once set, gently run a butter knife around the edges of the pan to loosen the fudge. Lift it out using the foil or parchment overhang, peel off the lining, and cut into small squares. Serve immediately or store in the refrigerator for up to one month, or freeze for up to two months in an airtight container.
Notes
- Use sweetened condensed milk, not evaporated milk, for the right sweetness and texture.
- Do not overheat the chocolate mixture to avoid a greasy or separated fudge.
- Optional nuts or crushed candies add nice texture and variety; you can omit for a smooth fudge.
- Storing fudge in an airtight container in the fridge will keep it fresh up to one month.
- Fudge can also be frozen for up to two months; thaw in refrigerator before serving.
- Sprinkling flaky sea salt on top adds a sophisticated salty-sweet flavor contrast.
Nutrition
- Serving Size: 1 square (approx. 24 servings per pan)
- Calories: 170
- Sugar: 18g
- Sodium: 45mg
- Fat: 10g
- Saturated Fat: 6g
- Unsaturated Fat: 3g
- Trans Fat: 0g
- Carbohydrates: 20g
- Fiber: 1g
- Protein: 2g
- Cholesterol: 15mg


