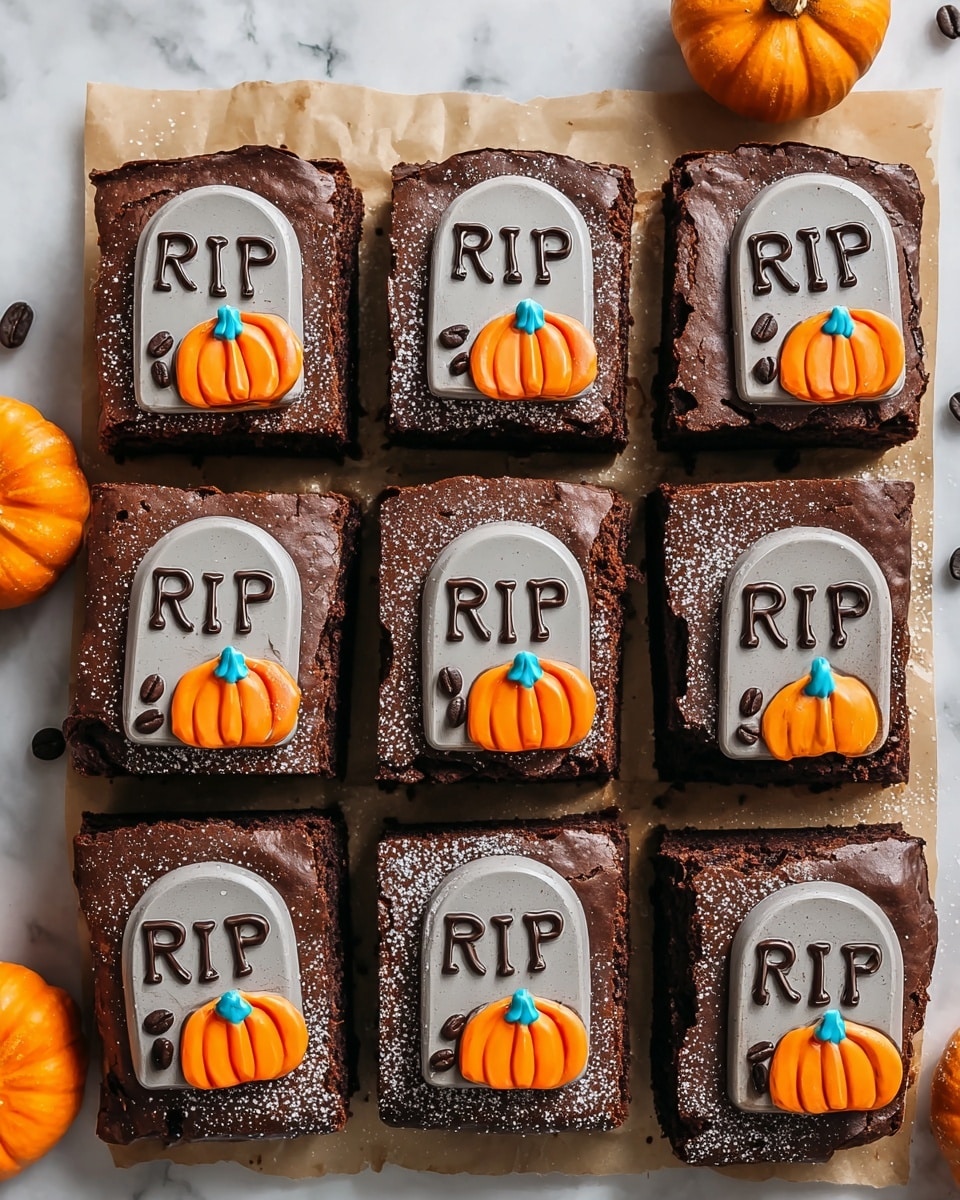
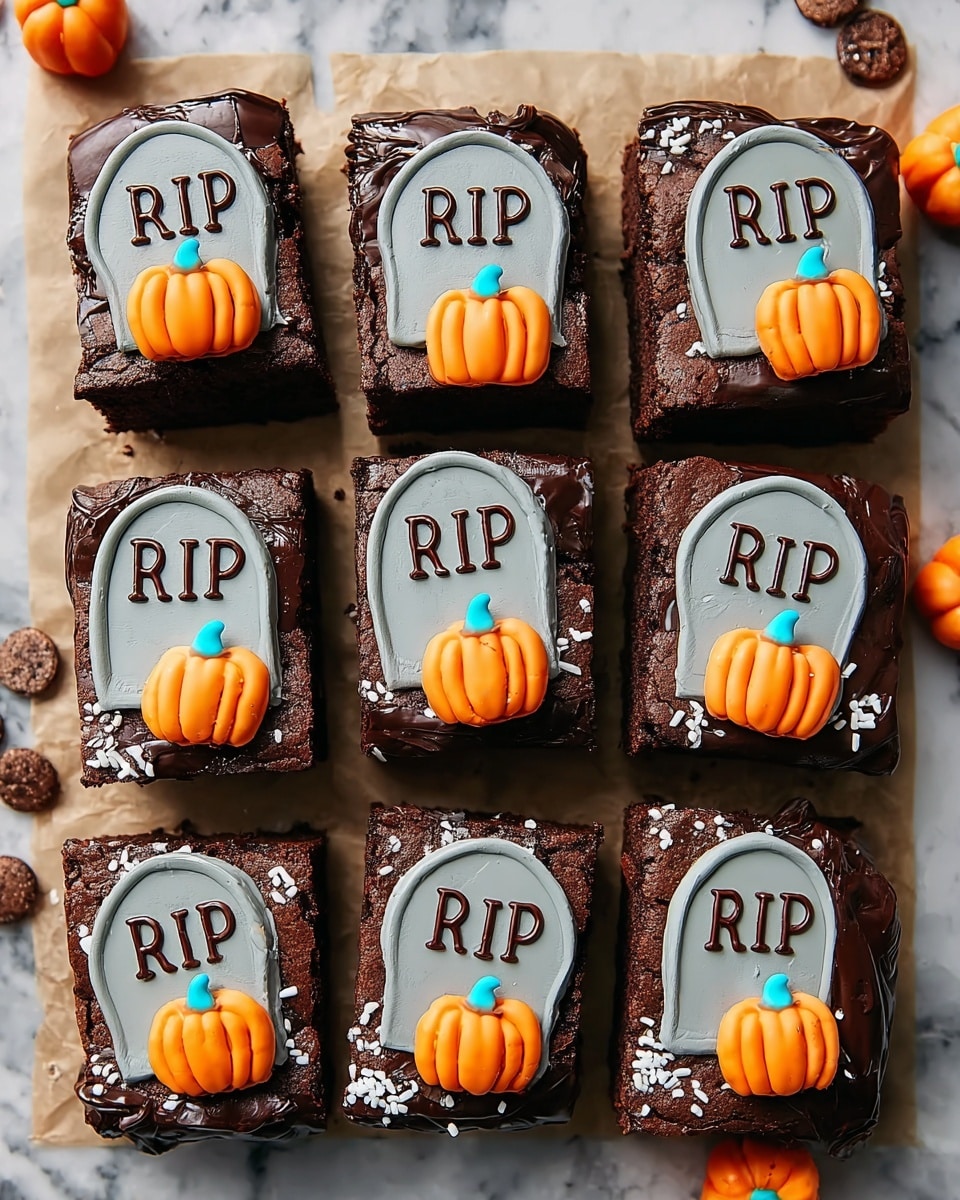
If you’re looking for a fun, spooky treat that’s also surprisingly easy to make, you’re going to love this Graveyard Brownies Recipe. It’s perfect for Halloween parties, a playful dessert with kids, or anytime you just want brownies with a wicked twist. I absolutely love how these brownies turn out—rich, chocolatey, and decorated with cute little “tombstones” that bring a whole lot of fun to your dessert table. Keep reading, and I’ll share all my best tips to help you nail this recipe and impress everyone who tries them.
Why You’ll Love This Recipe
- Simple but Effective: This Graveyard Brownies recipe uses a boxed mix, so it’s quick, but the decorations make it look handmade and impressive.
- Kid-Friendly and Fun: Decorating the tombstones and sprinkling the “dirt” is a creative activity you can do with kids or friends.
- Perfect Halloween Vibes: The look is spooky yet cute—great for themed parties or just a seasonal treat to get everyone smiling.
- Tasty and Versatile: You get classic fudgy brownies with an extra layer of whimsy, but you can easily swap out cookie types or decorations to suit your style.

Ingredients You’ll Need
The magic of this recipe is all in the combo: simple brownie base plus clever decorations that transform each bite into a mini graveyard scene. When you’re picking out your ingredients, think about what brands or types your family loves—especially the cookie tombstones!
- Brownie Mix: Choose your favorite boxed brownie mix—you’ll get the best texture by following the package instructions for eggs, oil, and water.
- Rectangular Cookies: Milano cookies are my go-to because their shape and size work perfectly as tombstones, but any rectangular cookie will do.
- Black Gel or Chocolate Icing: This is for writing “RIP” on the cookies; gel icing holds up well without smudging.
- Chocolate Sandwich Cookies: Crush these up to create the “dirt” around your tombstones—Oreos are classic and give great texture.
- Candy Pumpkins: These add a festive pop of color and complete the graveyard look—you can find them at most grocery stores this time of year.
Variations
I love to shake things up a bit depending on who I’m serving these Graveyard Brownies to. This recipe is really flexible, so don’t hesitate to customize your “graveyard” to fit your style or dietary needs.
- Gluten-Free Version: Use a gluten-free brownie mix and swap in gluten-free rectangular cookies for the tombstones to keep everyone happy around the table.
- Double Chocolate Graveyard: I sometimes add chocolate chips into the brownie batter and use fudge icing to make the decorations even richer.
- Spooky Season Twist: Try topping the graveyard with candy eyeballs or edible spiders for an extra creepy vibe, which is always a hit at Halloween gatherings.
- Mini Graveyard Brownies: Make bite-sized brownies in a mini muffin tin and decorate with tiny cookie “tombstones”—perfect for party platters.
How to Make Graveyard Brownies Recipe
Step 1: Mix and Bake Your Brownies
Start by preparing your brownie batter exactly as the box directs. I find that following the package instructions closely helps achieve that perfect fudgy texture we all crave. Use a greased 9×13 inch pan (I like to spray with baker’s spray for easy release) and pour your batter in evenly. Bake according to the recommended time—it might be slightly less if you’re using a glass pan, so keep an eye on it. I always test mine with a toothpick inserted in the center; it should come out with a few moist crumbs but no wet batter.
Step 2: Cool Completely and Cut
Resist the urge to cut while the brownies are warm—your tombstone cookies won’t sit right, and the “dirt” will be messier too. Once your brownies have cooled fully at room temperature, cut them into 12 equal squares. This is the perfect base for your graveyard scene.
Step 3: Decorate the Tombstones
Grab your rectangular cookies and use the black gel or chocolate icing to pipe a crisp “RIP” on each one. I’ve learned that letting the icing sit for a bit before moving them makes it less likely to smear. Don’t worry if your writing is a little imperfect—it adds character and charm!
Step 4: Assemble the Graveyard
Press one decorated tombstone cookie gently into the top center of each brownie square, so it stands up slightly. Next, sprinkle crushed chocolate sandwich cookies around the base to create the “dirt.” I like to crush the cookies by placing them in a ziplock bag and smashing gently with a rolling pin for a good mix of fine crumbs and small chunks. Lastly, add a few candy pumpkins to each brownie for that perfect festive touch.
Pro Tips for Making Graveyard Brownies Recipe
- Cool Completely Before Decorating: From experience, rushing this step leads to sinking tombstones or messy icing—patience really pays off here.
- Use Sturdy Cookies for “Tombstones”: I’ve learned that thinner cookies can break or bend when standing up, so Milano or similarly firm cookies work best.
- Crush “Dirt” Cookies to Mix Textures: Mixing fine crumbs with a few bigger chunks gives a more realistic, interesting look to the “graveyard” dirt.
- Write Your “RIP” Once Brownies are Cooled: Gel icing doesn’t stick well on warm cookies, so writing last ensures your decorations last and look crisp.
How to Serve Graveyard Brownies Recipe
Garnishes
For garnishes, I’m a big fan of adding mini candy pumpkins and sometimes edible glitter to make the graveyard shimmer a bit under the party lights. I’ve also used colorful sprinkles shaped like bones or stars to add quirky details that guests love asking about.
Side Dishes
These Graveyard Brownies stand out on their own but pair beautifully with a scoop of vanilla or pumpkin ice cream for an extra indulgent treat. If it’s a party, some hot apple cider or spiced coffee makes a nice warm companion to the rich chocolate flavors.
Creative Ways to Present
One of my favorite ways to present these brownies is on a dark serving platter dusted lightly with cocoa powder or crushed cookies to extend the “graveyard” effect beyond the brownies themselves. For Halloween, I’ve even lined the platter with fake spider webbing and scattered plastic spiders for that extra spooky factor—kids went wild for it!
Make Ahead and Storage
Storing Leftovers
I usually keep any leftover Graveyard Brownies in an airtight container at room temperature for up to 3 days. If it’s warm or humid, refrigeration helps keep the “dirt” crispy and the brownies fresh longer. Just be sure to bring them back to room temp before serving for the best flavor.
Freezing
Freezing these brownies is definitely doable, but I recommend freezing them before you add the cookie “tombstones” and decorations. Once frozen, wrap tightly and freeze up to 2 months. Thaw completely before decorating to maintain that fresh, just-made vibe.
Reheating
Since these are best served at room temperature, I usually just let refrigerated brownies sit out 20–30 minutes before serving. If you want them warm, a quick zap in the microwave (10-15 seconds) works great, but avoid overheating or you might melt the decorations.
FAQs
-
Can I make Graveyard Brownies Recipe from scratch instead of using a box mix?
Absolutely! While the boxed mix saves time, you can use your favorite homemade brownie recipe. Just be sure to bake in a 9×13 pan and allow them to cool completely before adding the decorations to keep your “graveyard” intact.
-
What if I don’t have black gel icing for the “RIP” writing?
You can use melted chocolate piped through a small piping bag or even a thin paintbrush dipped in dark chocolate. Food-safe markers can work too, especially on plain cookies. Just test your decorating method ahead of time for best results.
-
How do I keep the cookies standing up on the brownies?
Gently press the cookie into the brownie after it’s fully cooled and slightly set the “dirt” crushed cookies around it for additional support. Don’t push too hard or the brownie might crumble. The cookie should stand easily with just a little pressure.
-
Can I use different cookies for the “dirt” besides chocolate sandwich cookies?
Yes! You can use crushed chocolate graham crackers, toasted coconut dyed black with food coloring, or even crushed pretzels for a salty-sweet twist. I like to experiment but usually stick to Oreos for the classic look.
Final Thoughts
This Graveyard Brownies Recipe is a total winner in my book because it combines simple baking with playful creativity—you get a dessert that’s festive and delicious without hours in the kitchen. Every time I make them, they bring smiles and spark conversations, especially with kids who love the “graveyard” setup. I hope you give it a go and enjoy the process as much as the finished product. Trust me, these brownies will become a seasonal favorite you’ll whip up again and again!
Print
Graveyard Brownies Recipe
- Prep Time: 15 minutes
- Cook Time: 25 minutes
- Total Time: 40 minutes
- Yield: 12 servings
- Category: Dessert
- Method: Baking
- Cuisine: American
Description
Graveyard Brownies are a fun and festive Halloween treat featuring classic brownies topped with cookie tombstones, crushed cookie dirt, and candy pumpkins for a spooky graveyard effect. Perfect for parties and celebrations, this easy recipe combines rich chocolate flavors with creative decorations for a delightfully eerie dessert.
Ingredients
Brownie Base
- 1 box brownie mix (plus ingredients listed on the box, typically eggs, oil, and water)
Toppings and Decorations
- 12 rectangular cookies (such as Milano)
- Black gel or chocolate icing for writing
- Crushed chocolate sandwich cookies (such as Oreos) for “dirt”
- Candy pumpkins for decoration
Instructions
- Prepare Brownie Batter: Follow the instructions on your brownie mix box to make the batter, combining the necessary wet and dry ingredients as directed.
- Bake Brownies: Pour the prepared batter into a greased baking pan and bake according to the package directions. Once baked, allow the brownies to cool completely before cutting them into individual squares.
- Decorate Tombstone Cookies: Use black gel or chocolate icing to write “RIP” on each rectangular cookie to create the appearance of tombstones.
- Assemble Graveyard Scene: Gently press one decorated tombstone cookie into the top of each brownie square, ensuring it stays upright.
- Add Dirt and Pumpkins: Sprinkle crushed chocolate sandwich cookies around the tombstones to resemble dirt. Finish by placing candy pumpkins on top or around the brownies to complete the spooky graveyard look.
Notes
- Ensure brownies are fully cooled before decorating to prevent melting or sliding of the cookie tombstones.
- You can use any rectangular cookie you prefer for the tombstones; Milano cookies work great due to their size and shape.
- For a creative twist, write different sayings or decorate tombstones with different designs.
- Store assembled brownies in an airtight container at room temperature for up to 3 days to maintain freshness.
Nutrition
- Serving Size: 1 brownie with decorations
- Calories: 280
- Sugar: 22g
- Sodium: 150mg
- Fat: 14g
- Saturated Fat: 5g
- Unsaturated Fat: 7g
- Trans Fat: 0g
- Carbohydrates: 36g
- Fiber: 2g
- Protein: 3g
- Cholesterol: 30mg


