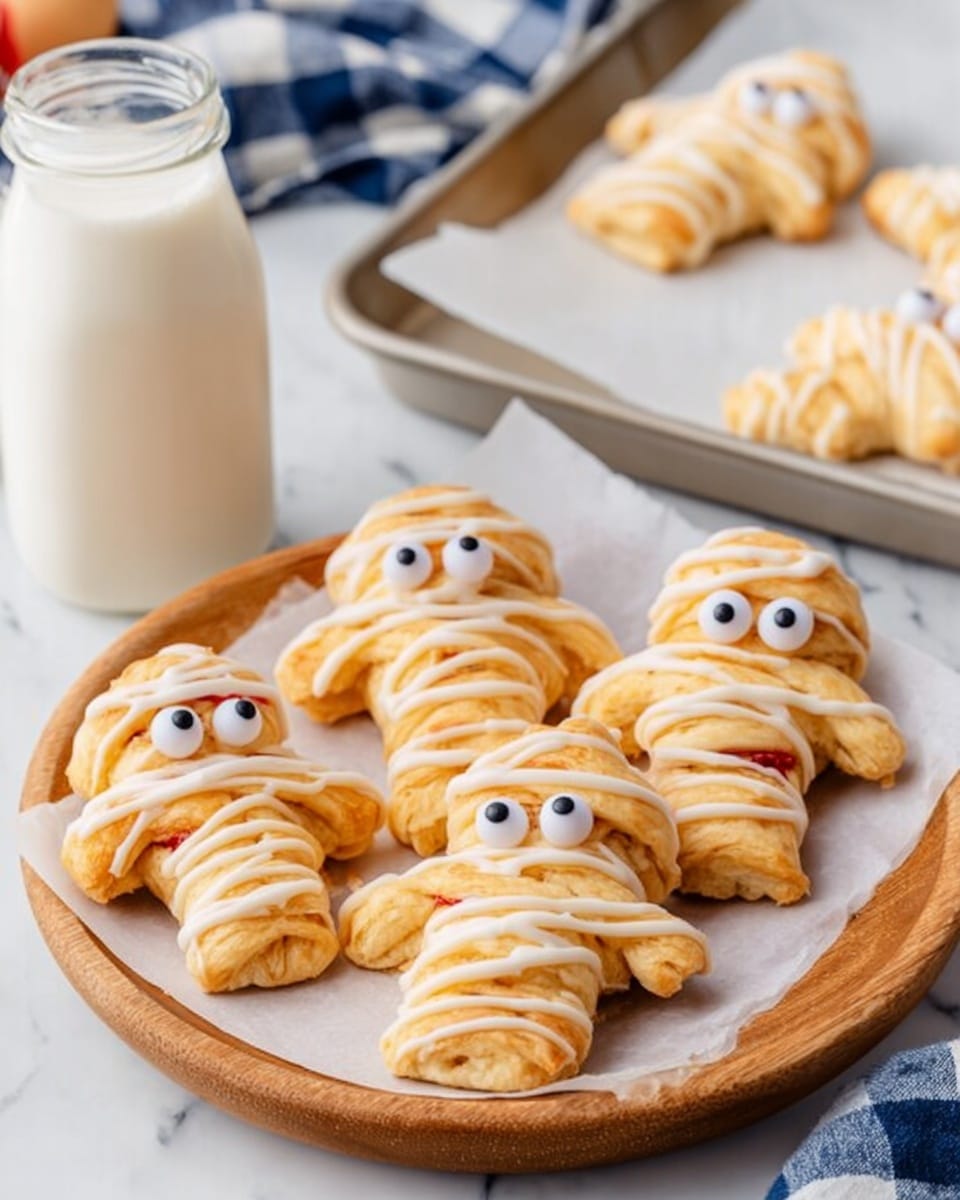
If you’re looking to wow your friends or family this spooky season, you’ve got to try this Halloween Hand Held Pies Recipe. These little treats are not just adorable—they’re seriously delicious, with gooey raspberry jam filling and a fun marshmallow mummy drizzle that makes them perfect for Halloween parties or cozy nights in. Trust me, once you make these, they’ll become a holiday staple you’ll love pulling out every October.
Why You’ll Love This Recipe
- Easy to Make: Uses ready-made pie crusts for quick prep without sacrificing flavor.
- Fun for All Ages: The marshmallow mummy drizzle makes these hand pies a hit with kids and adults alike.
- Perfect Portion Size: These are great for hand-held snacking—no forks needed!
- Customizable: You can swap fillings or decorate any way you want to suit your Halloween vibe.

Ingredients You’ll Need
These ingredients are simple and easy to find, plus they come together in a way that balances sweet and tart with that irresistible marshmallow topping. I usually grab a good-quality ready-made pie crust to save time—it really helps you focus on the fun decorating part!
- Ready-made pie crusts: Using pre-made dough cuts prep time drastically, but feel free to make your own if you’re up for it.
- Raspberry jam: This gives a vibrant, tart sweetness that pairs beautifully with the buttery crust.
- Egg yolk: Brushing this on before baking gives your pies that golden, bakery-perfect finish.
- Mini marshmallows: Melted and drizzled on top, they create that fun mummy look and add a delightfully gooey texture.
- Powdered sugar (optional): Great for dusting if you want an extra sweet touch or a bit of Halloween snow effect.
Variations
I love that this Halloween Hand Held Pies Recipe is totally customizable. Over the years, I’ve played around with different fillings and decoration ideas, and it’s always a hit no matter what. Feel free to get creative and make it your own!
- Fruit Fillings: I’ve swapped raspberry jam for apple butter or pumpkin puree mixed with cinnamon, which adds an autumnal twist that’s just as delicious.
- Chocolate Twist: For a richer treat, try adding mini chocolate chips inside before sealing the pies.
- Vegan Option: Use a plant-based pie crust and substitute the egg wash with a little plant milk for brushing.
- Spooky Shapes: Different cookie cutters like bats or pumpkins change up the vibe and make these perfect for all kinds of Halloween parties.
How to Make Halloween Hand Held Pies Recipe
Step 1: Prep Your Workspace and Oven
First up, preheat your oven to 375°F and line a baking sheet with parchment paper—this is key to keeping your pies from sticking. While the oven’s warming, lightly flour your surface before rolling out your pie crusts; this prevents them from tearing and makes cutting out shapes easier. When I first tried this, I didn’t flour enough and ended up frustrated with stuck dough!
Step 2: Cut Out Your Hand Pie Shapes
Grab your gingerbread man cookie cutter or any Halloween-themed cutter you like. Cut as many shapes as possible from the rolled-out dough because each pie needs a front and back. One trick I learned is to gently press—don’t twist—the cutter to keep the edges neat, which helps when sealing later.
Step 3: Fill and Seal Your Pies
Place half of the cutouts on your prepared baking sheet. Spoon a small dollop of raspberry jam in the center of each, making sure to leave a good border around the edges—this is crucial to get a proper seal. Then top with the other half of the cutouts, pressing the edges together with a fork. This little step ensures the filling stays put and creates a charming crimped edge.
Step 4: Egg Wash and Bake
Brush the tops of each pie lightly with beaten egg yolk to get that irresistible golden glow once baked. Pop the baking sheet in the oven and bake for about 10 minutes—or until you see the crust turn beautifully golden. Keep an eye on them during the last few minutes to avoid any burning.
Step 5: Prepare Your Marshmallow Drizzle
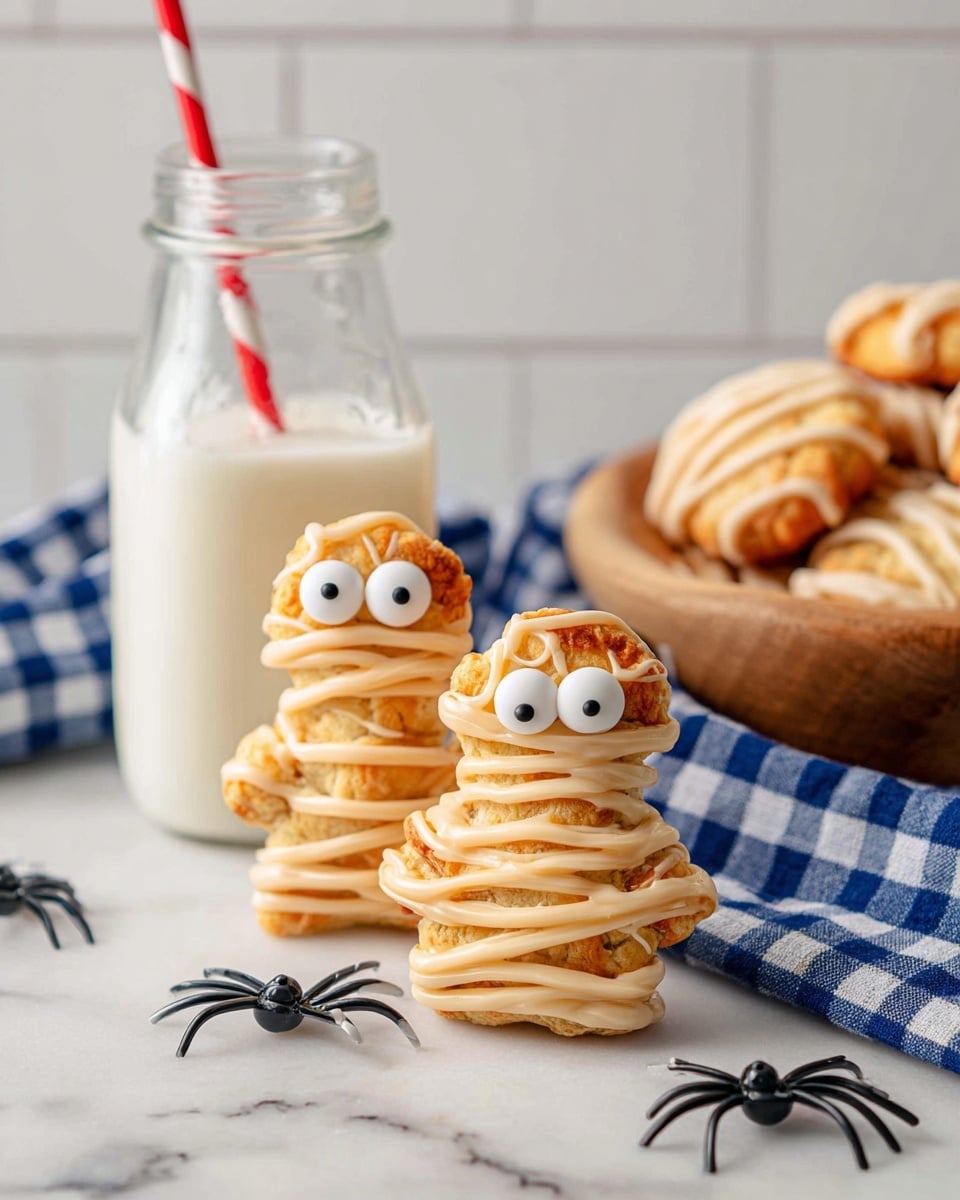
Once the pies are cooling on a wire rack, it’s time to get crafty! Microwave the mini marshmallows in short 15-20 second bursts, stirring between, until they’re smooth and melted. Let the marshmallow cool just a bit so it thickens up—if it’s too hot, it’ll slide right off your pies. Then drizzle it over the pies in mummy wrap patterns. If you have candy eyes, press them on while the drizzle’s still tacky for that perfect spooky effect.
Pro Tips for Making Halloween Hand Held Pies Recipe
- Don’t Skip the Flour: I’ve learned the hard way that a light dusting of flour before rolling keeps your dough from tearing—trust me, it makes your life easier.
- Seal Edges Well: Pressing the edges with a fork not only looks cute but seals your pies and keeps jam from leaking during baking.
- Marshmallow Drizzle Timing: Let your pies cool completely before adding drizzle so it doesn’t melt away; a little patience really pays off with that perfect mummy effect.
- Use Parchment Paper: Baking on parchment is a game changer, making cleanup easy and keeping pies intact.
How to Serve Halloween Hand Held Pies Recipe
Garnishes
I usually keep garnishes simple—powdered sugar dusting adds a little spooky “fog” effect that’s subtle but festive. Sometimes I sprinkle tiny edible Halloween sprinkles around the pies to add a bit of color, which the kids love. Candy eyes on the marshmallow drizzle always make people smile!
Side Dishes
These hand pies are sweet and filling enough on their own, but I love pairing them with a big mug of hot apple cider or a warm chai latte for those crisp fall evenings. For a party, I serve them alongside salted nuts or cheese plates to balance out the sweetness.
Creative Ways to Present
One fun idea I tried was serving these hand pies on a spooky-themed platter lined with shredded orange and black paper. For a kids party, I added little flags with Halloween jokes stuck in toothpicks for a playful touch. And if you’re feeling artsy, pipe some colored icing webs around the pies for a creepy-cute effect.
Make Ahead and Storage
Storing Leftovers
If you end up with leftovers (and you might!), store them in an airtight container at room temperature for up to two days. I’ve found that letting them sit without the marshmallow topping helps the crust stay crisp. You can add fresh drizzle before serving again.
Freezing
I usually freeze these pies before baking. Lay them out on a baking sheet until frozen solid, then transfer to a freezer bag. When you want them, bake straight from frozen but add a few extra minutes to the baking time. This trick saves loads of time if you want to prep for a party in advance.
Reheating
To reheat, pop the pies in a warm oven at 325°F for 5-7 minutes to bring back crispness without drying them out. Avoid microwaving if you can; it tends to make the crust soggy. I like to add a fresh drizzle of marshmallow just before serving to restore that signature look and gooey texture.
FAQs
-
Can I use other types of jam in this Halloween Hand Held Pies Recipe?
Absolutely! While raspberry jam offers a nice tart contrast, you can swap in strawberry, blueberry, or even apricot jam to suit your taste. Just be sure not to overfill the pies to prevent seepage during baking.
-
What’s the best way to melt the marshmallows for the mummy drizzle?
The microwave method works great if you heat in short 15-20 second intervals and stir thoroughly in between. This prevents burning and gives you a smooth consistency that’s easy to drizzle but not runny.
-
Can I make the Halloween Hand Held Pies ahead and freeze them?
Yes, the pies freeze well before baking. Just assemble and freeze on a tray before storing in a freezer bag. When ready to bake, add a few minutes to the baking time. Adding the marshmallow drizzle is best done after baking and cooling.
-
What if I don’t have a gingerbread man cookie cutter?
No worries! You can use any cookie cutter shape you have, like bats, hearts, or circles. Just make sure the shapes are large enough to hold some jam and that you have pairs to create the hand pies.
Final Thoughts
This Halloween Hand Held Pies Recipe holds a special place in my heart because it combines simplicity, nostalgia, and that whimsical Halloween spirit all in one bite. Whether you’re baking with kids or hosting a spooky get-together, these pies bring smiles and a little magic to the table. I genuinely hope you enjoy making—and eating—these as much as my family and I do every fall. Give them a try, and prepare for some serious “oohs” and “aahs”!
Print
Halloween Hand Held Pies Recipe
- Prep Time: 20 minutes
- Cook Time: 10 minutes
- Total Time: 45 minutes
- Yield: 10 pies
- Category: Dessert
- Method: Baking
- Cuisine: American
- Diet: Vegetarian
Description
These Halloween Hand Held Pies are a festive and fun treat perfect for spooky celebrations. Made with flaky pie crusts filled with sweet raspberry jam, they are baked to golden perfection and decorated with melted marshmallow drizzle to resemble mummy wrappings, complete with candy eyes. Easy to prepare and delightful to eat, these mini pies make a charming seasonal dessert or snack.
Ingredients
Pie Crust
- 2 ready-made pie crusts (1 package)
Filling
- 1/2 cup raspberry jam
Topping
- 1 cup mini marshmallows
- 1 egg yolk, beaten
- Powdered sugar, optional for dusting
- Store-bought candy eyes (quantity as needed)
Instructions
- Preheat Oven: Preheat the oven to 375°F (190°C) and line a baking sheet with parchment paper to prevent sticking and ensure easy cleanup.
- Prepare Pie Crusts: On a lightly floured surface, roll out the ready-made pie crusts evenly. Alternatively, use homemade crust if preferred. This provides a smooth, workable surface to cut shapes.
- Cut Shapes: Using a gingerbread man cookie cutter, cut out as many hand shapes as possible from the rolled crusts. Make sure to have an even number to create front and back pieces for each pie.
- Arrange Bases: Place half of the cut-out shapes on the prepared baking sheet; these will serve as the bottom layer of the hand pies.
- Add Filling: Spoon a small amount of raspberry jam onto the center of each base, leaving a border around the edges for sealing purposes.
- Seal Pies: Place the remaining cut-out shapes on top of each jam-covered base. Press the edges together firmly using a fork to seal and prevent filling leakage during baking.
- Apply Egg Wash: Brush the tops of the sealed hand pies with the beaten egg yolk, which will help them develop a golden, shiny crust while baking.
- Bake: Bake the pies in the preheated oven for approximately 10 minutes or until they turn golden brown and the crust is fully cooked.
- Cool Pies: Remove the pies from the oven and let them cool completely on a wire rack to set and firm up before decorating.
- Melt Marshmallows: In a microwave-safe bowl, heat the mini marshmallows in 15-20 second intervals, stirring each time until they melt and become smooth. Allow them to cool slightly to a drizzle-able consistency.
- Decorate: Drizzle the melted marshmallow over the cooled hand pies to create a mummy-wrapping effect. Quickly add candy eyes onto the marshmallow before it sets to complete the look.
- Final Cool: Let the decorated pies cool completely so the marshmallow drizzle sets firmly before serving.
Notes
- Make sure the hand pies are completely cooled before applying the marshmallow drizzle, or it may melt and lose shape.
- You can substitute raspberry jam for any other fruit jam or preserves of your choice.
- Use a firm homemade pie crust for best results if opting not to use store-bought crust.
- Store leftover pies in an airtight container at room temperature for up to 2 days to maintain freshness.
- For a gluten-free version, use gluten-free pie crust and verify jam ingredients.
- Powdered sugar can be dusted over the finished pies for an extra touch of sweetness and a frosty look.
Nutrition
- Serving Size: 1 hand pie
- Calories: 220
- Sugar: 14g
- Sodium: 120mg
- Fat: 10g
- Saturated Fat: 3g
- Unsaturated Fat: 6g
- Trans Fat: 0g
- Carbohydrates: 28g
- Fiber: 1g
- Protein: 2g
- Cholesterol: 25mg


