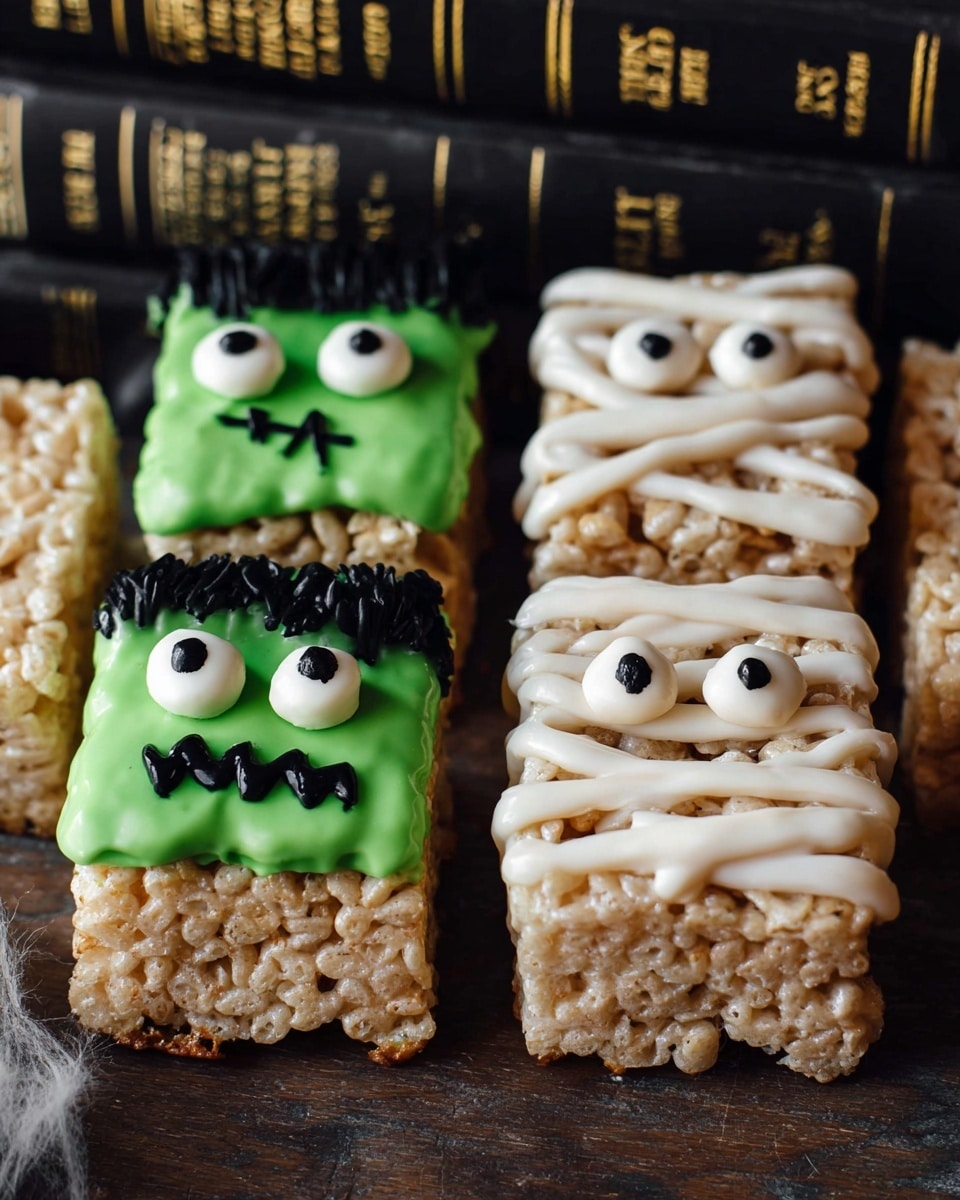
If you’re looking for a fun, festive, and downright delicious treat to impress your friends and family this spooky season, you’ve got to try this Halloween Rice Krispie Treats Recipe. I absolutely love how these turn out—crispy, gooey, and dressed up with bright candy melts and cute candy eyes that really bring that Halloween spirit to the table. Whether you’re making these for a party, a bake sale, or just for a fun weekend snack, this recipe is sure to become your go-to!
Why You’ll Love This Recipe
- Simple Ingredients: You likely have most of these on hand already, making this super easy and convenient.
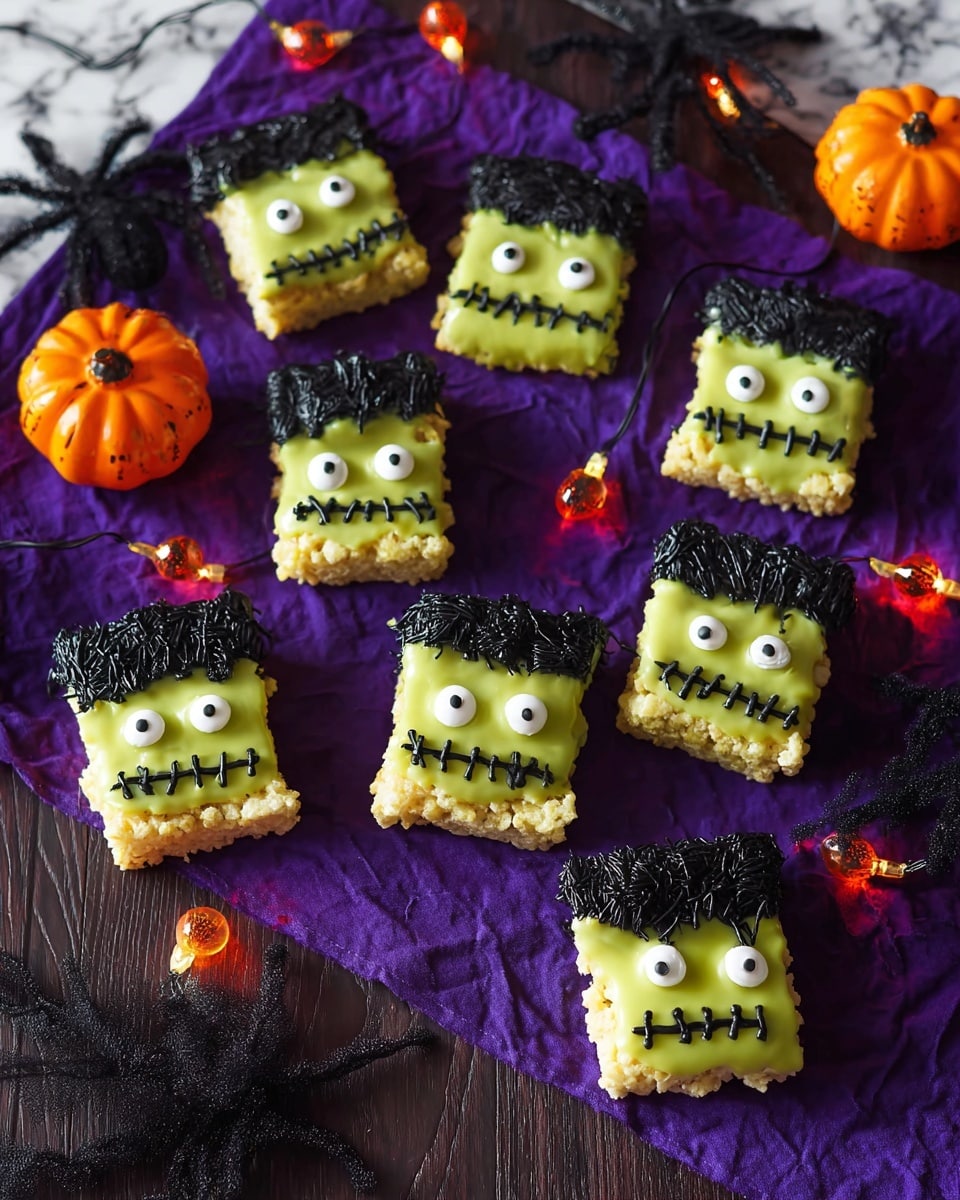
- Fun and Festive: The candy melts and candy eyes turn classic Rice Krispie treats into Halloween stars.
- Kid-Friendly: Little helpers will love assembling and decorating these spooky treats.
- Quick to Make: From start to finish, it takes just about 15 minutes, perfect when you’re short on time.

Ingredients You’ll Need
The magic behind this Halloween Rice Krispie Treats Recipe is in how the simple ingredients come together to create that perfect balance of crispy and chewy, then get a festive twist with colorful candy melts. Choosing the right marshmallows and candy melts makes a huge difference, so keep an eye on quality when you shop.
- Butter: I always go with unsalted to control the saltiness in the treats.
- Mini marshmallows: They melt quickly and give you that perfect gooey texture.
- Salt: Just a pinch to balance all the sweetness.
- Vanilla extract: Adds a hint of warmth and depth that you won’t want to skip.
- Puffed rice cereal: Classic Rice Krispies make these treats crispy and light.
- Bright/light green candy melts: For a fun Halloween color that really pops on top.
- Bright white candy melts: Perfect for creating those spooky white eyes.
- Refined coconut oil (or shortening): Helps candy melts go on silky and smooth.
- Candy eyes: I love these for instantly bringing character to each treat.
- Black buttercream frosting: Optional, but it’s great for adding tiny details or spooky faces.
Variations
One thing I love about this Halloween Rice Krispie Treats Recipe is how easy it is to make your own. I’ve played around with adding flavors, colors, and toppings, and it’s always a hit when you personalize it to your taste (or what you have in your pantry!).
- Spooky colors: I sometimes swap the green candy melts for orange or purple for a different Halloween vibe—my nieces love picking their favorite color.
- Allergy-friendly: You can find dairy-free butter and vegan marshmallows, which works great if anyone’s dietary needs call for it.
- Additional Mix-ins: Add Halloween sprinkles or mini chocolate chips for a surprise crunch inside.
- Sour twist: Drizzle some melted red candy melts on top to mimic “bloody” decor for a creepier edge.
How to Make Halloween Rice Krispie Treats Recipe
Step 1: Prep Your Space and Tools
Line a baking sheet with parchment paper and butter or spray a 9×13 baking dish with non-stick spray. Trust me, this prep saves so much hassle later when you’re trying to get those treats out cleanly and neatly. Having everything ready means you can focus on the fun part without interruptions.
Step 2: Melt Butter and Marshmallows
In a medium stock pot over medium-low heat, melt the butter gently. Add your mini marshmallows, salt, and vanilla, stirring constantly until everything is melted and smooth. I always keep the temperature low here to avoid scorching—marshmallows can get tough if overheated. Once melted, remove from heat right away.
Step 3: Combine with Rice Cereal and Press
Stir in the puffed rice cereal until every bit is coated with that luscious marshmallow mixture. Press evenly into your prepared 9×13 dish—don’t press too hard, or the treats become too dense, but firm enough to stick together. This balance was something I learned the first time; it makes the texture just right.
Step 4: Cool and Cut Into Squares
Allow the treats to cool and set completely before cutting. I usually let them rest for about an hour at room temperature. When cutting, use a sharp knife (I dip mine in hot water for cleaner cuts) to slice into 24 squares. This is where you start to get excited because they already look amazing—but we’re just getting started!
Step 5: Melt Candy and Decorate
Melt the green and white candy melts separately with 2–4 tablespoons of refined coconut oil or shortening for a nice smooth finish. Dip or drizzle the treats with the green to create a spooky base, then add white candy melts for eyeballs or fun shapes. Place candy eyes while the coating is still warm so they stick nicely. For extra fun, pipe black buttercream frosting details for mouths or spooky accents. This step always brings the treats to life!
Pro Tips for Making Halloween Rice Krispie Treats Recipe
- Gentle Heat: Melting marshmallows on medium-low prevents burning and keeps that perfect chewy texture.
- Don’t Over-Press: Pressing your mixture too hard packs those treats—they lose their airy crunch, something I had to learn the hard way!
- Smooth Candy Melt Finish: Adding coconut oil to your candy melts helps them spread beautifully without cracking when set.
- Sharp Knife for Cuts: Dipping your knife in hot water before slicing keeps edges neat and the treats intact.
How to Serve Halloween Rice Krispie Treats Recipe
Garnishes
I usually stick with candy eyes because they’re so fun and give personality to the treats, but sometimes I add edible glitter or Halloween-themed sprinkles for a little extra sparkle. Black buttercream works great for tiny web details or scary smiles, turning simple treats into mini Halloween masterpieces.
Side Dishes
Pair these with some pumpkin spice cookies or a hot cup of apple cider for a cozy Halloween snack spread that everyone enjoys. They’re also great alongside your favorite spooky punch or even just plain milk for dipping.
Creative Ways to Present
I’ve wrapped individual treats in clear cellophane bags tied with orange and black twine—that presentation was a huge hit at a neighborhood party. Another favorite is arranging them on a platter shaped like a pumpkin or spider web for a striking Halloween centerpiece. Get your creative hat on—it’s half the fun!
Make Ahead and Storage
Storing Leftovers
I like to store extra treats in an airtight container at room temperature, where they keep their chewy texture for up to 3 days. If your kitchen is warm, popping them in the fridge helps keep the candy melts from getting sticky, though they’ll firm up a bit more.
Freezing
Here’s what I discovered: you can freeze these treats wrapped tightly in plastic wrap and stored in a freezer-safe container for up to a month. Just thaw them at room temperature before unwrapping to keep that fresh-baked taste!
Reheating
If you want to soften the treats after storing, I give them a quick zap in the microwave for 10 seconds—it’s usually enough to bring back that perfect gooey feel without melting the candy decorations. Just be cautious not to overheat!
FAQs
-
Can I use regular marshmallows instead of mini marshmallows?
Yes, you can definitely use regular marshmallows for this Halloween Rice Krispie Treats Recipe. Just keep in mind they might take a bit longer to melt, so stir gently and patiently to avoid burning. The texture will still be wonderful!
-
What if I don’t have candy melts—can I use chocolate chips instead?
Chocolate chips work in a pinch, but they don’t melt as smoothly or harden with the same shine and texture as candy melts. If you want that perfect glossy decoration, candy melts are the way to go, but for a quick fix, chocolate chips dipped in a little coconut oil can work.
-
How do I make black buttercream frosting?
I usually make mine by tinting a basic buttercream with gel food coloring in black. It’s best to add color gradually until you get a deep black without making the frosting too runny. You can also buy pre-made black frosting if you want to save time.
-
Can I make this recipe gluten-free?
Absolutely! Just swap out the regular puffed rice cereal with certified gluten-free puffed rice cereal. Everything else in the Halloween Rice Krispie Treats Recipe is naturally gluten-free.
-
How do I prevent my candy melts from cracking after they set?
Adding a bit of refined coconut oil or shortening to the candy melts before melting keeps them smooth and flexible after they harden, which helps prevent cracking when you cut or handle your treats.
Final Thoughts
I can’t tell you how many times I’ve turned to this Halloween Rice Krispie Treats Recipe when I needed a quick, crowd-pleasing treat that still wows. The combination of crunchy cereal, gooey marshmallow, and bright, spooky decorations never fails to bring smiles. Plus, it’s just plain fun to make! I hope you give this a try and enjoy making your Halloween celebrations a little sweeter and a lot more festive.
Print
Halloween Rice Krispie Treats Recipe
- Prep Time: 5 minutes
- Cook Time: 10 minutes
- Total Time: 15 minutes
- Yield: 24 treats
- Category: Dessert
- Method: Stovetop
- Cuisine: American
Description
Celebrate Halloween with these fun and festive Halloween Rice Krispie Treats! Made with buttery marshmallows and crisp puffed rice cereal, then decorated with vibrant candy melts and spooky candy eyes, these treats are perfect for parties, bake sales, or quick seasonal snacks that kids and adults will love.
Ingredients
Main Ingredients
- 4 tablespoons butter
- 7 cups mini marshmallows
- 1/4 teaspoon salt
- 1/4 teaspoon vanilla extract
- 6 cups puffed rice cereal
Decoration
- 12 ounces bright/light green candy melts
- 6 ounces bright white candy melts
- 2-4 tablespoons refined coconut oil or shortening
- Candy eyes
- Black buttercream frosting (see notes for preparation or substitutions)
Instructions
- Prepare the baking area: Line a baking sheet with parchment paper and set aside. Butter or spray a 9×13 inch baking dish with non-stick cooking spray, then set it aside to prepare for pressing the treats.
- Melt the butter and marshmallows: In a medium stock pot over medium-low heat, melt the butter. Add in the mini marshmallows, salt, and vanilla extract. Stir continuously until the marshmallows are fully melted and the mixture is smooth.
- Combine with cereal: Remove the mixture from heat. Immediately stir in the puffed rice cereal until it is thoroughly coated with the marshmallow mixture.
- Press mixture into dish: Transfer the coated cereal mixture into the prepared 9×13 baking dish. Use a buttered spatula or wax paper to evenly press the mixture firmly into the dish to create an even layer.
- Cool and cut: Allow the Rice Krispie Treats to cool and set at room temperature until firm. Once set, cut into 24 equal squares to serve.
- Decorate: Melt the candy melts according to package instructions, using 2-4 tablespoons of refined coconut oil or shortening to achieve a smooth, drizzleable consistency. Decorate the squares with green and white candy melts, candy eyes, and black buttercream frosting to create spooky Halloween-themed treats.
Notes
- These treats are easy to make, quick, and perfect for Halloween-themed events, bake sales, or as fun snacks for kids.
- For black buttercream frosting, you can tint store-bought frosting with black gel food coloring or make your own by mixing butter, powdered sugar, a splash of milk, and black gel dye.
- Use refined coconut oil instead of shortening for a subtle coconut flavor and smoother texture.
- Store treats in an airtight container at room temperature for up to 3 days to maintain freshness.
Nutrition
- Serving Size: 1 treat
- Calories: 81 kcal
- Sugar: 8 g
- Sodium: 53 mg
- Fat: 2 g
- Saturated Fat: 1 g
- Unsaturated Fat: 1 g
- Trans Fat: 0 g
- Carbohydrates: 16 g
- Fiber: 1 g
- Protein: 1 g
- Cholesterol: 5 mg


