
I absolutely love this Homemade Dill Pickles Recipe because it’s simple, fresh, and captures that perfect tangy crunch you crave. Whether you’re new to pickling or looking for a straightforward way to make something special in your kitchen, this recipe hits all the right notes without any fuss. I first whipped this up on a lazy Sunday, and ever since, my family has gone crazy for these zesty pickles — they’re always the first to disappear from the fridge!
You’ll find that making dill pickles at home is not just fun but also incredibly rewarding. The flavors gel beautifully after just a day, but if you give it a few more days, it transforms into something truly delicious. Homemade Dill Pickles Recipe is perfect as a snack, a sandwich booster, or even a tangy side for your summer barbecues. Trust me, once you try this, store-bought pickles won’t even come close.
Why You’ll Love This Recipe
- Simplicity: The ingredients are simple and easy to find, perfect for beginner picklers.
- Quick Flavor Development: You get a tasty pickle in as little as 1-2 days, with flavor improving over time.
- Versatility: Customize the cut – spears or chips – depending on how you want to enjoy them.
- Crunch Factor: Keeps cucumbers crisp and refreshingly crunchy, just like your favorite deli pickles.

Ingredients You’ll Need
This Homemade Dill Pickles Recipe shines because the ingredients balance tartness, crunch, and aromatics beautifully. When you shop, look for fresh cucumbers and good-quality white vinegar to get that classic bright pickle flavor.
- Persian or Pickling Cucumbers: Persian cucumbers stay crunchy and small, pickling cucumbers are a classic choice for pickling.
- Garlic Cloves: Adds pungent depth and aroma to every bite.
- Mustard Seeds: Imparts a mild tangy warmth that makes the pickles pop.
- Peppercorns: Provides a subtle spice and texture contrast.
- Fresh Dill Sprigs: The star herb – fresh dill is key to that unmistakable pickle flavor.
- Water: Used to dilute the vinegar and create the brine.
- Distilled White Vinegar: The acid that pickles and preserves.
- Cane Sugar: Balances the tartness with a touch of sweetness.
- Sea Salt: Essential for flavor and aiding in the pickling process.
Variations
I love experimenting with this Homemade Dill Pickles Recipe to keep things fun and tailored to my family’s cravings. Don’t hesitate to tweak the spices or switch up the cucumber cut to suit your mood – you’ll find new favorites every time.
- Spicy Kick: I once added a sliced fresh jalapeño to the jar and my friends couldn’t get enough of the heat.
- Herb Mix: Try adding fresh tarragon or thyme for a unique twist on the usual dill flavor.
- Sweet & Spicy: Adding a pinch of red pepper flakes alongside a bit more sugar creates a sweet, spicy symphony that’s addictive.
- Low Sodium: You can reduce sea salt slightly if you’re watching sodium — just extend pickling time for more flavor to develop.
How to Make Homemade Dill Pickles Recipe
Step 1: Prep Your Cucumbers
Start by washing your cucumbers thoroughly to remove any dirt. Then, decide how you like your pickles — I personally enjoy dill pickle spears, so I slice the cucumbers lengthwise into quarters. For a snack-friendly option, try dill pickle chips by slicing the cucumbers thinly across. The cut influences not only the eating experience but also how quickly they absorb the brine.
Step 2: Load Your Jars with Flavor
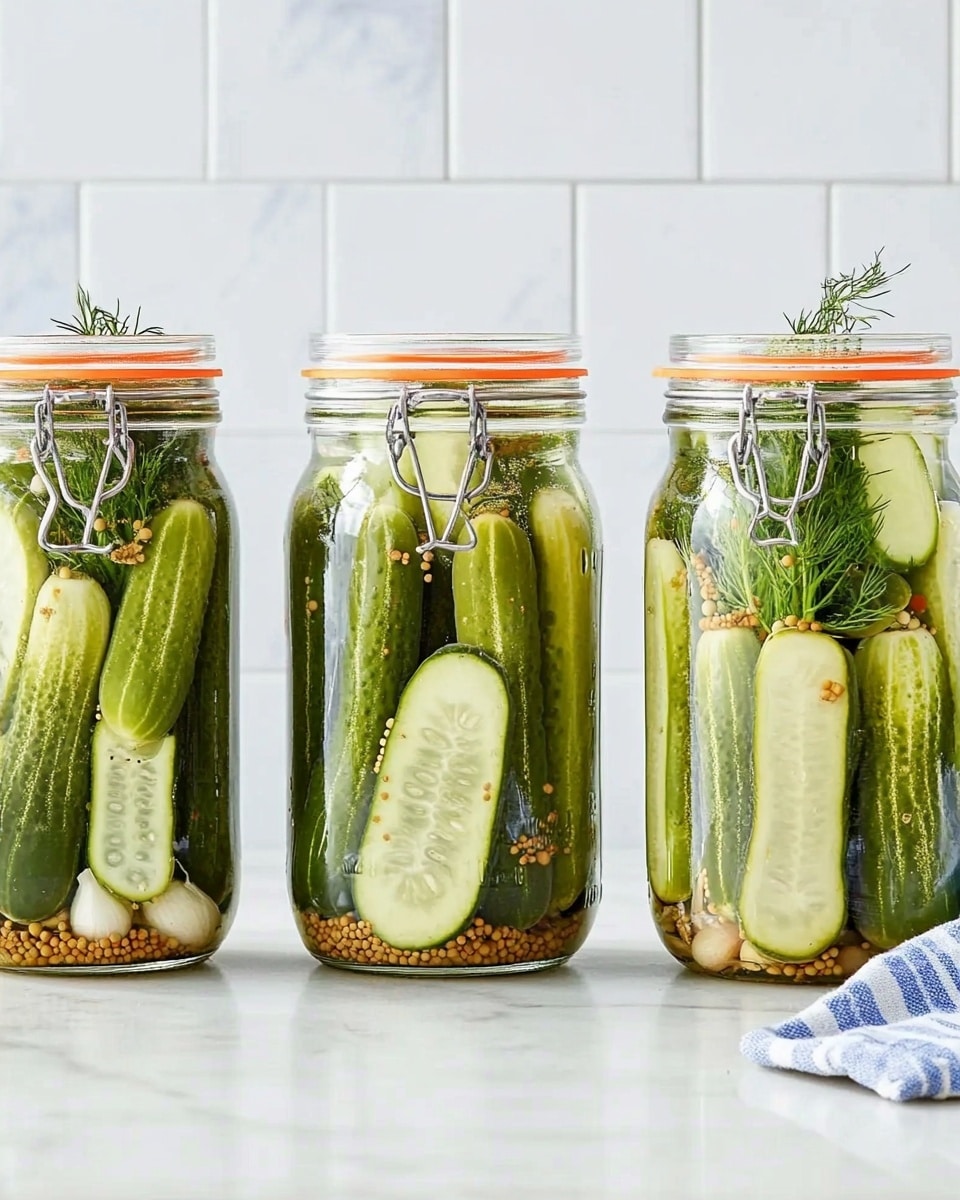
Divide the cucumbers evenly among your jars – 8-ounce jars work great for gift-giving, while 16-ounce jars are perfect for home fridge storage. Then, add the garlic halves, mustard seeds, peppercorns, and a couple of fresh dill sprigs into each jar. This layering infuses the pickles with aroma and depth while you wait for the magic to happen.
Step 3: Make the Brine and Pour Over
In a medium saucepan over medium heat, combine water, distilled white vinegar, cane sugar, and sea salt. Stir gently until the sugar and salt dissolve completely – this usually takes about 1 minute. Let the brine cool slightly before pouring it over the cucumbers in your jars. If it’s too hot, you risk softening your crisp cucumbers.
Step 4: Chill and Let the Flavors Develop
Let the pickle jars cool to room temperature on the counter before sealing and refrigerating. The pickling process happens in the fridge, which means you don’t need to worry about sterilizing jars or canning. Pickle spears will be lightly pickled in 2 days, though the flavor really hits its stride after 5 or 6 days. Chips get a head start and will be delicious in just 1 day. Keep your jars refrigerated and enjoy for several weeks.
Pro Tips for Making Homemade Dill Pickles Recipe
- Choose Crisp Cucumbers: I always pick firm, unblemished cucumbers to keep the texture crunchy after pickling.
- Cool the Brine: Pouring warm brine can soften cucumbers quickly, so let it cool before adding.
- Use Fresh Dill: Fresh dill sprigs make all the difference compared to dried dill in flavor and aroma.
- Jar Size Matters: Smaller jars work best for faster pickling and easy fridge storage, plus they make thoughtful gifts!
How to Serve Homemade Dill Pickles Recipe
Garnishes
I love adding a little extra fresh dill or a sprinkle of crushed red pepper flakes on top of a pickle spear on my sandwich for that added punch. Sometimes, a brush of olive oil drizzled over pickle chips with a dusting of smoked paprika makes for an irresistible snack garnish.
Side Dishes
Nothing pairs better than a thick deli-style sandwich or a juicy burger alongside these pickles. They’re also fantastic next to soft cheeses or served up with Mediterranean mezze boards for a fresh contrast.
Creative Ways to Present
I’ve found that serving these pickles in pretty glass jars on a picnic or at parties gets everyone talking. Stack the spears upright, add a sprig of dill for decoration, and serve with toothpicks for the perfectly styled appetizer. For kids, pickle chips in small bowls with dips like ranch or hummus always go down a treat.
Make Ahead and Storage
Storing Leftovers
I store my homemade dill pickles right in their sealed jars in the fridge. They stay crisp and delicious for several weeks – sometimes disappearing before then! Keeping them cold prevents over-softening and helps the flavors deepen slowly.
Freezing
Freezing isn’t really ideal for these pickles because the cucumbers can lose their crunch and get soggy when thawed. I recommend sticking to fridge storage for the best texture and flavor.
Reheating
Since these are refrigerator pickles meant for cold serving, I don’t reheat them. They’re best enjoyed straight from the fridge, where their crispness and tang remain at their peak.
FAQs
-
How long do homemade dill pickles last in the fridge?
When stored properly in sealed jars, homemade dill pickles stay fresh and delicious for up to 4 weeks. They may get more flavorful over time but try to eat them within this period to enjoy the best crunch and taste.
-
Can I use regular cucumbers instead of Persian or pickling cucumbers?
While you can use regular cucumbers, they tend to be larger with more seeds and thinner skins, so they might get softer or less crunchy after pickling. I recommend Persian or pickling cucumbers for the best texture in your homemade dill pickles.
-
Do I need to sterilize jars for this recipe?
Nope! Because this is a refrigerator pickle recipe, sterilizing jars isn’t necessary. Just make sure your jars are clean and airtight to keep your pickles fresh and safe.
-
How can I make my pickles crunchier?
Using fresh cucumbers that are firm and cold helps maintain crunch. Also, avoid pouring hot brine directly onto the cucumbers and keep your pickles refrigerated at all times to prevent them from going soft.
-
Can I add other spices or herbs to customize my pickles?
Absolutely! Feel free to experiment with spices like coriander seeds, red pepper flakes, or herbs such as thyme and tarragon to tailor this Homemade Dill Pickles Recipe to your taste preferences.
Final Thoughts
This Homemade Dill Pickles Recipe has become a staple in my kitchen because it’s approachable, quick, and consistently delicious. I love sharing it with friends who often say they didn’t realize pickling at home could be this simple. Give it a try—you’ll love how it brightens up your meals with its crisp tang and fresh herbaceous notes. Once you make your first batch, you’ll see why homemade just tastes so much better!
Print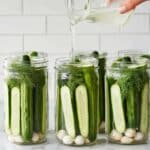
Homemade Dill Pickles Recipe
- Prep Time: 10 minutes
- Cook Time: 1 minute
- Total Time: 1 day 11 minutes
- Yield: 16 servings
- Category: Pickling
- Method: No-Cook
- Cuisine: American
Description
This easy homemade dill pickles recipe uses fresh cucumbers, garlic, mustard seeds, peppercorns, and dill sprigs soaked in a simple brine of vinegar, water, cane sugar, and sea salt. Perfectly tangy and crisp, these pickles can be made as spears or chips and are ready to enjoy in just a day, with flavor improving over time. A quick refrigerator pickle method that yields deliciously refreshing pickles with minimal prep.
Ingredients
Pickles
- 12 to 14 Persian cucumbers or 8 to 10 pickling cucumbers
- 4 garlic cloves, halved
- 2 teaspoons mustard seeds
- 2 teaspoons peppercorns
- Fresh dill sprigs, a few per jar
Brine
- 2 cups water
- 2 cups distilled white vinegar
- 1/4 cup cane sugar
- 2 tablespoons sea salt
Instructions
- Prepare the Cucumbers: Slice the cucumbers lengthwise into quarters for spears or thinly slice horizontally for chips, depending on your preference for pickle shape and size.
- Fill the Jars: Divide the cucumbers evenly among 4 (8-ounce) or 2 (16-ounce) jars. Add halved garlic cloves, mustard seeds, peppercorns, and a few fresh dill sprigs to each jar for flavor.
- Make the Brine: In a medium saucepan, combine water, distilled white vinegar, cane sugar, and sea salt. Heat over medium heat while stirring until the sugar and salt fully dissolve, about 1 minute. Remove from heat and let it cool slightly.
- Pour the Brine: Carefully pour the slightly cooled brine over the cucumbers and spices in each jar, ensuring cucumbers are fully submerged.
- Cool and Refrigerate: Let the jars cool to room temperature before sealing with lids. Store the jars in the refrigerator to pickle.
- Pickling Time: Dill pickle spears will be lightly pickled and ready to eat after 2 days, with best flavor developing around days 5 to 6. Chips pickle faster, becoming lightly pickled in 1 day and more flavorful with each day after. Keep refrigerated and consume within several weeks for optimal freshness.
Notes
- Use fresh cucumbers for crisp and crunchy pickles.
- If you prefer spicier pickles, add a pinch of red pepper flakes or a few slices of jalapeño.
- Make sure cucumbers are fully submerged in brine to avoid spoilage.
- Store pickles in the refrigerator for up to 3–4 weeks.
- The sugar balance can be adjusted according to taste preference.
- The pickling jars should be sterilized before use for best food safety.
Nutrition
- Serving Size: 1 pickle spear or equivalent
- Calories: 10 kcal
- Sugar: 1.5 g
- Sodium: 300 mg
- Fat: 0 g
- Saturated Fat: 0 g
- Unsaturated Fat: 0 g
- Trans Fat: 0 g
- Carbohydrates: 2 g
- Fiber: 0.5 g
- Protein: 0.3 g
- Cholesterol: 0 mg

