
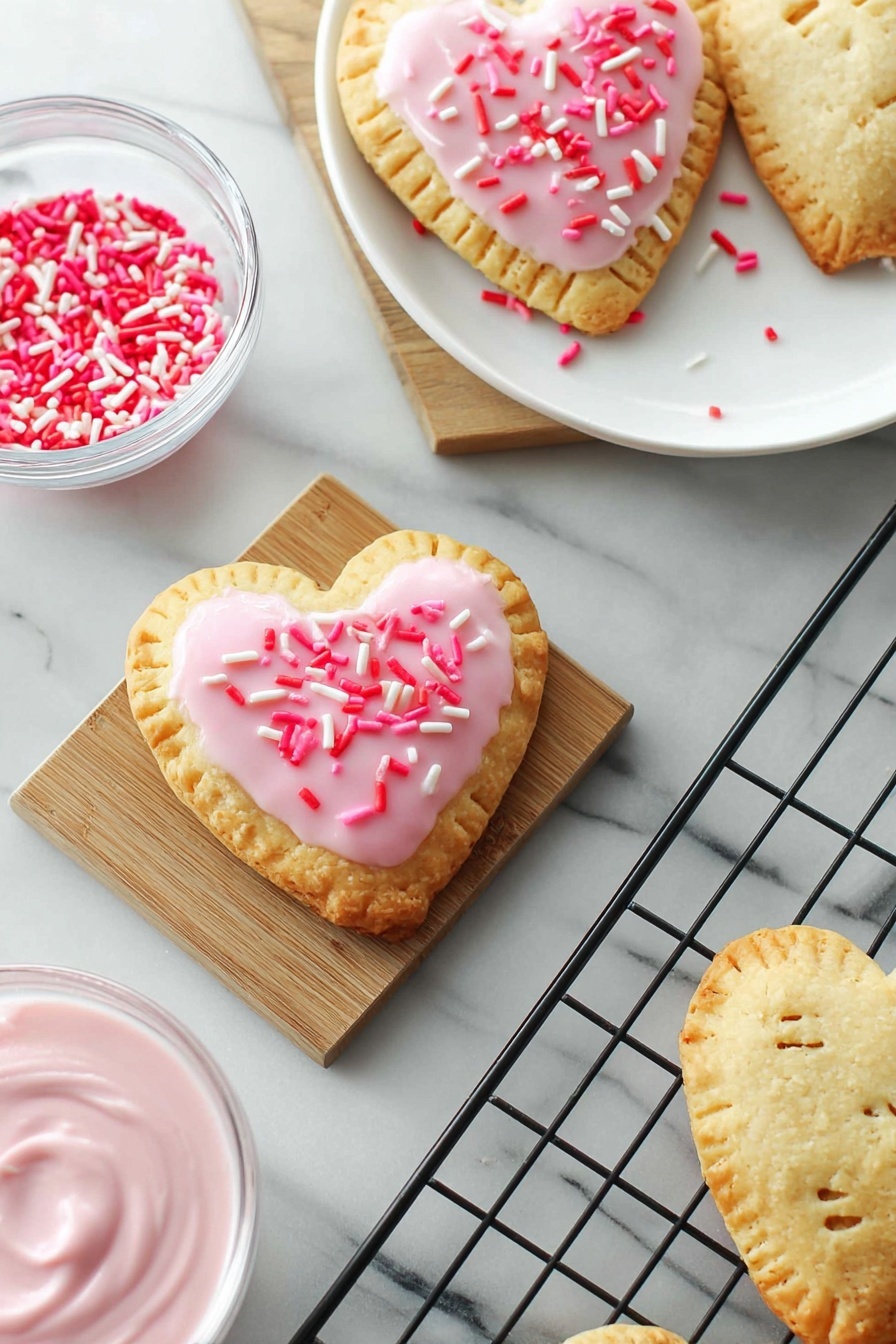
If you’ve ever dreamed of bringing that nostalgic, flaky, jam-filled pop tart experience to your kitchen, then you’re going to fall head over heels for this Homemade Strawberry Pop Tarts Recipe. I absolutely love how these turn out—warm, buttery crust hugging a sweet strawberry jam center with a glossy, sprinkle-topped icing that makes every bite feel like a special occasion. Plus, you’ll find they’re way more satisfying and customizable than store-bought versions. Stick around and I’ll walk you through everything to nail these from scratch in no time!
Why You’ll Love This Recipe
- Super Simple Ingredients: Uses just a few pantry staples, so it’s easy to whip up any day.
- Perfectly Flaky Crust: Using premade pie crust means you get flaky layers with zero stress.
- Customizable Sweetness: You control how much strawberry jam and icing you want—sweet or just right.
- Fun and Festive: Heart shapes and sprinkles make it a hit for kids, parties, or anytime you want a smile.

Ingredients You’ll Need
These ingredients work together to create that iconic pop tart taste—flaky crust, luscious strawberry filling, and the perfect glaze on top. I like grabbing refrigerated pie crusts because they save loads of time but still bake beautifully.
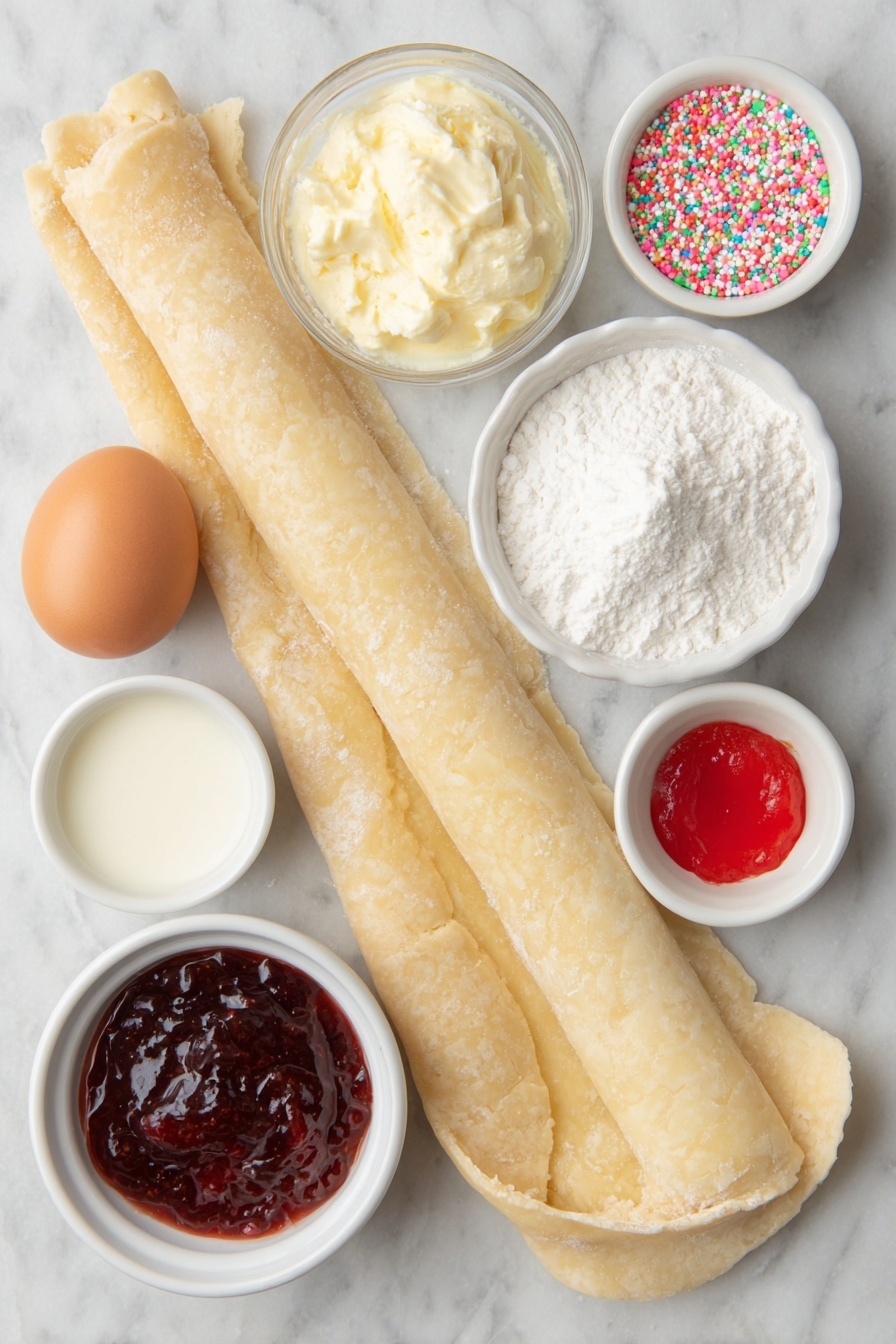
- Refrigerated premade pie crusts: Make sure they’re at room temperature before unrolling for easier handling.
- Strawberry jam: Choose a chunky or smooth jam, depending on your texture preference—both work wonderfully.
- Egg: Used for the egg wash that seals the edges and gives a golden finish.
- Confectioners sugar: For a smooth, melt-in-your-mouth icing that balances the fruity filling.
- Milk: To thin the icing just enough for easy spreading.
- Vanilla extract: Adds a warm, cozy flavor to the icing.
- Red food coloring (just one drop!): Gives the icing a lovely pink tint—totally optional but I love the pop of color.
- Sprinkles: Red and pink sprinkles make them feel extra festive and fun.
Variations
I love that you can easily customize this Homemade Strawberry Pop Tarts Recipe to match seasons, dietary needs, or just your mood. You’ll find it fun experimenting with fillings and toppings once you get the hang of the basic version.
- Different Jam Fillings: I once tried raspberry and my family went crazy for it—give blueberry or apricot a shot, too!
- Vegan Version: Swap the egg wash for a plant-based milk + maple syrup mix, and choose vegan pie crust to keep it dairy and egg-free.
- No-Bake Icing: Skip the vanilla and red food coloring for a simple powdered sugar glaze that really lets the jam shine.
- Fun Shapes: While hearts are my favorite, stars or circles work beautifully—especially for holidays or themed parties.
How to Make Homemade Strawberry Pop Tarts Recipe
Step 1: Roll Out and Cut Your Crusts
Preheat your oven to 400°F. Then, unroll your premade pie crusts on a lightly floured surface or parchment paper—this makes rolling and maneuvering them a breeze. Grab a heart-shaped cookie cutter (or your preferred shape) and cut as many pieces as you can by rotating and repositioning the cutter. Don’t worry if there’s scrap crust left; just knead it lightly and roll it out again about 1/8 inch thick to make more shapes. This step feels like a little puzzle and is kind of fun!
Step 2: Add Jam and Seal with Egg Wash
Place half of your cut-out shapes onto a parchment-lined baking sheet. Dollop about one tablespoon of strawberry jam in the center of each shape—it doesn’t need to be perfectly spread, as it will spread evenly during baking, which I’ve learned the hard way! Beat one egg in a small bowl and use a pastry brush (or your finger if you don’t have one) to paint the inside edges of each jam-topped piece. This helps the top seals stick perfectly. Then, carefully place a matching heart on top. Press the edges gently with your fingertips, then use a fork to crimp around the edges, sealing the tart and giving it that classic look.
Step 3: Vent, Egg Wash, and Bake
Use the fork to poke a few small holes in the top of each pop tart—this lets steam escape during baking and keeps them from puffing up too much. Brush the tops with the remaining egg wash for that beautiful golden sheen. Pop them in the oven for 10 to 12 minutes until they’re golden brown. Watching them bake is the hardest part because the smell is irresistible!
Step 4: Cool and Ice Your Pop Tarts
Let your pop tarts cool completely on a wire rack. Patience here is key so the icing doesn’t melt off. While they’re cooling, whisk together your icing by combining confectioners’ sugar, milk, and vanilla extract until smooth. Add just one drop of red food coloring for a lovely pink tint—that little touch makes me smile every time. Spread or spoon the icing over the cooled pop tarts and sprinkle with festive red and pink sprinkles. Now you have picture-perfect homemade strawberry pop tarts ready to devour!
Pro Tips for Making Homemade Strawberry Pop Tarts Recipe
- Room Temperature Crust: Letting the pie crust warm up before working with it prevents cracking and makes cutting out shapes easier.
- Don’t Overfill: Using about one tablespoon of jam keeps the filling from oozing out during baking—trust me, I learned this after a few messy tarts!
- Seal Edges Well: Press edges firmly then crimp with a fork to ensure your tarts don’t open up in the oven.
- Cool Before Icing: Always wait for tarts to cool completely before adding icing to avoid it sliding off or melting.
How to Serve Homemade Strawberry Pop Tarts Recipe
Garnishes
I love adding brightly colored sprinkles not just for the visual pop but because the slight crunch adds a fun texture contrast. If I’m feeling fancy, I sometimes grate a little white chocolate over the icing right after it sets for a decadent touch.
Side Dishes
These pop tarts are a treat on their own, but I often serve them alongside a fresh fruit salad or a simple dollop of whipped cream for brunch. A hot cup of coffee or a cold glass of milk perfectly rounds out the combo.
Creative Ways to Present
For birthdays or Valentine’s Day, I’ve turned these into little dessert sandwiches by spreading a thin layer of berry cream cheese between two tarts. I also love arranging them on a pretty platter with fresh strawberries and edible flowers—guaranteed to wow your guests.
Make Ahead and Storage
Storing Leftovers
Leftover pop tarts store best in an airtight container at room temperature for up to 2 days. I like to layer parchment paper between them to keep the icing from sticking. They’ve held up well this way without losing flakiness or freshness.
Freezing
If you want to make these ahead, you can freeze uniced pop tarts before baking or fully baked tarts after cooling (without icing). Wrapped tightly in plastic wrap and foil, they freeze beautifully for up to a month. Just thaw fully before icing or reheating.
Reheating
I reheat leftover pop tarts in a toaster oven or regular oven at 350°F for 5–7 minutes to bring back that fresh-baked texture. Avoid microwaving—it makes the crust soggy. If you’ve already iced them, a quick warm-up helps the filling soften without melting the icing too much.
FAQs
-
Can I use homemade pie crust instead of premade?
Absolutely! Homemade pie crust works beautifully if you have a favorite recipe. Just make sure it’s rolled out to about 1/8 inch thickness and chilled enough to cut cleanly. It may take a little more time, but the flavor payoff is worth it.
-
What can I substitute for the egg wash?
If you’re avoiding eggs, brushing tops and edges with milk, cream, or even a little melted butter works well to help seal the edges and brown the crust nicely.
-
Can I make these gluten-free?
You can if you use a gluten-free pie crust and make sure your jam and other ingredients don’t contain gluten. Gluten-free crusts might be a little more delicate, so handle carefully during cutting and sealing.
-
How do I prevent my pop tarts from leaking jam?
Use a moderate amount of jam (about one tablespoon), make sure to brush the edges with egg wash or milk before sealing, and press and crimp the edges firmly. Poking vent holes is also crucial to releasing steam and avoiding bursting.
Final Thoughts
This Homemade Strawberry Pop Tarts Recipe has truly become a family favorite in my kitchen — the kind of treat I’m proud to serve any day, not just special occasions. It’s approachable, customizable, and honestly so satisfying to pull out of the oven. I hope you’ll give it a try and fall in love with the fun of making pop tarts from scratch. There’s just something joyful about biting into that flaky crust and sweet strawberry center that brings back warm memories and new ones, too. Happy baking!
Print
Homemade Strawberry Pop Tarts Recipe
- Prep Time: 15 minutes
- Cook Time: 10-12 minutes
- Total Time: 30 minutes
- Yield: 10 pop tarts
- Category: Breakfast
- Method: Baking
- Cuisine: American
Description
This Homemade Pop Tarts recipe offers a delightful DIY twist on the classic breakfast treat, featuring flaky premade pie crust filled with sweet strawberry jam and topped with vibrant pink icing and sprinkles. Perfect for a fun weekend baking activity, these heart-shaped pop tarts are easy to prepare and baked to golden perfection for a warm, comforting treat.
Ingredients
Pop Tarts
- 2 Refrigerated Premade Pie Crusts (at room temperature)
- Strawberry Jam (about 10 tablespoons, 1 tablespoon per tart)
- 1 Egg (for egg wash)
Icing
- 1/2 Cup Confectioners Sugar
- 2 Tbsp Milk
- 1/2 Tsp Vanilla Extract
- 1 Drop Red Food Coloring
- Red and Pink Sprinkles (for decoration)
Instructions
- Preheat the oven: Preheat your oven to 400°F (200°C) to prepare for baking the pop tarts.
- Prepare the dough: On a baker’s mat, parchment paper, or lightly floured counter, unroll the premade pie crusts to flatten them out.
- Cut heart shapes: Using a heart-shaped cookie cutter, cut out as many heart shapes as possible from the pie crust. Place these onto a parchment-lined cookie sheet. Knead any remaining dough, roll it out to about 1/8 inch thickness, and cut more hearts until all dough is used.
- Add the filling: Place one tablespoon of strawberry jam in the center of half the heart-shaped dough pieces. The jam does not need to be spread evenly, as it will even out during baking.
- Apply egg wash to edges: Beat the egg in a small bowl. Brush the inside edges of the dough hearts that contain jam with the egg wash to help seal the tops.
- Seal the pop tarts: Lay a plain heart-shaped dough cutout on top of each jam-filled piece. Seal the edges by pressing them first with your fingers, then crimping the edges with a fork all around to secure the filling inside.
- Poke holes and brush egg wash: Use the fork to poke several holes into the tops of the pop tarts to allow steam to escape while baking. Then brush the entire tops with the egg wash for a golden finish.
- Bake: Place the tray in the oven and bake the pop tarts at 400°F for 10-12 minutes or until they are golden brown.
- Cool: Remove from the oven and transfer the pop tarts to a wire rack to cool completely before icing.
- Prepare the icing: In a small bowl, whisk together the confectioners sugar, milk, and vanilla extract until smooth. Add one drop of red food coloring and mix until the color is even.
- Ice and decorate: Spoon the icing over the cooled pop tarts and use the back of the spoon or a small spatula to spread it evenly. Immediately sprinkle red and pink sprinkles on top before the icing sets.
Notes
- Ensure the pie crusts are at room temperature before rolling to avoid cracking.
- Don’t overfill with jam to prevent leaking during baking.
- The egg wash helps create a shiny, golden crust and acts as glue for sealing the edges.
- Allow pop tarts to cool completely before icing to prevent melting.
- Store leftover pop tarts in an airtight container for up to 3 days.
Nutrition
- Serving Size: 1 pop tart
- Calories: 220
- Sugar: 15g
- Sodium: 180mg
- Fat: 11g
- Saturated Fat: 5g
- Unsaturated Fat: 5g
- Trans Fat: 0g
- Carbohydrates: 28g
- Fiber: 1g
- Protein: 3g
- Cholesterol: 35mg


