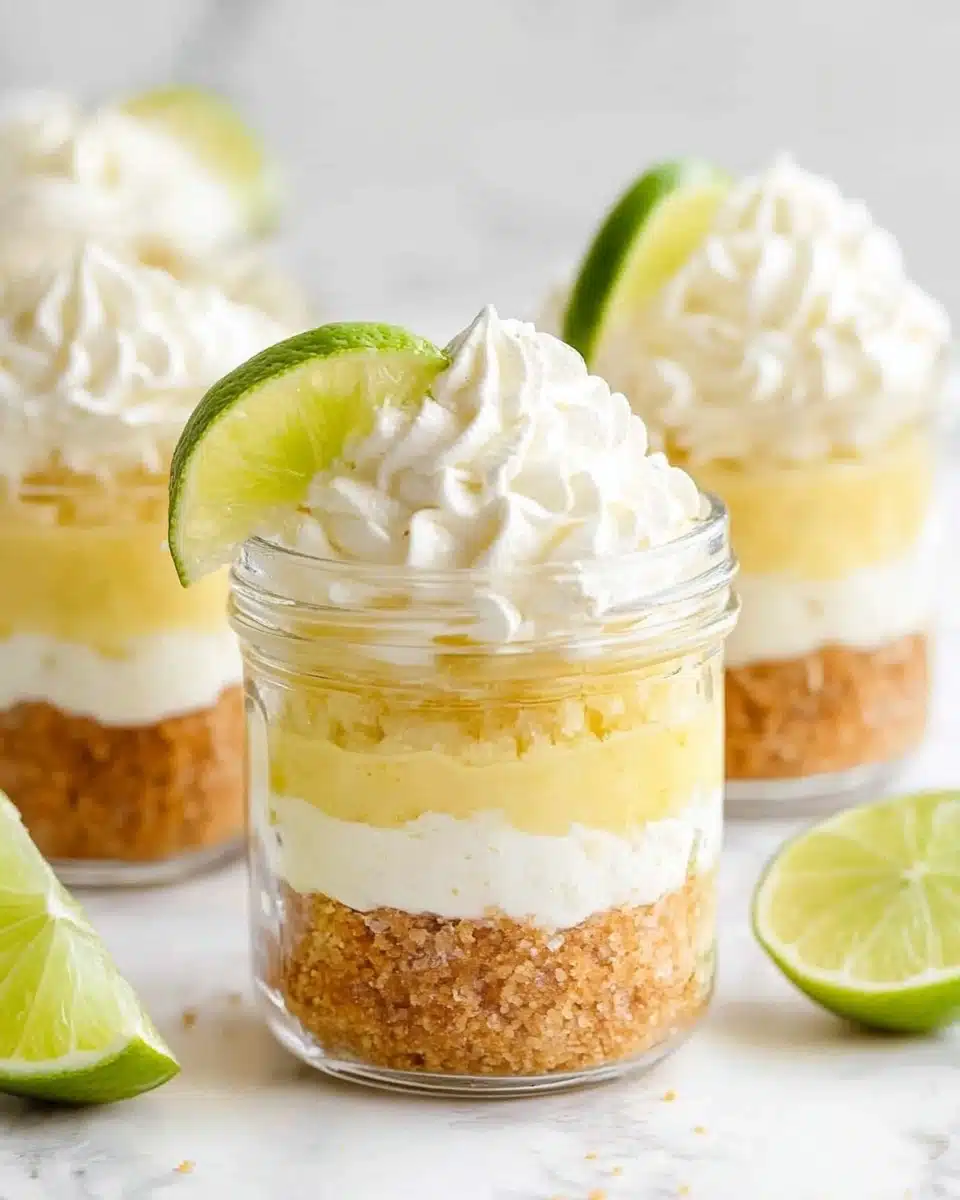
If you dream of chasing the sun with a tangy, sweet treat, this Key Lime Pie in a Jar Recipe is about to make your dessert dreams come true! Imagine all the creamy, citrusy goodness of classic key lime pie layered lovingly into adorable mason jars—each bite is pure summer captured in a spoonful.
Why You’ll Love This Recipe
- Sweet & Tangy Harmony: Every single jar balances that iconic creamy sweetness, punchy citrus, and buttery crust just right.
- Perfect Portion Control: Enjoy your pie in adorable, mess-free jars—ideal for picnics, parties, or a late-night treat without leftovers calling your name.
- Make-Ahead Magic: These jars are fridge-friendly, meaning you can prep dessert well ahead without any fuss.
- Totally Customizable: The Key Lime Pie in a Jar Recipe adapts beautifully for gluten-free, dairy-free, or creative flavor experiments!

Ingredients You’ll Need
This recipe keeps things delightfully simple—each ingredient serves a real purpose, giving you that classic graham crust, lush citrus filling, and a cloud of whipped cream on top. Here’s what you’ll want to have ready, and why every single one matters.
- Graham cracker crumbs: These are the golden foundation, adding crunch, sweetness, and a lightly toasty flavor to each bite.
- Granulated sugar: It sweetens the crust while helping bind the crumbs together just enough.
- Salt: Just a pinch wakes up all the other flavors and keeps the crust from tasting flat.
- Unsalted butter (melted): This is the magic that turns crumbs into the crumbly, indulgent base you love.
- Sweetened condensed milk: The not-so-secret weapon for a pie layer that’s impossibly creamy and just right on sweetness.
- Fresh lime zest: Adding zest gives your Key Lime Pie in a Jar Recipe vibrant color and a zing only fresh citrus can deliver.
- Lime juice (key lime or regular): This is where that signature tart-sweet flavor comes from—feel free to juice your own or use bottled for ease.
- Egg yolks: They add richness and help set the pie filling into that silky, spoonable perfection.
- Whipped cream: For topping—fluffy, creamy, and everything your pie jar deserves.
- Lime wedges: For a cute, citrusy garnish that signals tangy things inside every single jar.
Variations
One of the best parts of the Key Lime Pie in a Jar Recipe is how easily you can make it your own! There are loads of ways to play—accommodate dietary needs, new flavors, or whatever you have in the pantry. Experiment and make this dessert truly yours.
- Dairy-Free Delight: Use coconut-sweetened condensed milk and swap melted butter for coconut oil or your favorite vegan butter to keep things creamy and dreamy.
- Gluten-Free Upgrade: Grab gluten-free graham crackers or even crunchy cookies for a base everyone can enjoy.
- Fruit-Filled Surprise: Add a spoonful of raspberry or blueberry compote between layers for a burst of berry flavor and beautiful color.
- Chocolate Lovers’ Twist: Try chocolate graham crackers or a sprinkle of mini chocolate chips for a decadent edge.
How to Make Key Lime Pie in a Jar Recipe
Step 1: Prep Your Jars and Crumb Mixture
Start by preheating your oven to 350°F and lining your rimmed baking sheet with the four glass jars. Crush the graham crackers in a Ziploc with a rolling pin for that rustic, homemade touch—don’t stress over perfect crumbs! Mix them with sugar, salt, and a drizzle of melted butter until everything is sandy and moistened. Divide the crumb mixture between the jars, lightly pressing it into the bottom and slightly up the sides—keep it loose so your “crust” stays easy to scoop.
Step 2: Mix Up the Citrus Filling
Now for the sunshine! Zest your limes directly into the bowl for max flavor. Add the sweetened condensed milk, zingy lime juice, and those rich egg yolks, then whisk everything together until it’s completely smooth and vibrant. Pour this luscious filling evenly into your jars, right over your crumb layers—it’s okay if you sneak a taste with your finger, I won’t tell!
Step 3: Bake to Set
Pop the jars (on their baking sheet) in the oven and bake for about 15 minutes, until the filling no longer jiggles when you gently nudge a jar. This step sets the filling to that irresistible, spoonable texture we all crave, so don’t skip it!
Step 4: Chill and Top
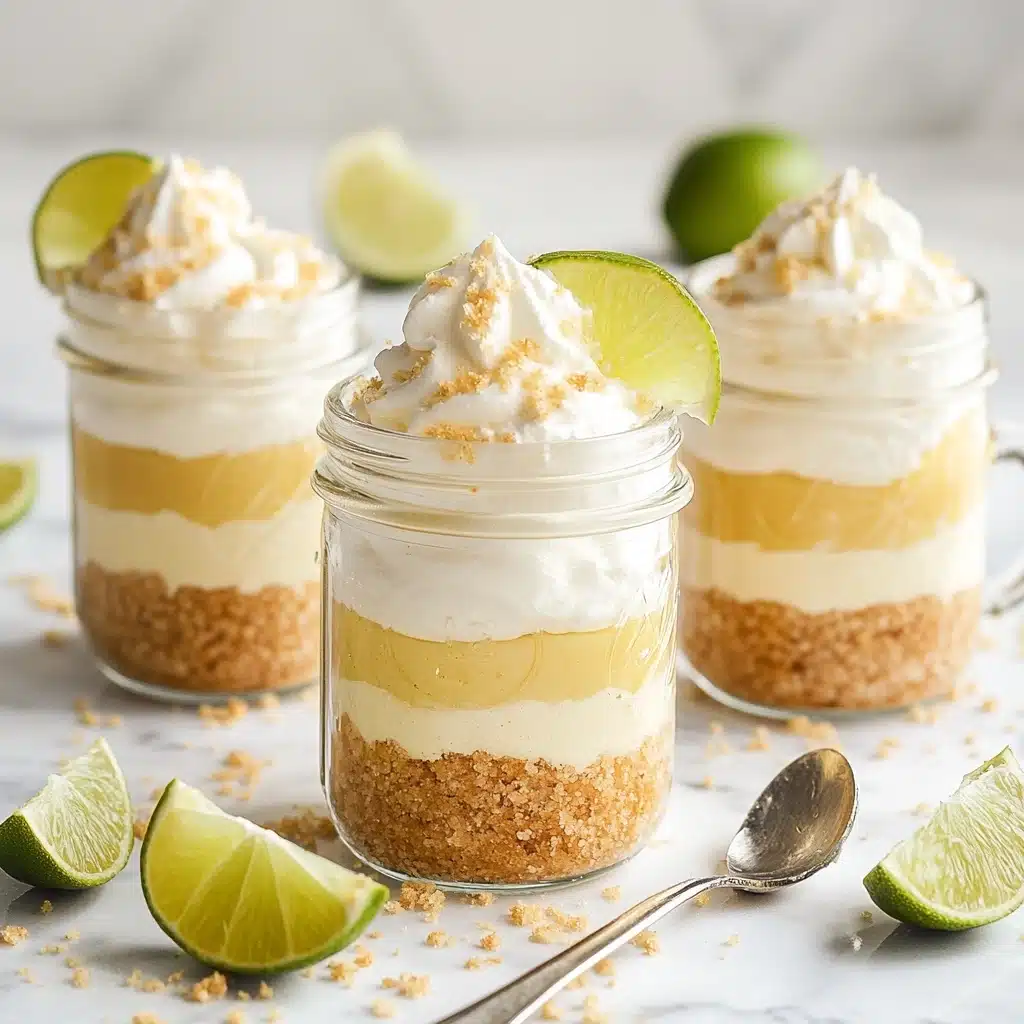
Once out of the oven, let the jars cool for half an hour at room temp, then seal with lids and chill in the fridge (at least two hours). When you’re ready to serve, crown each pie with a generous swirl of whipped cream and a jaunty lime wedge—or really pile it high if you’re feeling extra celebratory!
Pro Tips for Making Key Lime Pie in a Jar Recipe
- Crush with Love: For the best texture, leave some larger crumbs in your graham mixture—too fine and the crust gets pasty, with a mix it’s perfectly crunchy!
- Juice Choice Matters: If you’re lucky enough to get key limes, savor their boldness, but Persian limes (even bottled) also bring wonderful citrus zip to your jars.
- Smooth Filling Wins: Whisk your filling just until combined—over-beating makes the mixture airy, which isn’t what you want in a creamy key lime filling.
- Chill for Flavors to Meld: The longer the pies chill, the silkier and more harmonious the flavor—overnight is pure magic, if you can wait that long!
How to Serve Key Lime Pie in a Jar Recipe
Garnishes
The finishing touches can make your Key Lime Pie in a Jar Recipe magazine-worthy! Top yours with a thick swirl of whipped cream, a wedge or twist of fresh lime, and even a sprinkle of extra lime zest. A touch of graham crumbs on top gives extra crunch and a little visual drama.
Side Dishes
While these little jars absolutely shine solo, they’re also lovely alongside a light fruit salad or paired with coconut macaroons. For a more tropical theme, consider fresh mango slices or a pitcher of icy mint lemonade—the creamy, tangy, and fruity flavors all sing together!
Creative Ways to Present
Think beyond mason jars: experiment with small drinking glasses, vintage teacups, or clear espresso cups for an elegant spin. We also love serving these pies picnic-style, tucked in little baskets with ribbon-tied wooden spoons—festive, fun, and practical!
Make Ahead and Storage
Storing Leftovers
Cover your jars tightly with their lids and refrigerate—they’ll be perfect for up to three days. Add whipped cream and garnishes just before serving, so the toppings stay cloud-like and fresh.
Freezing
For longer storage, you can freeze the un-topped pies (no whipped cream!) directly in their jars. Thaw overnight in the fridge when your key lime cravings strike—just be sure your jars are freezer-safe to avoid any cracks.
Reheating
These treats are best enjoyed chilled, not reheated, but if you want just a hint of warmth, set a jar out at room temperature for about 15 minutes before serving—almost like a cool soufflé!
FAQs
-
Can I use regular limes instead of key limes for the Key Lime Pie in a Jar Recipe?
Absolutely! While key limes have a unique flavor, regular Persian limes (or even bottled key lime juice) work beautifully here. The pie will still be delightfully tangy and refreshing—use whichever limes are most accessible to you.
-
Can I make the Key Lime Pie in a Jar Recipe ahead of time for a party?
Yes! In fact, these jars actually taste even better after they’ve chilled for several hours or overnight. Just wait to add the whipped cream and lime garnish until right before serving for best results.
-
How can I make this recipe dairy-free?
It’s super easy! Swap the sweetened condensed milk for a coconut or oat-based version (many stores carry these), and use coconut oil or a vegan butter alternative in the crust. You’ll still enjoy the same creamy, zesty vibes!
-
Can I double the Key Lime Pie in a Jar Recipe for a crowd?
You sure can. Simply double (or triple!) all the ingredients and set up as many jars as you need—just keep the ingredient ratios the same, and stagger baking in batches if your oven is crowded.
Final Thoughts
There’s something about the Key Lime Pie in a Jar Recipe that brings instant sunshine and smiles. If you’re craving an easy, vibrant dessert that wows on both flavor and presentation, this is the one to try—one spoonful, and you’ll understand why it’s a crowd-pleaser every single time!
Print
Key Lime Pie in a Jar Recipe
- Prep Time: 10 minutes
- Cook Time: 15 minutes
- Total Time: 25 minutes
- Yield: 4 servings
- Category: Dessert
- Method: Baking
- Cuisine: American
- Diet: Vegetarian
Description
Indulge in the refreshing and tangy goodness of this Key Lime Pie in a Jar recipe. Perfect for individual servings and easy to make ahead for a delightful dessert treat.
Ingredients
Crust layer
- 1 cup graham cracker crumbs (about 18 crackers or 2/3 of a sleeve)
- 3 tablespoons granulated sugar
- Pinch of salt
- 3 tablespoons unsalted butter, melted
Key lime pie layer
- 1 14–ounce can sweetened condensed milk
- 2 teaspoons fresh lime zest
- 1/2 cup lime juice
- 3 egg yolks
Topping
- Whipped cream
- Lime wedges for garnish
Instructions
- Preheat the oven and prepare jars: Preheat the oven to 350°F. Place jars on a baking sheet.
- Prepare crust: Crush graham crackers, mix with sugar, salt, and melted butter. Divide mixture into jars.
- Mix key lime pie layer: Combine sweetened condensed milk, lime zest, lime juice, and egg yolks. Divide mixture into jars.
- Bake: Bake for about 15 minutes until set.
- Chill and serve: Cool, refrigerate for at least 2 hours. Top with whipped cream and lime slice before serving.
Notes
- Lime juice variations: Key limes, bottled key lime juice, or regular Persian limes can be used.
- Storage: Store the pies in the refrigerator for up to three days. Add toppings just before serving.
- Dairy-free option: Use dairy-free sweetened condensed milk and butter alternatives for a dairy-free version.
Nutrition
- Serving Size: 1 jar
- Calories: Approximately 380
- Sugar: 32g
- Sodium: 240mg
- Fat: 16g
- Saturated Fat: 9g
- Unsaturated Fat: 6g
- Trans Fat: 0g
- Carbohydrates: 54g
- Fiber: 1g
- Protein: 7g
- Cholesterol: 115mg
