
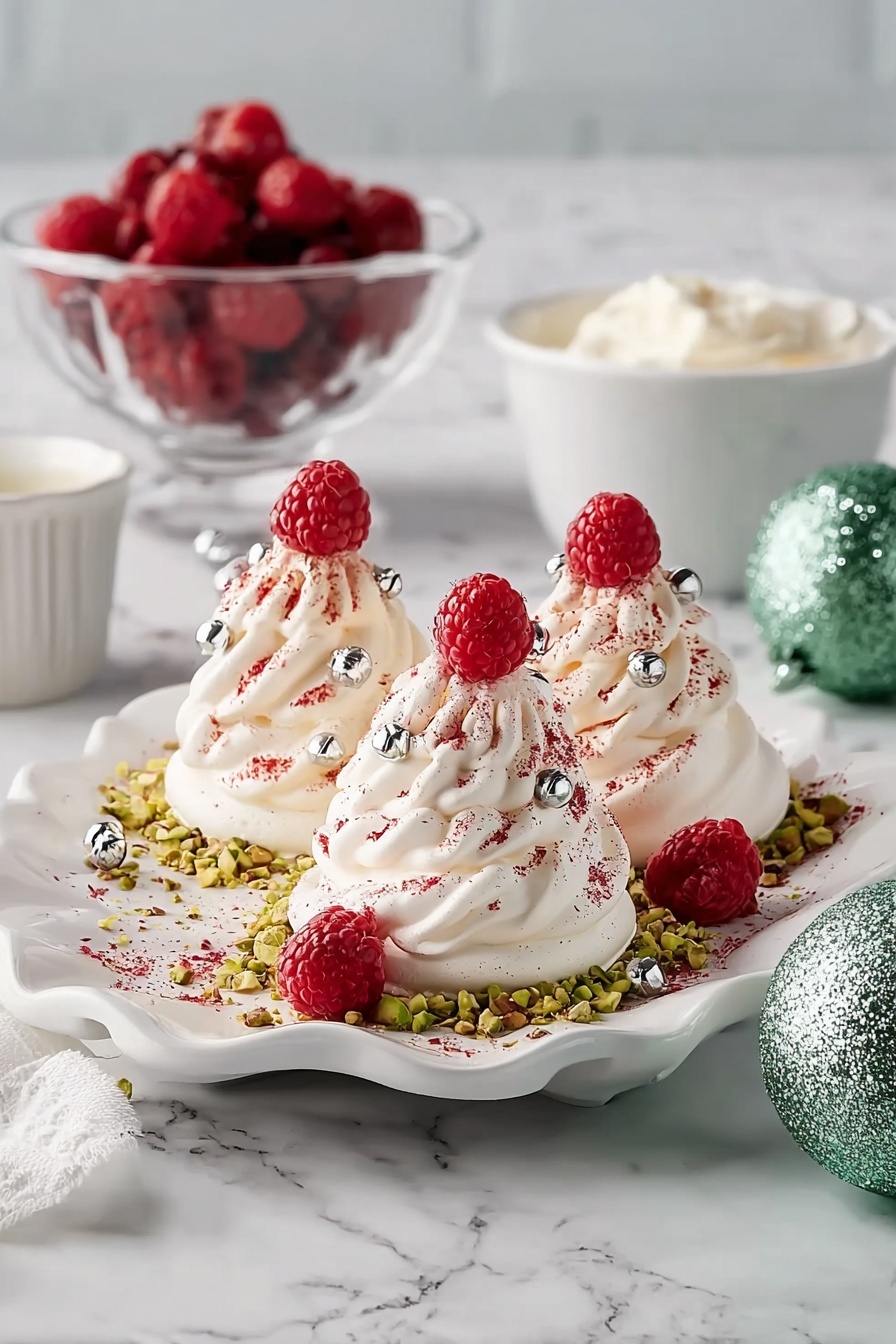
If you’re looking for a festive dessert that’s not only adorable but absolutely delicious, then you have to try this Mini Christmas Pavlova Trees Recipe. These little meringue creations are as fun to make as they are to eat, topped with fluffy cream and colorful garnishes that scream holiday cheer. Trust me, once you nail this recipe, your family and friends will be begging you to make them every Christmas!
Why You’ll Love This Recipe
- Festive and Fun: These mini pavlova trees stand out as a unique holiday treat that’s sure to wow your guests.
- Perfect Portion Size: The mini size means you can enjoy a sweet bite without feeling overly indulgent.
- Crunchy Yet Creamy: The crisp meringue contrasts beautifully with the smooth rosewater-scented cream topping.
- Customizable Decorations: You can play around with colors and toppings to make each tree your own festive masterpiece.

Ingredients You’ll Need
These ingredients work together to create that perfect light, crunchy meringue base and the indulgent cream that makes the pavlova trees irresistible. You’ll want to make sure you’re using fresh egg whites and thickened cream for the best results.

- Free-range egg whites: Room temperature ones whip up better for a stable, fluffy meringue.
- Caster sugar: Fine sugar dissolves quickly, which helps avoid a gritty texture in your pavlova.
- White vinegar: Helps stabilize the meringue and gives it that perfect glossy finish.
- Cornflour: Keeps the center of your pavlova soft and marshmallowy.
- Sunbeam Australian Pistachios: Adds a lovely green crunch and a nutty flavor that pairs beautifully with the cream.
- Thickened cream: Whipping cream is essential for that silky, airy topping.
- Pure icing sugar: Sweetens the cream just right without weighing it down.
- Rosewater: Adds a subtle floral note that makes this dessert extra special.
- Silver cachous, raspberries, freeze-dried raspberry powder, strawberries: Beautiful garnishes that bring sparkle and color.
Variations
I love personalizing the Mini Christmas Pavlova Trees Recipe to match whatever mood or ingredients I have on hand. The basic version is fantastic, but feel free to get creative!
- Berry Medley: I sometimes swap raspberries and freeze-dried raspberry powder for mixed berries like blueberries and pomegranate seeds, giving the trees a more colorful and juicy pop.
- Dairy-Free Option: If you need a dairy-free version, coconut cream whips up nicely and pairs well with the pistachios and rosewater.
- Chocolate Drizzle: I discovered that drizzling a little melted white or dark chocolate over the trees before serving adds an elegant touch and a flavor contrast that’s divine.
- Festive Flavors: Add a pinch of cinnamon or nutmeg into the cream for a cozy winter twist that’s perfect for holiday gatherings.
How to Make Mini Christmas Pavlova Trees Recipe
Step 1: Preparing Your Oven and Baking Sheets
Start by preheating your oven to 100°C fan-forced (or 120°C conventional). I always grease two large oven trays and then place my baking paper sheets on top. Here’s a trick: before flipping the sheets, mark four 4.5cm circles on the back to guide your meringue piping—it helps keep the trees uniform and neat. Make sure to leave enough space between each circle so air can circulate while baking.
Step 2: Whipping the Meringue
Using an electric mixer, beat your room temperature egg whites until you see soft peaks forming—that’s when they hold a gentle peak but still curl over when the beaters lift out. Then, add your caster sugar gradually, one tablespoon at a time. It’s crucial to wait until the sugar dissolves after each addition. This step took me a few tries to master, but patience here means no gritty bits in your pavlova! Once all the sugar is in, mix in the vinegar and cornflour until everything is glossy and combined.
Step 3: Piping Your Mini Christmas Pavlova Trees
Divide a quarter of your meringue into a piping bag fitted with a 1cm plain nozzle and pipe small mounds onto the marked circles on your baking sheets. These mounds will form the base of your little trees. Next, take the rest of your meringue and switch to a smaller, 0.5cm fluted nozzle. Start piping rows of small vertical layers around the base mound to create the shape and texture of a Christmas tree. This layering is what gives the pavlovas their charming pine-tree look. It might seem fiddly at first, but it’s actually quite fun and therapeutic! Bake for 50 minutes to 1 hour, or until the edges are crisp but not colored. Once done, turn the oven off and leave the pavlovas inside to cool slowly with the door ajar. This helps avoid cracks.
Step 4: Making the Pistachio Crumbs and Whipping the Cream
While the pavlovas cool, chop your pistachios in a food processor until you get fine crumbs. I love the little crunch and color they add. Then whip your cream together with icing sugar and rosewater until you get just-firm peaks. Be careful not to overwhip here; you want a smooth but stable cream that’ll hold its shape when piped.
Step 5: Decorating and Serving Your Mini Christmas Pavlova Trees
Pop about a quarter of the cream in a small piping bag with a plain nozzle and pipe little rounds of cream onto your cooled pavlova trees—this acts like edible glue for your silver cachous, raspberries, and raspberry powder decorations. Sprinkle on the pistachio crumbs for a festive pop of green, and serve with fresh strawberries and the remaining cream on the side. Your guests will be instantly enchanted.
Pro Tips for Making Mini Christmas Pavlova Trees Recipe
- Use Room Temperature Egg Whites: I learned that cold egg whites don’t whip up as well, so always let them sit out for about 30 minutes before starting.
- Slow Sugar Incorporation: Adding sugar bit by bit and ensuring it dissolves prevents a grainy texture—this made a huge difference in my pavlova’s smoothness.
- Cool Pavlovas Gradually: Leaving the pavlovas to cool in the turned-off oven stopped cracks and kept them perfectly crisp on the outside and marshmallowy inside.
- Pipe With Patience: Taking your time to pipe the layers neatly results in those magical tree-like ridges, and your effort really shows on the plate.
How to Serve Mini Christmas Pavlova Trees Recipe
Garnishes
I love silver cachous because they give a sparkling, festive touch that instantly makes the trees feel special. The tangy raspberries balance the sweetness perfectly, and the freeze-dried raspberry powder adds a lovely burst of color and flavor. Pistachio crumbs not only add crunch but also a pretty green that fits the Christmas tree theme so well.
Side Dishes
These mini pavlova trees are quite the showstopper, so I usually keep sides simple. Fresh berry salad or a light citrus sorbet pairs beautifully, balancing the sweetness while keeping the meal feeling fresh and light.
Creative Ways to Present
For holiday parties, I’ve arranged these mini pavlovas on a large platter dusted lightly with coconut flakes to mimic snow. Adding a few sprigs of fresh mint or edible gold leaf makes them look extra magical. You can even serve them on individual mini cake stands or in clear glass domes for a wow factor that guests love.
Make Ahead and Storage
Storing Leftovers
Because meringues can get soggy quickly, I recommend storing any leftover pavlova bases separately in an airtight container at room temperature. The cream topping should be kept refrigerated and added fresh before serving again. This way, your pavlova trees stay crisp and delicious.
Freezing
I’ve frozen the baked pavlova shells before with great success—just make sure they’re fully cooled and wrapped well in airtight containers. When you’re ready to use them, thaw at room temperature then add the cream and decorations fresh. This trick saves so much time before the big day.
Reheating
I don’t recommend reheating meringues since heat can cause them to soften or lose their crunch. Instead, bring the shells to room temperature before adding cream and garnishes for the best texture and flavor.
FAQs
-
Can I use regular sugar instead of caster sugar in this recipe?
While regular granulated sugar can work in a pinch, caster sugar dissolves much more easily, which ensures a smooth meringue with no graininess. If you only have granulated sugar, consider pulsing it briefly in a blender to make it finer.
-
Why is vinegar added to the meringue mixture?
The vinegar acts as a stabilizer for the egg whites, helping the meringue hold its shape and develop that glossy finish. It also helps produce a slightly chewier center, which is perfect for pavlova texture.
-
How can I prevent the pavlova trees from cracking?
The key is to cool the pavlovas slowly. After baking, leave them in the turned-off oven with the door ajar to reduce the temperature gradually. Sudden changes in temperature cause cracks, so this step is crucial for beautifully intact trees.
-
Can I decorate the pavlova trees with other toppings?
Absolutely! Feel free to get creative with your decorations—think edible glitter, finely chopped nuts, pomegranate seeds, or even small candies. Just make sure whatever you use complements the light, sweet flavors of the pavlova and cream.
Final Thoughts
I can’t tell you how many times my family has gone crazy over this Mini Christmas Pavlova Trees Recipe. It’s become our festive tradition—not just because it tastes incredible, but because the process is so enjoyable and the presentation is breathtaking. If you want to surprise your guests with something a little different this holiday season, give this recipe a go. I promise, once you try it, your Christmas dessert game will never be the same!
Print
Mini Christmas Pavlova Trees Recipe
- Prep Time: 20 minutes
- Cook Time: 1 hour
- Total Time: 1 hour 20 minutes
- Yield: 8 servings
- Category: Dessert
- Method: Baking
- Cuisine: Australian
- Diet: Vegetarian
Description
Delightfully festive Mini Pavlova Christmas Trees made from delicate meringue, whipped cream, and decorated with vibrant raspberries, pistachios, and silver cachous. These charming individual pavlovas are perfect for holiday celebrations, combining crisp edges with a soft, airy center and a decorative, snowy finish.
Ingredients
Meringue
- 6 free-range egg whites, at room temperature
- 1 1/2 cups caster sugar
- 1 tsp white vinegar
- 3 tsp cornflour
Decoration & Cream
- 1/4 cup Sunbeam Australian Pistachios
- 300ml thickened cream
- 1 tsp pure icing sugar
- 1 tsp rosewater
- Silver cachous, for decorating
- Raspberries, for decorating
- Freeze-dried raspberry powder, for sprinkling
- Strawberries, to serve
Instructions
- Prepare oven and trays: Preheat your oven to 100°C fan-forced (120°C conventional). Grease two large oven trays. On two sheets of baking paper, draw four 4.5cm circles each with enough spacing. Place the baking paper, marked side down, on the prepared trays to use as guides for piping meringue.
- Make the meringue: Using an electric mixer, beat the egg whites until soft peaks form. Gradually add the caster sugar, one tablespoon at a time, ensuring sugar dissolves before adding more. Add in the white vinegar and cornflour, then beat the mixture until it is glossy and well combined.
- Pipe the pavlova bases and shape trees: Transfer one-quarter of the meringue mixture into a large piping bag fitted with a 1cm plain nozzle. Pipe small mounds onto the circles marked on the trays as bases. Place the remaining meringue into another piping bag fitted with a 0.5cm fluted nozzle. Starting at the base of each meringue mound, pipe three vertical rows of small layers upwards around the mound to create the shape of Christmas trees.
- Bake the meringues: Bake the piped meringue trees for 50 minutes to 1 hour until the edges are crisp but not coloured. Turn off the oven and let the meringues cool inside the oven with the door slightly ajar to prevent cracking.
- Prepare pistachio crumbs: Place the pistachios in a small food processor and pulse until they become fine crumbs, perfect for garnish.
- Whip the cream: With an electric mixer, beat the thickened cream along with the icing sugar and rosewater until just-firm peaks form. Transfer a quarter of the cream to a small plain nozzle piping bag for decorating.
- Decorate the pavlova trees: Pipe little rounds of cream onto the meringue trees to help the silver cachous stick. Decorate with silver cachous, fresh raspberries, and sprinkle freeze-dried raspberry powder. Finish by sprinkling the pistachio crumbs and serve with fresh strawberries and the remaining whipped cream on the side.
Notes
- Make sure egg whites are at room temperature for better volume in meringue.
- Allow meringues to cool in the oven to avoid cracks and maintain their shape.
- Use fresh raspberries and strawberries for the best flavor and texture in decorations.
- The rosewater in the cream adds a subtle floral note that complements the sweetness of the meringue.
- Store leftover pavlovas in an airtight container away from humidity to keep them crisp.
Nutrition
- Serving Size: 1 mini pavlova
- Calories: 230 kcal
- Sugar: 20 g
- Sodium: 30 mg
- Fat: 14 g
- Saturated Fat: 9 g
- Unsaturated Fat: 4 g
- Trans Fat: 0 g
- Carbohydrates: 20 g
- Fiber: 1 g
- Protein: 3 g
- Cholesterol: 55 mg
