If you’ve been hunting for a fun, festive treat that’s as adorable as it is delicious, then you’re going to love this Mummy Oreo Balls Recipe. Seriously, these little mummies bring such a playful Halloween vibe, and they’re surprisingly simple to make — plus, they taste absolutely divine! Whether you’re baking with the kids or need a quick dessert for a party, this recipe is an absolute winner. Let me walk you through how to nail them perfectly every time.
Why You’ll Love This Recipe
- Super Easy to Make: You only need four ingredients, and no baking required—perfect when you’re short on time.
- Kid-Friendly Fun: My kids love helping out, especially with decorating those cute candy eyes and drizzling the chocolate.
- Delicious Texture: Creamy inside with a crisp chocolate shell—the best combo that keeps everyone coming back for more.
- Great for Parties & Holidays: These little mummies add a playful Halloween touch to any dessert spread.

Ingredients You’ll Need
For this Mummy Oreo Balls Recipe, I like to keep things simple yet flavorful. The ingredients work beautifully together—sweet golden Oreos add a nice base, creamy cream cheese ties everything, and the smooth vanilla candy melts create that stunning mummy wrapping effect.
- Golden Oreos: You’ll want these for their mild vanilla flavor and light-colored crumbs—they create a great canvas for the white candy melts.
- Cream Cheese: Softened to room temperature—this is key so it blends smoothly without lumps.
- Vanilla Candy Melts or Dipping Wafers: These melt beautifully and harden with a deliciously crisp texture.
- Candy Eyes: These little eyes bring the whole mummy look to life and are so fun for decorating.
Variations
I love playing with this Mummy Oreo Balls Recipe and changing it up depending on the occasion or what I have on hand. Feel free to customize it—creativity is part of the fun!
- Chocolate Oreos: Swapping golden Oreos for classic chocolate ones gives you a darker mummy that’s just as delicious and a bit richer in flavor.
- Dairy-Free Version: Try using vegan cream cheese and dairy-free candy melts for allergy-friendly treats that still taste great.
- Flavor Twists: Add a pinch of cinnamon or pumpkin pie spice to your Oreo crumb mixture for a subtle seasonal kick.
- Colored Candy Melts: Go wild for a party by dipping the Oreo balls in different colored candy melts—instead of vanilla white—for a colorful “mummy” effect.
How to Make Mummy Oreo Balls Recipe
Step 1: Crush the Oreos to Fine Crumbs
Start by pulsing your golden Oreos in a food processor until they’re finely ground into crumbs. If you don’t have a food processor, a sealed plastic bag and rolling pin work just fine—just keep crushing until you see mostly fine crumbs with no big chunks left. The finer the crumbs, the smoother your Oreo ball texture will be.
Step 2: Mix Crumbs With Cream Cheese
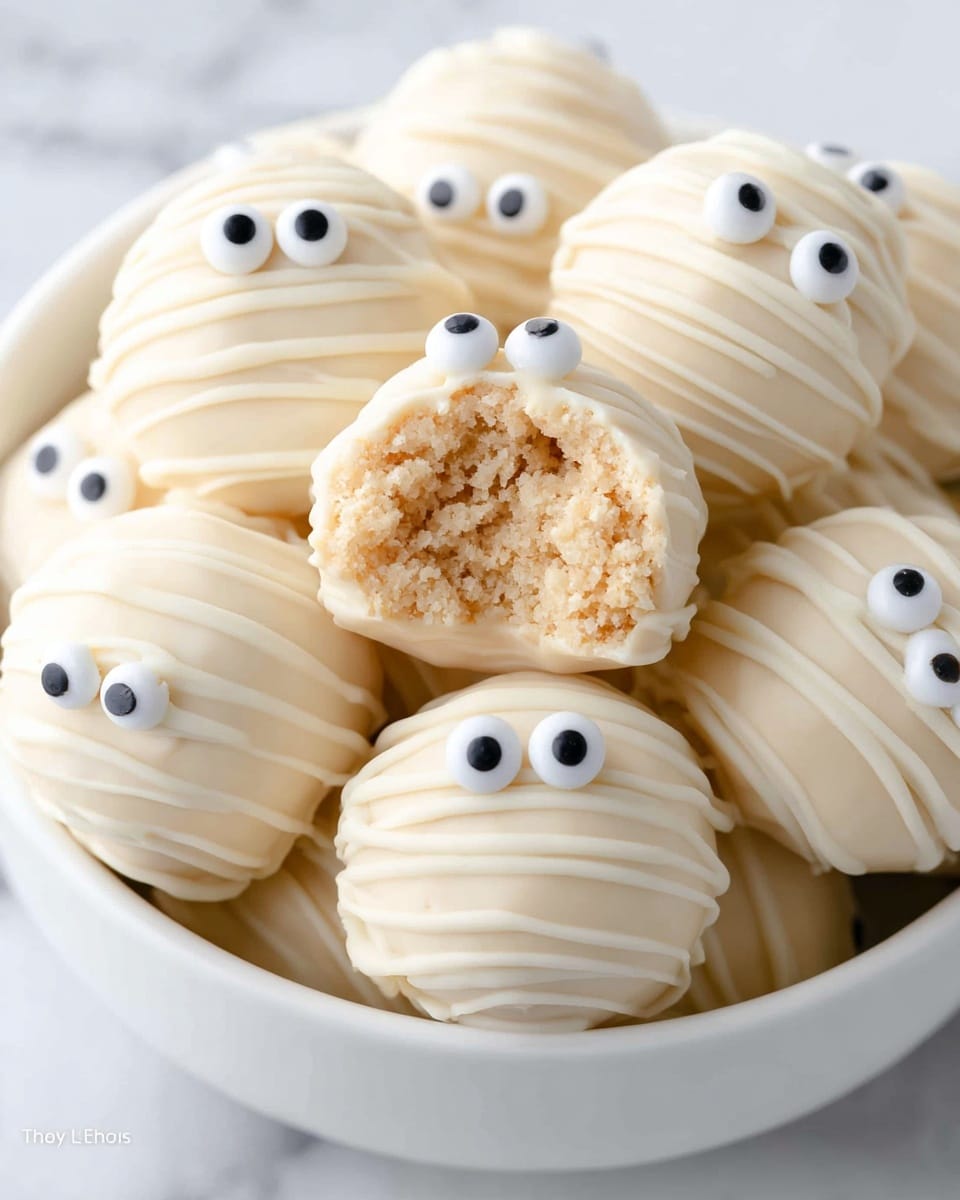
Pour the Oreo crumbs into a large bowl and add the softened cream cheese. Stir with a spatula or spoon until the mixture is smooth and well combined. This part might seem a bit messy, but trust me—it’s worth it. If your cream cheese is too cold, it won’t blend well, so make sure it’s softened beforehand!
Step 3: Form Oreo Balls & Freeze
Using a cookie scoop or tablespoon, scoop out about 1-inch portions of the mixture and roll them between your palms until they form smooth, round balls. This is where your hands get a bit messy but stick with it—it’s fun! Place the balls onto parchment-lined baking sheets and pop them into the freezer for 30 minutes to set up. This step makes the next part way easier.
Step 4: Dip in Melted Vanilla Candy Melts
Melt your vanilla candy melts according to the package directions. When melted, spoon the chocolate into a small bowl or glass. Now, here’s a trick I discovered: instead of piercing the balls with a fork, rest each truffle on top of a fork to dip—it keeps their shape perfect! Coat each ball thoroughly and tap off any excess coating before placing it back on your tray.
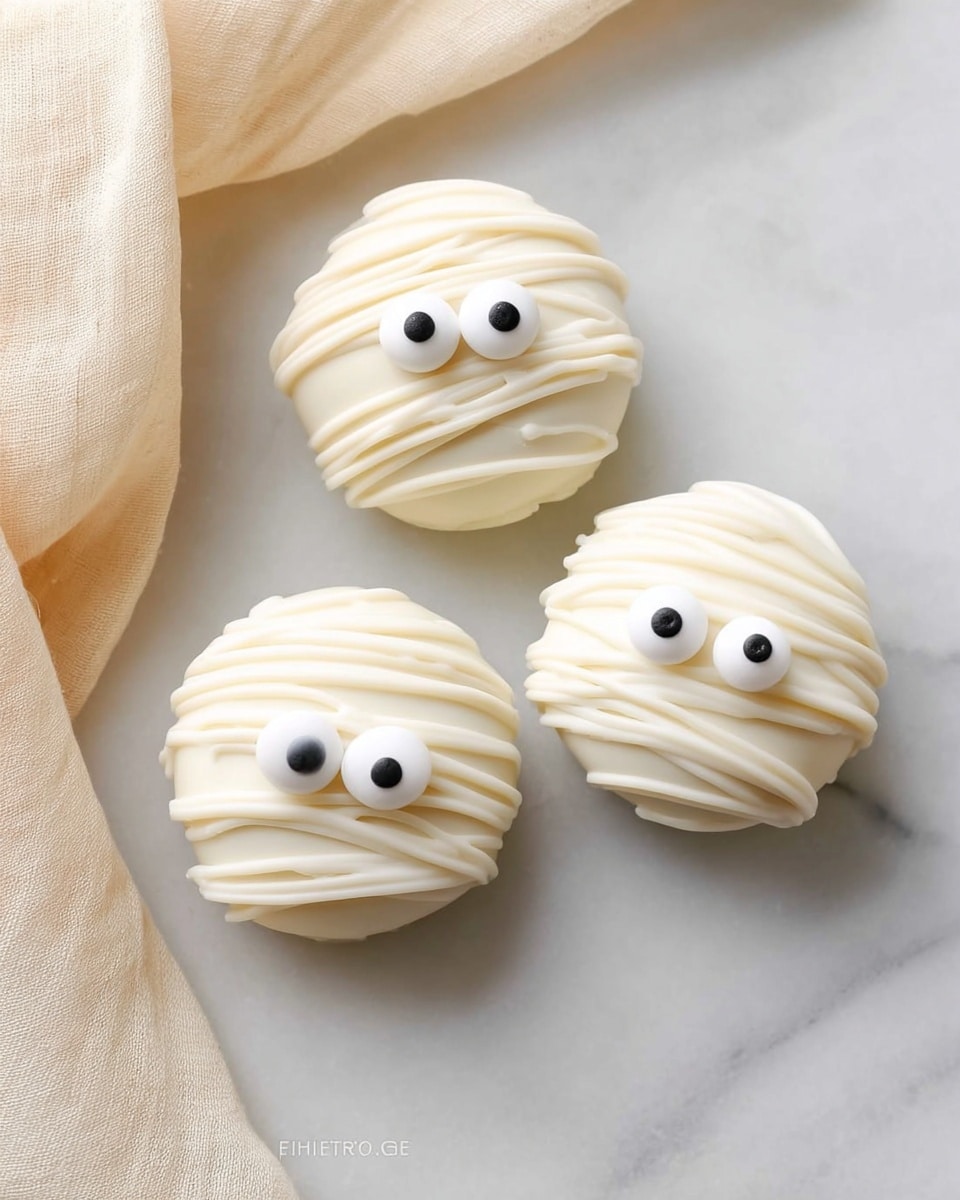
Step 5: Decorate the Mummies
Pour the remaining melted chocolate into a zip-top bag and snip a tiny hole in one corner. Drizzle the chocolate over each coated ball to create the “wrapped mummy” look. While the chocolate is still tacky, stick two candy eyes on each mummy. If your chocolate starts to harden before you can place the eyes, just add a tiny dab of melted chocolate to the back of each eye to secure them better.
Step 6: Chill & Serve
Place your mummy Oreo balls in the fridge for 15 to 20 minutes so the chocolate can fully set up. Then, it’s time to serve these mini cuties and watch them disappear in no time.
Pro Tips for Making Mummy Oreo Balls Recipe
- Softening Cream Cheese: Let the cream cheese sit out at room temperature for at least 30 minutes before mixing to ensure smooth blending.
- Crumb Texture: The finer your Oreo crumbs, the easier it is to form smooth balls without cracks.
- Chocolate Dipping: Rest the balls on top of your fork tines instead of piercing them; it keeps their shape intact.
- Fast Chocolate Drying: Work efficiently when adding eyes—if the dipped chocolate sets too fast, re-melt a bit of candy melts to ‘glue’ the eyes on perfectly.
How to Serve Mummy Oreo Balls Recipe
Garnishes
I usually keep the garnishing simple since the candy eyes and chocolate drizzle speak for themselves visually. But for a little extra flair, sprinkling some edible glitter or tiny Halloween-themed sprinkles around the tray turns these into eye-catching party treats.
Side Dishes
These mummies go great alongside a warm cup of spiced apple cider or hot chocolate for those chilly autumn nights. If you’re serving a party platter, I like pairing them with pumpkin-shaped sugar cookies or caramel popcorn.
Creative Ways to Present
One year, I arranged these Oreo mummies inside a hollowed-out pumpkin for a spooky centerpiece—everyone was so impressed! Another fun idea is serving them in mini paper cups lined up on a Halloween-themed platter, making grab-and-go treats that are perfect for kids.
Make Ahead and Storage
Storing Leftovers
If you have any of these mummy Oreo balls left (good luck with that!), store them in an airtight container in the refrigerator. They last beautifully for up to five days and keep that perfect balance of creamy and crunchy textures.
Freezing
These freeze wonderfully! Just place them on a baking sheet to freeze until solid, then transfer to a freezer-safe container. When you want a quick treat, take them out and let thaw in the fridge overnight. The texture remains just as tasty as fresh.
Reheating
Since these are no-bake treats with a firm chocolate shell, reheating isn’t necessary. But if you prefer them slightly softer, just let them sit at room temperature for 10-15 minutes before diving in.
FAQs
-
Can I use regular Oreos for this mummy Oreo balls recipe?
Absolutely! Regular chocolate Oreos work just as well if you prefer a darker chocolate flavor. Just keep in mind that the mummy ‘wraps’ made from vanilla candy melts will stand out more against golden Oreos, but both versions taste amazing.
-
What if I don’t have a food processor to crush the Oreos?
No worries! Place Oreos inside a zip-top bag and use a rolling pin or heavy pan to crush them into fine crumbs. It may take a little more elbow grease, but it works perfectly fine.
- How do I prevent the candy melts from seizing?
Make sure to melt candy melts gently—preferably in short bursts in the microwave, stirring often. Avoid getting any water droplets inside the melts, as moisture causes seizing.
- Can I make the mummy Oreo balls a day ahead?
Yes! You can prepare and decorate them a day in advance. Just keep them chilled in an airtight container in the fridge until ready to serve for best freshness.
Final Thoughts
I absolutely love how this Mummy Oreo Balls Recipe brings a festive spirit to my kitchen with minimal effort. The way the creamy center blends with the crisp chocolate exterior is pure magic, and those candy eyes just make everyone smile. If you’re looking for a Halloween treat that’s fun, easy, and delicious, you really can’t go wrong here. I’m betting you’ll enjoy making these as much as eating them—go on, give it a try for your next spooky gathering!
Print
Mummy Oreo Balls Recipe
- Prep Time: 20 minutes
- Cook Time: 0 minutes
- Total Time: 50 minutes
- Yield: 14 Oreo balls
- Category: Dessert
- Method: No-Cook
- Cuisine: American
Description
These spooky Mummy Oreo Balls are a fun and festive Halloween treat made with crushed Golden Oreos, cream cheese, and coated in vanilla candy melts. Featuring candy eyes and drizzled chocolate to resemble mummies, these no-bake snacks have a creamy interior with a crisp chocolate shell, perfect for parties or an easy dessert.
Ingredients
Oreo Mixture
- 20 Golden Oreos
- 4 ounces cream cheese (softened to room temperature)
Coating and Decoration
- 10 ounces vanilla candy melts or dipping wafers
- 1 package candy eyes
Instructions
- Prepare Baking Sheet: Line a large baking sheet with parchment paper to prevent sticking and set aside.
- Crush Oreos: Pulse the Golden Oreos in a food processor until they become very fine crumbs, ensuring a smooth texture for the mixture.
- Mix Filling: In a large mixing bowl, combine the crushed Oreo crumbs with the softened cream cheese. Stir thoroughly until the mixture is well combined and smooth.
- Form Balls: Using a cookie scoop, portion out about 1-inch-sized balls. Roll each ball between your palms until smooth, then place them on the prepared baking sheet. Freeze the balls for 30 minutes to set firmly.
- Melt Chocolate: Melt the vanilla candy melts according to the package instructions, ensuring a smooth and creamy consistency for dipping.
- Coat Oreo Balls: Using a fork, dip each frozen Oreo ball into the melted white chocolate, turning it to coat evenly. Tap off any excess chocolate carefully. The truffle should rest on the fork without the tines piercing it.
- Decorate: Return the coated balls to the parchment-lined baking sheet. Pour any remaining melted chocolate into a zip-top bag, cut a tiny hole in one corner, and drizzle the chocolate over the balls in thin lines to emulate mummy wrappings. Attach two candy eyes to each ball; if the chocolate hardens quickly, use a small dab of melted chocolate to adhere the eyes.
- Set Chocolate: Place the decorated Oreo balls in the refrigerator for 15-20 minutes to allow the chocolate coating and drizzle to fully harden.
- Serve: Once set, serve these whimsical mummy treats to delight guests and enjoy the creamy, crunchy texture combination.
Notes
- These Mummy Oreo Balls are a fun and easy no-bake Halloween recipe with just four ingredients.
- The hard chocolate shell provides a nice contrast to the creamy Oreo filling inside.
- Perfect for making with kids as they are simple and mess-free.
- If the candy melts become too thick while working, reheat gently to maintain a smooth coating consistency.
- Store leftover Oreo balls in an airtight container in the refrigerator for up to one week.
Nutrition
- Serving Size: 1 Oreo ball
- Calories: 111 kcal
- Sugar: 7 g
- Sodium: 86 mg
- Fat: 6 g
- Saturated Fat: 2 g
- Unsaturated Fat: 3 g
- Trans Fat: 0 g
- Carbohydrates: 13 g
- Fiber: 1 g
- Protein: 1 g
- Cholesterol: 9 mg


