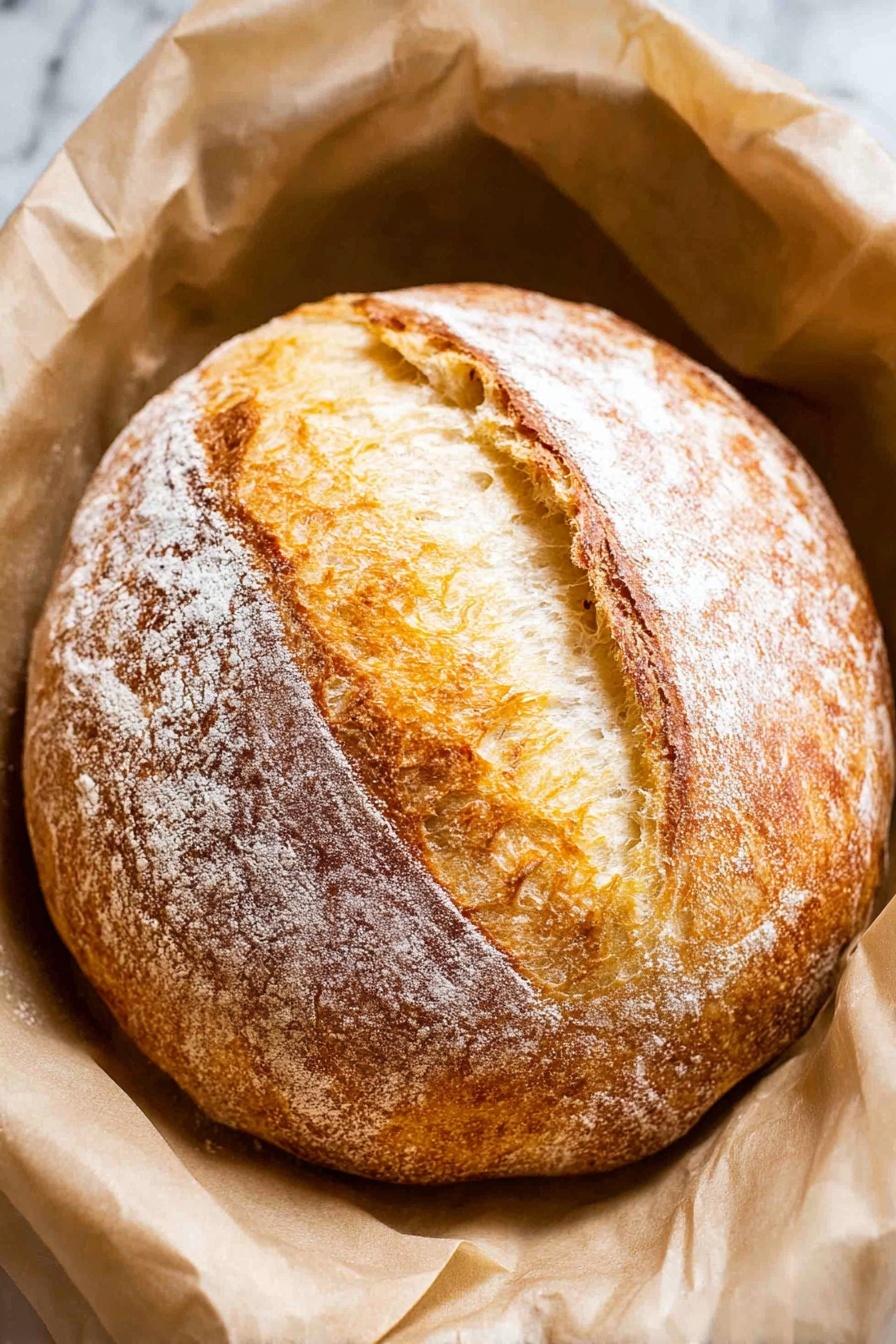
If you’ve ever been intimidated by sourdough bread, this No-Knead Sourdough Bread Recipe is about to become your new best friend. I absolutely love this recipe because it takes all the fuss and muscle out of bread baking but still gives you that beautifully crusty, chewy loaf you dream about. It’s hands-off for the most part, uses simple ingredients, and produces such a satisfying, artisan-quality bread that you’ll find yourself coming back to it again and again.
Why You’ll Love This Recipe
- Easy and Low Effort: No kneading means less time and no scary dough-handling for you.
- Great Flavor Development: Slow fermentation gives that tangy, deep sourdough taste.
- Perfect Crust Every Time: Baking covered in a Dutch oven locks in steam for a crusty exterior.
- Simple Ingredients: Just flour, water, salt, and your starter—no fancy additives needed.

Ingredients You’ll Need
These ingredients are straightforward, but each plays a key role in creating your perfect loaf. When shopping, quality matters—especially flour and salt that bring out flavor and texture beautifully.

- Mature Starter: Use an active, bubbly sourdough starter—it’s the heartbeat of your bread.
- Bread or All-Purpose Flour: Bread flour provides more structure, but all-purpose works fine too.
- Filtered Water: I always go for filtered or bottled water to avoid chlorine, which can slow fermentation.
- Sea Salt: I prefer sea salt for its clean taste and because it dissolves nicely in the dough.
Variations
I love mixing things up with this No-Knead Sourdough Bread Recipe by adding different flours or mix-ins—plus it’s super easy to adapt for your tastes or dietary needs.
- Whole Wheat Addition: Swapping up to half the white flour for whole wheat adds nuttiness and extra fiber—I do this when I want a heartier loaf.
- Seeds and Nuts: Toss in toasted sunflower seeds, flax, or walnuts during mixing for a crunchy surprise that my family adores.
- Herbs: Fresh rosemary or thyme folded in before the second rise makes a beautiful aromatic bread perfect with soups.
- Gluten-Free Adaptation: While trickier, using a gluten-free sourdough starter and flour blend requires more tweaks but is doable—I’m happy to share tips if you want!
How to Make No-Knead Sourdough Bread Recipe
Step 1: Build Your Starter the Night Before
This step is key for success. I learned that mixing 25 grams of your mature starter with fresh flour and warm water in a jar and letting it sit loosely covered overnight gives you a bubbly, active starter by morning. Make sure your water is about 90°F—not too hot or cold—to wake up those wild yeasts. By morning, you want it doubled and fizzy—that’s your signal to move forward.
Step 2: Mix the Dough in the Morning
Next, pour 100 grams of your ripe starter into a big bowl with 300 grams warm water and stir it until dissolved. Add 500 grams of flour and salt, then mix until you get a shaggy, sticky dough. I always warn friends not to worry if it looks rough and sticky—that’s how you want it! Using your hands here to pull and fold into a ball makes it easier and more intuitive. Cover it loosely with plastic wrap and pop it into your oven with just the light on for warmth. The dough should rise low and slow for 5-6 hours until puffy and doubled.
Step 3: The Gentle Fold
Once risen, dust your counter lightly with flour and turn out the dough seam-side down. This part used to stress me out until I watched a few videos on gentle folding. Starting at the top edge, stretch and fold the dough toward the center, then repeat for each side. Pinch to seal, flip it seam-side down, and use your hands to create surface tension by pulling the dough toward you on the counter gently. You’ll finish with a smooth, tight ball that feels soft but taut—exactly what you want before the final rise.
Step 4: The Second Rise in a Basket
Place the dough seam-side up in a generously floured bread basket or a bowl lined with a floured towel. Cover loosely with plastic wrap and return it to the oven with the light on. This rise takes 2-3 hours until the dough doubles again and holds an indentation when gently pressed. It’s a little like watching paint dry, but that patience is what makes this bread so special.
Step 5: Score and Bake
Here’s where your bread turns magical. Preheat the oven to 450°F (you won’t preheat the Dutch oven itself for this recipe). Carefully turn your dough out onto parchment paper, seam side down. Score the top lengthwise with a sharp knife or lame about half an inch deep—don’t hesitate here! A confident cut helps the loaf expand beautifully. Using the parchment to lift the dough, place it into your Dutch oven, cover with the lid, reduce temperature to 425°F, and bake covered for 40 minutes. Then uncover and bake an additional 5-10 minutes until golden brown. When it sounds hollow to the tap, it’s ready to come out.
Step 6: Cooling is Crucial
I can’t stress enough how important this step is. Removing your bread from the oven and letting it cool completely for at least two hours—preferably on a wire rack—allows the crumb to set and the crust to crisp perfectly. Slicing too soon is a rookie mistake I made once, and the loaf was gummy inside. Patience pays off beautifully here.
Pro Tips for Making No-Knead Sourdough Bread Recipe
- Keep Your Starter Happy: I learned that an active, bubbly starter is the secret to rising success—feed it regularly and watch for bubbles.
- Oven Light as Proofing Box: My oven light keeps the dough warm just right, but if yours heats too much, crack the door open slightly to avoid over-proofing.
- Confident Scoring: Don’t be shy cutting the dough—quick, deep strokes help your bread spring open beautifully during baking.
- Cool Completely Before Slicing: Resist the temptation to cut early; a fully cooled loaf ensures the crumb finishes baking internally and holds its shape.
How to Serve No-Knead Sourdough Bread Recipe

Garnishes
I’m a big fan of simple garnishes like a light brush of good-quality olive oil or a sprinkle of flaky sea salt right after baking. It enhances the crust’s flavor and adds a lovely finishing touch. You can also add a little garlic butter if you’re feeling indulgent—the aroma fills the kitchen, and it tastes heavenly.
Side Dishes
This bread pairs perfectly with almost anything! My family especially loves it alongside homemade soups like tomato basil or butternut squash. It’s also amazing for dipping in olive oil and balsamic or serving with cheese and charcuterie boards.
Creative Ways to Present
For special occasions, I like to slice the bread into thick rounds, lightly toast them, and top with fresh tomato, basil, and a drizzle of balsamic glaze for an elegant bruschetta. Or place the whole loaf in a linen bread bag, tied with rustic twine—invite your guests to tear off chunks for a cozy, communal vibe.
Make Ahead and Storage
Storing Leftovers
Once cooled, I store leftovers at room temperature wrapped loosely in a paper bag or kitchen towel to keep the crust crisp. It lasts beautifully for up to 3 days. Plastic tends to soften the crust too much, and I prefer that contrast of crusty outside with a tender crumb.
Freezing
This No-Knead Sourdough Bread Recipe freezes wonderfully. Just slice and wrap it tightly in plastic wrap and then foil or a freezer bag. I’ve kept it up to 3 months in the freezer with excellent results. Thaw at room temperature before reheating.
Reheating
To reheat, I like to wrap slices in foil and warm them in a 350°F oven for 10-15 minutes. It refreshes the crust and crumb without drying it out—way better than microwaving, which can make the bread chewy or soggy.
FAQs
-
Can I use all-purpose flour instead of bread flour for this No-Knead Sourdough Bread Recipe?
Absolutely! While bread flour provides more gluten and a chewier texture, all-purpose flour works well too and still yields excellent results. Just note the crumb might be a bit softer and less chewy but still delicious.
-
How do I know if my starter is ready to use?
Your starter should be active and bubbly, doubling in size within 6-8 hours of feeding. A good test is the float test: drop a spoonful of starter into water—if it floats, it’s ready. If it sinks, it needs more time or feeding.
-
What if my kitchen is too cold for fermentation?
If your kitchen is chilly, use the oven light trick as described in the recipe. It keeps your dough warm around 80-85°F without cooking it. If your oven light is too hot, open the door slightly or turn it off after an hour to avoid overheating.
-
Can I skip using a Dutch oven?
You can bake on a heavy baking stone or cast iron pot covered with a large roasting pan lid to trap steam. The Dutch oven is ideal because it traps steam perfectly, giving you that beautiful crust, but substitutes can work in a pinch.
Final Thoughts
This No-Knead Sourdough Bread Recipe holds a special place in my kitchen because it’s approachable enough for beginners yet delivers such beautiful, bakery-worthy bread. I used to shy away from sourdough because of all the kneading and timing, but this method changed everything for me—it’s virtually foolproof and incredibly rewarding. Give it a try—you’ll feel proud tearing into a loaf you made with your own hands, and honestly, nothing beats the smell of fresh sourdough in your home.
Print
No-Knead Sourdough Bread Recipe
- Prep Time: 15 minutes
- Cook Time: 50 minutes
- Total Time: 10 hours 5 minutes
- Yield: 8 servings
- Category: Bread
- Method: Baking
- Cuisine: American
Description
This Easiest Ever Sourdough Bread recipe offers a simple no-knead approach to baking crusty, artisan-style bread at home. Using a naturally fermented starter and minimal hands-on time, it produces a loaf with a crisp golden crust and soft, airy crumb. Perfect for beginners, this method relies on slow fermentation and gentle folding to develop flavor and structure without complex techniques.
Ingredients
Starter Build (Night Before)
- 25 grams mature starter (about 2 tablespoons)
- 75 grams unbleached bread flour or all-purpose flour (½ cup + 1 teaspoon)
- 75 grams water, 90°F (⅓ cup)
For the Dough
- 100 grams ripe starter (heaping ⅓ cup)
- 300 grams filtered water, 90°F (1¼ cups + 1 tablespoon)
- 500 grams white bread flour or unbleached all-purpose flour (3½ cups + ½ teaspoon)
- 10 grams sea salt (2⅛ teaspoons)
Instructions
- Prepare the Starter Build: The evening before baking, mix 25 grams mature starter with 75 grams flour and 75 grams warm water (about 90°F) in a clean mason jar. Stir until no dry flour remains, cover loosely with plastic wrap, and let rest at room temperature for 8-12 hours until doubled in size and bubbly.
- Mix the Dough: In the morning, combine 100 grams ripe starter with 300 grams warm water in a large bowl. Stir until the starter disperses completely. Add 500 grams bread flour and 10 grams sea salt, mixing until a shaggy, sticky dough forms. Use your hands to gather the dough into a sticky ball.
- First Rise: Cover the bowl with plastic wrap and place it in the oven with just the light on to create a warm environment around 80-85°F. Let the dough rise for 5-6 hours until noticeably puffy and doubled in size. The dough should hold a finger indentation that fills in slowly.
- Shape the Dough: Lightly flour a counter and turn the dough onto it seam side down. Fold each edge to the center twice, pinching to seal. Flip the dough seam-side down and use cupped hands to gently rotate and tighten it into a smooth, taut ball.
- Second Rise: Dust a bread basket generously with flour. Place the shaped dough seam-side up in the basket, dust lightly with more flour, and cover with plastic wrap. Return to the oven with the light on for 2-3 hours until doubled and airy, holding a light finger indentation.
- Preheat Oven and Prepare for Baking: Remove the dough from the oven and preheat it to 450°F. Prepare a Dutch oven but do not preheat it. Place a sheet of parchment on the counter, gently turn the dough onto it seam-side down, and score the top lengthwise about ½ inch deep with a sharp knife or lame.
- Bake: Using the parchment paper, carefully lift the dough into the Dutch oven. Cover with the lid and reduce the oven temperature to 425°F. Bake covered for 40 minutes, then remove the lid and bake an additional 5-10 minutes until the crust is dark golden and sounds hollow when tapped.
- Cool: Remove the bread using the parchment paper onto a cooling rack. Let it cool completely for at least 2 hours to allow the crumb to set properly. The internal temperature should reach 190-205°F before slicing and serving.
Notes
- Active, bubbly starter is crucial for success. If your starter doesn’t float in water, it isn’t ready to use.
- If you don’t have a proofing basket, a large bowl lined with a well-floured kitchen towel works well.
- The dough will be sticky when mixing; this texture yields the best artisan bread texture.
- In cooler kitchens, longer fermentation may be necessary. The oven light provides ideal warmth for rising dough.
- Score the dough confidently with a single straight cut for even rising; hesitant cutting can cause uneven results.
- Bread flour yields the best texture, but all-purpose flour can be substituted with good results.
- Store the bread at room temperature in a paper bag for up to 3 days. For longer storage, slice and freeze in an airtight container for up to 3 months.
Nutrition
- Serving Size: 1 slice (about 85g)
- Calories: 200
- Sugar: 0.5g
- Sodium: 400mg
- Fat: 1g
- Saturated Fat: 0.2g
- Unsaturated Fat: 0.6g
- Trans Fat: 0g
- Carbohydrates: 42g
- Fiber: 2g
- Protein: 6g
- Cholesterol: 0mg


