
If you’ve ever tried making sushi at home and found yourself frustrated with soggy or sticky rice, trust me, you’re not alone. I’ve been there, and that’s why I’m excited to share this Perfect Sushi Rice Recipe with you — it’s the one I rely on every time I want that ideal balance of stickiness and fluffiness that makes sushi truly shine. Whether you’re rolling California rolls or making a poke bowl, this method is a game changer!
Why You’ll Love This Recipe
- Reliable Results Every Time: Whether you use a rice cooker or stovetop, you’ll end up with perfectly cooked sushi rice.
- Simple Ingredients: With just rice, vinegar, sugar, and salt, you get those authentic sushi rice flavors without fuss.
- Versatile Use: Ideal not only for sushi rolls but also perfect for poke bowls or as a base for creative rice dishes.
- Beginner-Friendly: I recommend the rice cooker method if you’re new to making sushi rice—it takes the guesswork out!

Ingredients You’ll Need
These ingredients are super straightforward, but what really makes your sushi rice stand out is picking the right kind of rice and a good quality rice vinegar. It’s all about balance and freshness here.

- Sushi Rice: Use Japanese short-grain rice for that perfect sticky yet fluffy texture; avoid long-grain rice as it won’t bind properly.
- Water: The amount varies slightly depending on your cooking method—precise water to rice ratio is key for perfect texture.
- Rice Vinegar: This gives sushi rice its characteristic tang; don’t substitute with other vinegars because the flavor profile differs.
- Sugar: Balances the vinegar’s acidity; I like to use regular granulated sugar, but you can try a little honey for a twist.
- Salt: Enhances the overall flavor, so don’t skip it—even a small amount makes a big difference.
Variations
I love that you can tweak this Perfect Sushi Rice Recipe to suit your mood or occasion. Sometimes I add a touch more sugar when making rolls for kids, and other times I experiment with different vinegars for a subtle twist.
- Brown Sushi Rice: I tried using brown short-grain rice once, and while it’s healthier, the texture wasn’t quite right for traditional sushi—more chewy but still tasty.
- Vinegar Substitution: Mixing in a bit of mirin along with rice vinegar gives a sweeter, more complex flavor that my family adored during a sushi night.
- Low-Sugar Version: For a lighter taste, reduce sugar by half, and balance it with a dash more salt; still delicious but less sweet.
- Vegan Friendly: This recipe is naturally vegan, perfect if you’re avoiding animal products but still craving authentic sushi rice.
How to Make Perfect Sushi Rice Recipe
Step 1: Rinse and Soak Your Rice
Start by placing your sushi rice in a large bowl and rinsing it under cold running water. I like to move the rice gently in a circular motion with my hand—that’s a little trick I discovered that helps wash off excess starch faster. Keep rinsing until the water runs clear, which usually takes a few washes. Then, drain it using a sieve and let it soak for 30 minutes to hydrate the grains fully; this soaking step is key for fluffy yet sticky results.
Step 2: Cook Your Sushi Rice
If you have a rice cooker, this is your best friend for foolproof sushi rice. Add the washed rice and 1 ½ cups plus 1 tablespoon of water, then soak it in the cooker for 30 minutes before turning it on—this soak inside the cooker lets the rice absorb moisture evenly. Use the “sushi rice” setting if yours has one; otherwise, regular white rice mode works. After cooking, don’t open the lid—leave it resting for 10-15 minutes so steam finishes the cooking gently.
For stovetop lovers, combine the washed rice with 1 ⅜ cups water in a pot, soak for 30 minutes, then bring it to a boil with the lid on. Lower the heat to a simmer and cook for exactly 8 minutes without lifting the lid. Afterward, remove from heat but keep the lid on for 10-15 minutes—this resting period is magic for perfect texture.
Step 3: Prepare the Sushi Vinegar
While your rice is cooking, mix rice vinegar, sugar, and salt in a small saucepan. Heat it gently until the sugar and salt dissolve completely, then turn off the heat. This warm vinegar mixture will season your rice perfectly, infusing a delicate tang and slight sweetness that sushi rice is known for.
Step 4: Season and Cool the Rice
Transfer your hot cooked rice to a large bowl (a wooden one if you have it), then pour over the warm vinegar mixture. I find using a cutting/spatula knife to fold and toss the rice gently works best to avoid smashing the grains but still mix the seasoning well. Once combined, cover the rice with a damp tea towel to keep moisture in and prevent drying, leaving it to cool to room temperature before using.
Pro Tips for Making Perfect Sushi Rice Recipe
- Rinse Thoroughly: I learned the hard way that not rinsing the rice enough leads to gummy rice, so keep washing until the water’s clear.
- Don’t Skip the Soak: Soaking hydrates the grains uniformly, and skipping it means unevenly cooked rice that’s partly crunchy.
- Use a Wooden Bowl if Possible: It helps absorb excess moisture and keeps the rice from getting soggy as it cools.
- Never Stir Aggressively: Fold gently with a cutting motion to maintain grain integrity, which keeps your sushi rolls neat and less crumbly.
How to Serve Perfect Sushi Rice Recipe

Garnishes
When I serve sushi rice, I love to sprinkle it lightly with toasted sesame seeds or thinly sliced scallions — these add a subtle crunch and a pop of flavor that complement the rice perfectly. Some fresh nori strips on top also add that umami surprise your taste buds crave.
Side Dishes
My go-to sides with this Perfect Sushi Rice Recipe are miso soup, pickled ginger, and edamame. These simple sides balance the meal and make it feel like you’re dining at an authentic sushi bar right at home.
Creative Ways to Present
For special occasions, I’ve tried serving sushi rice in cute mini bowls topped with sashimi and a drizzle of spicy mayo for a sushi bowl presentation. Another fun idea is to mold the rice with plastic wrap into neat shapes and pair with colorful toppings — it’s always a crowd-pleaser!
Make Ahead and Storage
Storing Leftovers
I try to use sushi rice fresh for rolling because chilled rice tends to harden and lose the perfect texture. But if you have leftovers, store them in an airtight container in the fridge and use them within three days for dishes like poke bowls or fried rice instead of sushi.
Freezing
Freezing sushi rice isn’t my favorite because it changes the texture once thawed, but if you must, portion it out before freezing and thaw gently in the fridge overnight. It works better for cooked rice dishes than raw sushi rice.
Reheating
When reheating leftovers, sprinkle a few drops of water over the rice and cover it with a damp paper towel before microwaving to help retain moisture. This way, the rice won’t dry out or toughen up.
FAQs
-
What type of rice should I use for the Perfect Sushi Rice Recipe?
You want to use Japanese short-grain sushi rice for the best texture and stickiness. It’s different from long-grain rice and is designed to clump together just right without becoming mushy.
-
Can I make sushi rice without a rice cooker?
Absolutely! This recipe includes a stovetop method that works wonderfully if you don’t have a rice cooker. Just be sure to follow the soaking and cooking times and keep the lid closed during cooking to retain steam.
-
Why do I need to soak the rice before cooking?
Soaking hydrates the rice grains evenly, which helps them cook more uniformly. It prevents hard centers and makes the texture light and fluffy while still sticky.
-
Can I prepare sushi rice in advance?
For best results, sushi rice is freshest when used immediately. Refrigerating sushi rice can cause it to harden and lose its ideal texture, so if you need to store it, use leftovers in dishes like poke bowls or fried rice rather than sushi rolls.
-
How do I prevent sushi rice from being too sticky?
Rinsing the rice thoroughly removes excess surface starch, which can cause clumping. Also, avoid stirring too vigorously after cooking to keep the grains separate yet sticky enough to hold together.
Final Thoughts
I absolutely love how this Perfect Sushi Rice Recipe turns out every single time—it’s my go-to whenever I want that authentic sushi experience at home. I remember the first time I nailed it; it was a total confidence booster and made me fall in love with homemade sushi all over again. You’re going to enjoy how simple, reliable, and tasty this method is. Give it a try—you might just find yourself making sushi nights a regular thing!
Print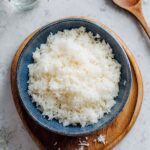
Perfect Sushi Rice Recipe
- Prep Time: 40 minutes
- Cook Time: 10 minutes
- Total Time: 1 hour 50 minutes
- Yield: 4 servings (enough for 4-8 sushi rolls)
- Category: Side Dish
- Method: Rice Cooker or Stovetop Boiling
- Cuisine: Japanese
- Diet: Gluten Free
Description
Learn how to make perfect sushi rice every time with this easy step-by-step guide. Whether using a rice cooker or stovetop, this recipe ensures fluffy, flavorful sushi rice seasoned with the ideal balance of rice vinegar, sugar, and salt, ready to be the foundation for your favorite sushi rolls or poke bowls.
Ingredients
Sushi Rice
- 1 1/2 cups sushi rice
- 1 1/2 cups + 1 tablespoon (375ml) water (rice cooker method)
- 1 3/8 cups (330ml) water (stovetop method)
Sushi Vinegar
- 1/4 cup rice vinegar
- 2 tablespoons sugar
- 1 teaspoon salt
Instructions
- Rinse Rice: Place the sushi rice in a large bowl and wash under running cold water until the water runs clear, moving the rice in a circular motion with your hand to speed up the rinsing process.
- Drain Rice: Carefully discard the rinse water using a sieve or by pouring off the water while keeping the rice inside the bowl.
- Cook Sushi Rice in a Rice Cooker: Place the rinsed rice into the rice cooker bowl with 1 ½ cups plus 1 tablespoon of water. Let the rice soak for 30 minutes before starting the cooking process. If your rice cooker has a ‘sushi rice’ setting, use that. Once cooking completes, turn off the rice cooker but leave the lid closed and let the rice sit for 10-15 minutes to steam.
- Cook Sushi Rice in a Pot: Alternatively, place rinsed rice and 1 ⅜ cups (330ml) water in a pot and soak for 30 minutes. Bring the pot to a boil with the lid on, then reduce heat to minimum and cook for 8 minutes without opening the lid. Remove from heat and let it sit covered for another 10-15 minutes.
- Make Sushi Vinegar: While the rice is cooking, combine rice vinegar, sugar, and salt in a small saucepan. Heat until boiling, then remove from heat and stir until sugar dissolves completely.
- Season Rice: Transfer the cooked rice to a large bowl. Pour the hot vinegar mixture over the rice and gently toss to combine evenly without mashing the grains.
- Cool: Cover the bowl with a damp tea towel to prevent the rice from drying out. Let it cool at room temperature until no longer warm.
- Serve: Use the perfectly seasoned sushi rice as a base for sushi rolls, poke bowls, or other delicious Japanese-style dishes.
Notes
- Using a rice cooker is recommended for beginners for consistent results.
- Rice to water ratio differs slightly by cooking method: 1:1.1 by volume for stovetop, 1:1.25 for rice cooker (check your rice cooker manual to adjust if necessary).
- 1 ½ cups (300g) uncooked sushi rice yields enough for about 4-5 thick California rolls or 7-8 medium Maki rolls, serving 2-4 people depending on appetite.
- Always use freshly cooked sushi rice to make sushi, as refrigerated rice hardens and is unsuitable for sushi but can be repurposed in poke bowls or fried rice within three days.
- Let the rice rest with the lid closed after cooking to achieve ideal texture and moisture.
Nutrition
- Serving Size: 1/4 of cooked rice (approx. 150g)
- Calories: 175
- Sugar: 4g
- Sodium: 250mg
- Fat: 0.3g
- Saturated Fat: 0g
- Unsaturated Fat: 0.3g
- Trans Fat: 0g
- Carbohydrates: 38g
- Fiber: 1g
- Protein: 3g
- Cholesterol: 0mg


