
If you’re anything like me and love a rich, creamy treat that packs a protein punch, then you are going to adore this Protein Chocolate Milkshake with Ninja Creami Recipe. It’s everything you want in a milkshake—thick, chocolatey, a bit nutty from the peanut butter, yet surprisingly healthy and protein-packed. Plus, it’s made right in the Ninja Creami, which means you get this lightweight, luscious texture without all the added sugars or artificial ingredients. Stick with me here—I’ll walk you through exactly how to make this fan-freaking-tastic milkshake that my family and I can’t get enough of.
Why You’ll Love This Recipe
- High Protein Boost: It satisfies your sweet tooth while fueling your muscles, perfect for post-workout or a midday pick-me-up.
- Ninja Creami Magic: The machine transforms simple ingredients into an ultra-smooth, creamy milkshake that rivals any ice cream shop.
- Customizable Flavor: You can easily switch up sweetness and chocolate intensity to suit your cravings.
- Easy Prep & Storage: Make ahead, freeze, and enjoy whenever you want a nutrient-packed treat.

Ingredients You’ll Need
The beauty of this Protein Chocolate Milkshake with Ninja Creami Recipe is in how well these simple ingredients blend to provide creaminess, flavor, and a protein boost. I love using oat milk for that smooth texture, but you’ll see a tip for soy milk if you want extra protein without compromising creaminess.

- Oat milk: I use this for its creamy consistency and subtle sweetness, but soy milk works great too if you want more protein.
- Peanut butter: Adds a lovely nutty flavor and creaminess; natural peanut butter with no added sugar is my go-to.
- Maple syrup: Sweetens the base naturally; you can also try honey or agave if you prefer.
- Vanilla extract: A little splash amps up all the flavors—don’t skip it!
- Vanilla protein powder: This is the protein powerhouse; I usually use whey or plant-based blends depending on my mood.
- Chocolate syrup: Adds that chocolate kick in the final milkshake step—opt for low-sugar or sugar-free to keep it guilt-free.
- Additional oat milk: Used when spinning your milkshake for perfect pourability without thinning the texture too much.
Variations
I like to mix things up depending on what I have on hand or what flavor mood I’m in. This Protein Chocolate Milkshake with Ninja Creami Recipe is super easy to tweak and still turns out amazing every time.
- Peanut Butter Swap: Once I swapped peanut butter for almond butter, and the nutty twist was incredible—just as creamy and rich.
- Protein Powder Flavors: Vanilla protein powder is versatile, but chocolate or mocha flavors give the milkshake a richer, dessert-like quality.
- Sweetener Adjustments: If you want less sugar, try using a sugar-free maple syrup alternative or reduce the amount you add.
- Milk Options: Experiment with soy milk for more protein or even unsweetened cashew milk for a lighter take.
How to Make Protein Chocolate Milkshake with Ninja Creami Recipe
Step 1: Whisk Together Your Ice Cream Base Ingredients
Start by combining your oat milk, peanut butter, maple syrup, vanilla extract, and vanilla protein powder in a bowl. Whisk everything really well—you want a smooth, consistent mixture with no clumps of protein powder. I’ve learned that taking a bit of extra time here pays off in texture, so don’t rush this step!
Step 2: Freeze the Mixture in Your Ninja Creami Pint
Pour your whipped-together mixture into the Ninja Creami pint container. Seal it tightly and pop it into the freezer for at least 12 hours, up to 24 hours if you want to prep ahead. This step is key because the Creami does all its magic on a solid, frozen base.
Step 3: Add Milk and Chocolate Syrup, Then Spin on Milkshake Setting
Once frozen solid, remove the pint’s lid, add the half cup of oat milk and chocolate syrup, then lock the lid back on. Place the pint in your Ninja Creami and select the milkshake setting. This is when the Creami blends everything into that velvety, thick shake you’re craving.
Step 4: Stir and Respin for the Perfect Texture
After the first spin, give the shake a good stir to mix everything evenly. Then, spin it again on milkshake mode for an ultra-smooth finish. It’ll be thick but melts quickly into that luscious milkshake consistency that feels indulgent without any guilt. This two-step spin and stir is a trick I stumbled upon and now swear by—don’t skip it.
Pro Tips for Making Protein Chocolate Milkshake with Ninja Creami Recipe
- Use Natural Peanut Butter: I’ve found natural peanut butter (no sugar or oils added) gives the creamshake a cleaner taste with a richer nutty flavor.
- Don’t Skip the Stir: The stir between spins is what avoids grit from protein powder and creates that silky finish.
- Freeze Fully: Make sure to freeze the base for at least 12 hours; a partial freeze leads to a watery shake.
- Adjust Chocolate to Taste: Start with less chocolate syrup, then add more on the second spin if you want it richer—easier to add than fix if too chocolatey!
How to Serve Protein Chocolate Milkshake with Ninja Creami Recipe

Garnishes
I usually sprinkle a few dark chocolate shavings or cacao nibs on top for that little crunch and extra chocolate burst. Sometimes I add a dollop of whipped cream (especially for celebrations) and even a drizzle more of peanut butter or chocolate syrup—it’s all about what makes you smile.
Side Dishes
This milkshake pairs beautifully with a simple oatmeal cookie or some fresh banana slices. One time, I served it alongside a batch of homemade protein granola bars, and it felt like an epic, well-rounded snack time.
Creative Ways to Present
For birthday parties, I pour the milkshake into little vintage milk bottles and wrap a cute straw with twine. Another fun idea: layer the shake with mini chocolate chunks and chopped nuts in clear glasses for a parfait-style presentation—totally Instagrammable.
Make Ahead and Storage
Storing Leftovers
When I have leftovers, I scoop the milkshake back into a Ninja Creami pint container and freeze it right away. It keeps well up to a week, so you can enjoy this protein-packed treat exactly when you want without worrying about spoilage.
Freezing
Freezing this milkshake base is straightforward—just make sure you’ve sealed your container well to avoid freezer burn or picking up any extra odors. The texture stays consistently creamy once you run it through the Ninja Creami again after thawing a bit.
Reheating
I don’t really “reheat” this milkshake since you want it cold, but if it’s too hard after freezing, I like to let it sit at room temperature for 10-15 minutes, add a splash of milk, and then respin in the Creami. That brings it back to perfect shake consistency every time.
FAQs
-
Can I use other types of milk instead of oat milk for this recipe?
Absolutely! While oat milk is great for creaminess, soy milk is a fantastic alternative if you want to up the protein content even more. Almond, cashew, or even regular dairy milk will also work; just keep in mind they can change the texture slightly, so you might want to adjust freezing time or liquid amounts.
-
What if I don’t have a Ninja Creami—can I still make this milkshake?
While Ninja Creami gives this milkshake its signature creamy texture, you could try blending the frozen ingredients in a high-powered blender. The texture won’t be exactly the same, but it’ll still be delicious. Just be sure to freeze the base well and add liquids slowly to avoid it getting too thin.
-
How do I make this recipe lower in sugar?
Great question! You can swap maple syrup for natural zero-calorie sweeteners like stevia or monk fruit drops. Also, opt for a sugar-free or low-sugar chocolate syrup for the milkshake step. Taste as you go so you don’t lose the balance of flavors.
-
Can I add more protein powder to increase protein content?
You can, but I wouldn’t recommend going overboard or the texture might become chalky or gritty. Stick to about ¼ cup protein powder as in the recipe, and if you want extra protein, consider soy milk or adding a scoop after the milkshake is made to mix in.
Final Thoughts
Honestly, this Protein Chocolate Milkshake with Ninja Creami Recipe has become my go-to when I’m craving something indulgent but still want to fuel my body right. I love how easy it is to prep ahead, how versatile the flavors are, and that it feels like a treat without the guilt. If you haven’t tried making milkshakes in your Ninja Creami yet, this is the perfect starter recipe. Trust me, once you do, you’ll find yourself dreaming up new combinations just like I did. Go on—give it a whirl and enjoy every creamy, chocolatey sip with a smile!
Print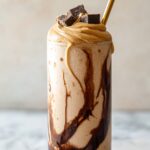
Protein Chocolate Milkshake with Ninja Creami Recipe
- Prep Time: 10 minutes
- Cook Time: 0 minutes
- Total Time: 12 hours 10 minutes
- Yield: 3 servings
- Category: Dessert
- Method: Blending
- Cuisine: American
- Diet: Vegetarian
Description
This Ninja Creami Protein Milkshake is a creamy, protein-packed treat perfect for a quick snack or post-workout recharge. Made with oat milk, peanut butter, maple syrup, and vanilla protein powder, it combines nutritious ingredients into a delicious, thick milkshake using the Ninja Creami machine. It features an easy freezing process and a simple mix-and-spin technique to create a smooth, satisfying shake enriched with chocolate syrup for a touch of indulgence.
Ingredients
Ice Cream Base
- 2 cups oat milk
- 1/4 cup peanut butter
- 1/4 cup maple syrup
- 1 teaspoon vanilla extract
- 1/4 cup vanilla protein powder
Milkshake Add-Ins
- 1/2 cup oat milk
- 2-3 Tablespoons chocolate syrup (lower-sugar or sugar-free option is best)
Instructions
- Prepare the Ice Cream Base: Whisk together 2 cups oat milk, 1/4 cup peanut butter, 1/4 cup maple syrup, 1 teaspoon vanilla extract, and 1/4 cup vanilla protein powder until smooth and fully combined.
- Freeze the Base: Pour the mixture into a Ninja Creami pint container, seal with the lid, and freeze for 12-24 hours to allow it to fully set.
- Add Milkshake Ingredients: Remove the lid and add 1/2 cup oat milk and 2-3 tablespoons chocolate syrup to the frozen base.
- Spin the Milkshake: Place the pint container into the Ninja Creami machine and select the milkshake setting to blend the ingredients into a creamy consistency.
- Stir and Respin: Remove the container, stir the mixture gently to blend any uneven parts, then respin on the milkshake setting to achieve a thick but pourable milkshake texture.
- Serve and Enjoy: The milkshake will be thick but will melt quickly to a smooth consistency. Serve immediately or store leftovers properly.
Notes
- Tip: Swap oat milk for soy milk to retain creaminess with higher protein content.
- Store: Return any leftovers to a Ninja Creami pint container and freeze for up to a week.
- Serve: Allow it to sit at room temperature for 10-15 minutes before adding a tablespoon of milk and respinning on the milkshake setting for best texture.
Nutrition
- Serving Size: 1 serving (approx. 1 cup)
- Calories: 280
- Sugar: 15g
- Sodium: 150mg
- Fat: 12g
- Saturated Fat: 2g
- Unsaturated Fat: 8g
- Trans Fat: 0g
- Carbohydrates: 28g
- Fiber: 4g
- Protein: 15g
- Cholesterol: 0mg


