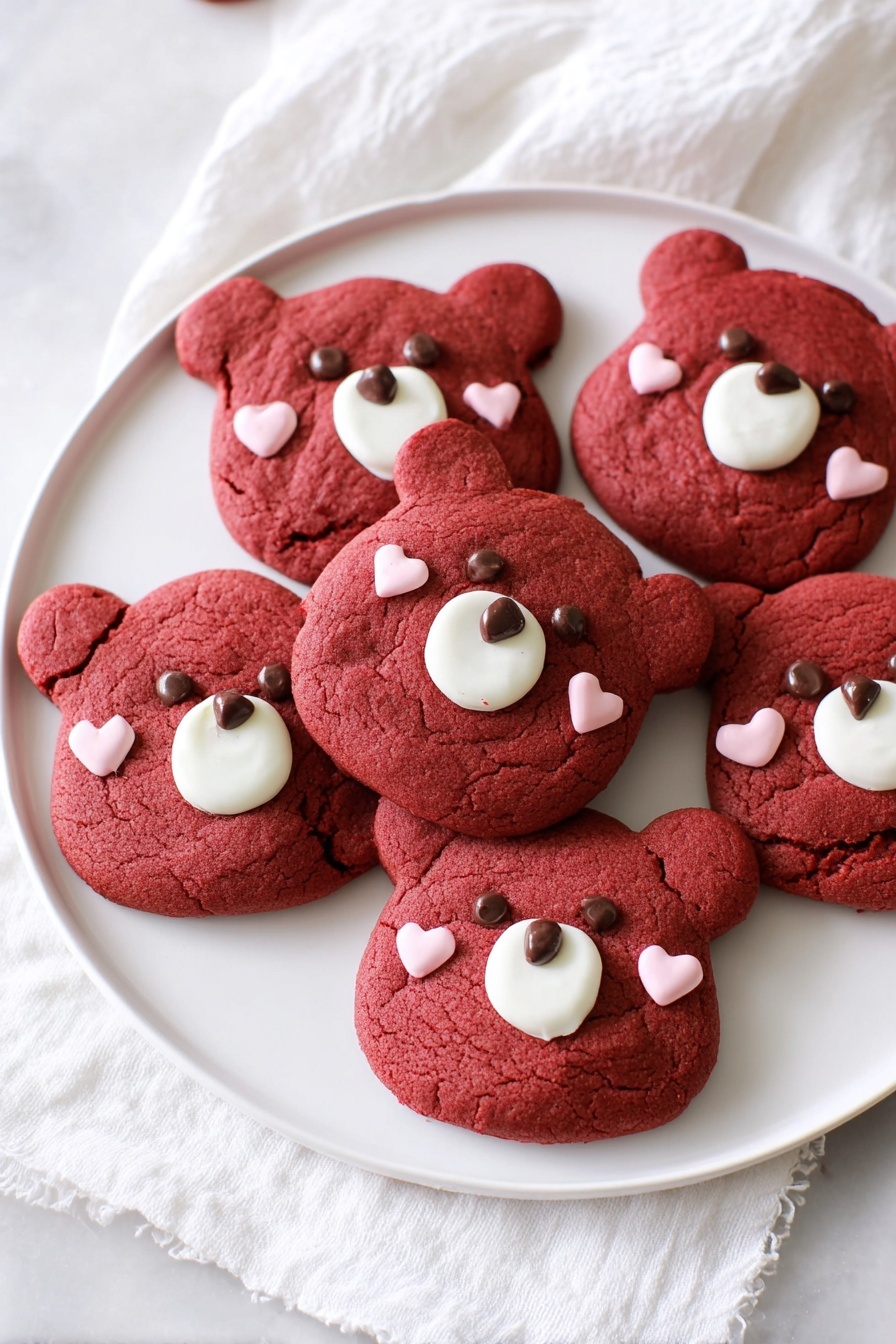
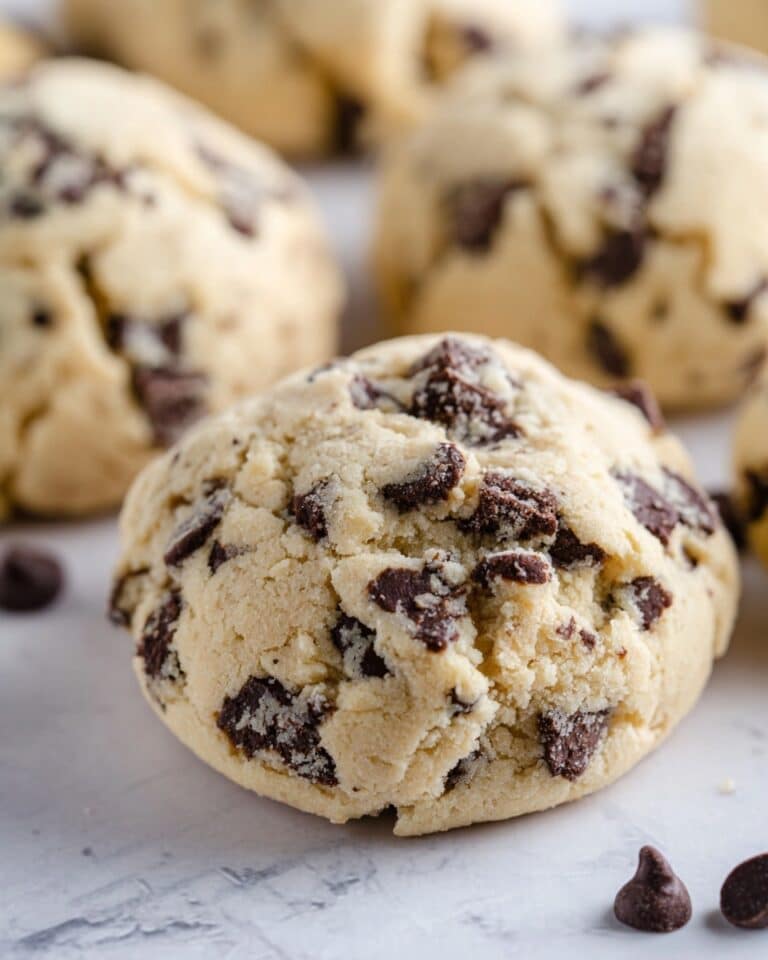
If you’re looking for a delightful treat that’s just as adorable as it is delicious, you’ve got to try this Red Velvet Bear Cookies Recipe. I absolutely love how these little bears turn out — soft, chewy, and with the perfect hint of cocoa and tangy red velvet flavor. They’re not only cute enough to make for Valentine’s Day but also a super fun baking project that you’ll enjoy as much as eating them. Trust me, once you try this recipe, your family and friends will be asking for these sweet little bears again and again!
Why You’ll Love This Recipe
- Irresistibly Cute: The bear shape makes them perfect for gifting or special occasions.
- Perfect Texture: Soft and chewy thanks to the resting dough trick I always recommend.
- Easy to Customize: You can swap ingredients for vegan or allergy-friendly versions with great results.
- Fun Decorating: Simple chocolate details bring these bears to life with just a few easy steps.

Ingredients You’ll Need
This Red Velvet Bear Cookies Recipe uses classic baking ingredients that come together to make that iconic red velvet flavor. I love how the cocoa and vinegar balance the sweetness, plus the melted butter keeps the cookies tender yet chewy. Here’s a quick overview so you can shop smart:

- All-purpose flour: Spoon and level for accuracy to get the right dough consistency every time.
- Cocoa powder: Choose a quality unsweetened cocoa powder for that rich chocolatey base.
- Baking soda & baking powder: Work together to give the cookies a slight lift without puffing them up too much.
- Salt: Just a pinch to enhance all the flavors.
- Unsalted butter: Melted and cooled for easy mixing and a tender crumb.
- Granulated sugar and brown sugar: I love using a combo for depth of sweetness and chewiness.
- Vanilla extract: Pure vanilla really brings out the warm notes in red velvet.
- White vinegar: It works magic reacting with the baking soda to help that classic red velvet tang.
- Egg: For binding and moisture.
- Red food coloring: The star that gives these bears their iconic look. Use as much as you like for brightness.
- Melted chocolates: Milk or dark chocolate for details, and white chocolate tinted with oil-based colors for blush and snouts.
Variations
One of my favorite things about this Red Velvet Bear Cookies Recipe is how easy it is to switch things up to suit your preferences or dietary needs. Whether you want to go vegan or just get creative with colors and flavors, these cookies are forgiving and fun to experiment with.
- Vegan Version: I’ve tried swapping butter with a solid vegan butter and omitting the egg, adding a bit of plant milk to bring the dough together—it worked surprisingly well without losing that chewy texture.
- Flavored Chocolates: Adding a splash of flavored extract like almond or orange to the melted chocolate decoration can make your bears extra special for holidays.
- Colors & Themes: You can change the food coloring to pink for a softer look or even mix colors to create ombré red velvet bears for celebrations.
How to Make Red Velvet Bear Cookies Recipe
Step 1: Whisk Dry Ingredients Together
Start by sifting together your flour, cocoa powder, baking soda, baking powder, and salt in a medium bowl. This helps evenly distribute the leavening and cocoa so each cookie has that perfect balance of flavor and texture. I always take a moment here to make sure no clumps sneak in, because clumpy cocoa powder can cause uneven color and spots in the dough.
Step 2: Cream Butter and Sugars
Using a stand mixer fitted with the paddle attachment (or a hand mixer if that’s what you have), mix your melted, cooled butter with the granulated and brown sugars on medium speed until everything is well combined. Don’t skip scraping down the sides of the bowl here — I learned this the hard way when uneven mixing meant pockets of sugar in my cookies!
Step 3: Add Wet Ingredients and Food Coloring
To your butter-sugar mix, add vanilla extract, white vinegar, and the egg, then mix until smooth. Now comes the fun part — add your red food coloring. I like to add it in stages, mixing in between, so I can customize just how bright or deep the color turns out. Remember, you can always add more but can’t take it away!
Step 4: Combine Wet and Dry Ingredients
Dump in your sifted dry ingredients and stir just until combined. Overmixing at this stage can make the cookies tough, so I stop as soon as I don’t see any more flour. If the dough looks a bit dry, add a tiny splash of milk, but generally, it should be thick and scoopable.
Step 5: Chill the Dough
Cover the dough and let it rest in the fridge for 20-30 minutes. This step is key! I discovered this trick when I wanted chewier cookies that keep their shape better. The resting lets the flour absorb moisture fully and the butter to firm up, making the dough easier to work with — and the cookies taste better, too.
Step 6: Shape the Bears
Preheat your oven to 325°F (163°C) and line your trays with parchment or silicone mats. Using a small cookie scoop (about 1 ½ tablespoon), portion out balls of dough onto the tray spaced about 3 inches apart. For the bear ears, take about a teaspoon of dough, split it into two smaller balls, and place them atop the heads of your cookies. It’s so satisfying to shape these—you really start to see the bears come alive!
Step 7: Bake and Cool
Bake for 9-11 minutes until edges are set and centers are still slightly puffy. If you prefer a chewier cookie, I recommend pulling them out closer to 9 minutes. Let the cookies cool on the pan for about 5-10 minutes before transferring to a wire rack to cool completely. I’ve learned that rushing this step can cause your cookies to break or lose shape, so patience is key.
Step 8: Decorate the Bear Faces
Once your cookies have completely cooled, it’s time to make those adorable bear faces. Use a piping bag, toothpick, or cookie scribe tool to decorate. Start with melted white chocolate to draw snouts and ears—if you want a pop of color, add a bit of oil-based pink or red food coloring to tint your white chocolate for blush. Heads up: if you don’t have oil-based colors, the chocolate might seize; I learned the trick of adding a teaspoon of neutral oil at a time to smooth it right out. Finally, use melted milk or dark chocolate for the eyes and noses. Watching these bears get their expressions is my favorite part—it feels like a little baking magic.
Pro Tips for Making Red Velvet Bear Cookies Recipe
- Rest the Dough: Don’t skip the fridge chill time—it makes scooping easier and your cookies chewier.
- Control Your Color: Add food coloring slowly to avoid an overly bitter red velvet taste from too much dye.
- Use Quality Cocoa: I switched from cheap to high-quality cocoa and the flavor difference was night and day.
- Decorate on a Cool Surface: Make sure your cookies are completely cool before decorating or the chocolate can run or melt.
How to Serve Red Velvet Bear Cookies Recipe

Garnishes
I love adding a little extra charm by dusting the finished cookies lightly with powdered sugar or even edible glitter for festive occasions—that subtle sparkle always makes these bears pop! Sometimes I also serve them with fresh berries or a dollop of whipped cream on the side to balance the richness.
Side Dishes
Pair these cookies with a tall glass of cold milk (or a warm cup of chai tea if you prefer), which really complements their rich flavor. They also go wonderfully with a simple fruit salad or vanilla ice cream for an after-dinner treat.
Creative Ways to Present
For Valentine’s Day or birthday parties, I like arranging the cookies standing in little edible “bears in a forest” themed displays with fresh greenery or edible flowers. Wrapping them individually in clear cellophane bags tied with a red ribbon also makes for a sweet homemade gift that’s guaranteed to impress.
Make Ahead and Storage
Storing Leftovers
I store leftover Red Velvet Bear Cookies in an airtight container at room temperature where they stay fresh and chewy for up to a week. If you want to keep the decorations perfect, separate the layers with parchment paper to avoid sticking or smudging.
Freezing
Yes, you can freeze the cookie dough or baked cookies! I prefer freezing shaped dough balls on a baking sheet, then transferring them to a freezer bag once solid. When you’re ready to bake, pop them straight into the oven—just add a minute or two to the baking time.
Reheating
If your cookies have lost a bit of their softness, I gently warm them in the microwave for about 10 seconds or place them in a low oven (around 300°F/150°C) for a few minutes. This revives the texture nicely without melting the chocolate decorations.
FAQs
-
Can I make Red Velvet Bear Cookies without red food coloring?
Absolutely! While the red coloring gives these cookies their signature look, you can skip it if you prefer a more natural color. Just omit the food coloring or use natural beet juice for a milder tint. Keep in mind the flavor won’t be affected, but the vibrant red hue will be missing.
-
How do I prevent chocolate from seizing when adding food coloring?
Chocolate typically seizes if you add water-based food coloring. To avoid this, use oil-based food coloring or add a teaspoon of neutral oil (like canola) to the melted chocolate before mixing in the color. This keeps the chocolate smooth for easy piping and decorating.
-
Can I make these cookies vegan?
Yes! Swap the butter with high-quality vegan butter and omit the egg, adding a tablespoon or two of plant-based milk to bring the dough together if it feels crumbly. Use vegan chocolates for decorating. I’ve tested this and the cookies still turn out soft and flavorful.
-
How do I store decorated Red Velvet Bear Cookies?
Store them in a single layer inside an airtight container at room temperature. Place parchment between layers if stacking to avoid smudging. Keep them away from heat or humidity to maintain the chocolate decorations.
Final Thoughts
This Red Velvet Bear Cookies Recipe holds a special place in my heart because it combines nostalgia, creativity, and a great flavor all in one bite-sized treat. I remember baking these bears with my kids last Valentine’s Day—they couldn’t get enough, and decorating those sweet little faces was half the fun! If you want a recipe that’s straightforward, customizable, and guaranteed to bring smiles, give this one a go. I promise, once you’ve baked and shared these cookies, they’ll become a staple in your recipe box, too.
Print
Red Velvet Bear Cookies Recipe
- Prep Time: 20 minutes
- Cook Time: 11 minutes
- Total Time: 1 hour 1 minute
- Yield: 16 cookies
- Category: Dessert
- Method: Baking
- Cuisine: American
Description
These adorable Red Velvet Valentine’s Day Bear Cookies combine a classic red velvet flavor with a cute bear design, perfect for gifting or celebrating Valentine’s Day. The cookies have a chewy texture with rich cocoa undertones, complemented by decorative milk and white chocolate faces for an extra festive touch.
Ingredients
Dry ingredients:
- 1 ½ cup (180 g) all-purpose flour, spooned and leveled
- 2 tbsp (14 g) cocoa powder, sifted
- ½ tsp (2 g) baking soda
- ½ tsp (2 g) baking powder
- ½ tsp (3 g) salt
Wet ingredients:
- ½ cup (113.5 g) unsalted butter, melted and cooled
- ¼ cup (50 g) granulated sugar
- ¼ cup (55 g) light or dark brown sugar, packed
- 1 tsp (4 g) vanilla extract
- 1 tsp (5 g) white vinegar
- 1 egg
- Red food coloring, as needed
Decoration for face:
- 1 tbsp (15 g) melted milk or dark chocolate
- 3 tbsp (44.36 g) melted white chocolate
- Oil-based food coloring (pink/red)
Instructions
- Mix dry ingredients: In a medium bowl, whisk together the all-purpose flour, cocoa powder, baking powder, baking soda, and salt until evenly combined.
- Combine wet ingredients: Using a stand mixer with a paddle attachment (or a hand mixer/whisk), mix the melted and cooled butter with granulated and brown sugars on medium speed until combined. Scrape the bottom of the bowl.
- Add flavorings and egg: Add vanilla extract, white vinegar, the egg, and red food coloring to the butter-sugar mixture and mix until the batter is smooth.
- Incorporate dry ingredients: Add the dry ingredients to the wet mixture and stir until just combined. Add more red food coloring if you want a deeper red color.
- Chill the dough: Cover the dough and refrigerate for 20-30 minutes to hydrate the flour and firm up the butter, resulting in chewier cookies that are easier to shape.
- Preheat oven & prepare trays: Set the oven to 325°F (163°C). Line two baking trays with parchment paper or silicone baking mats.
- Form cookie shapes: Use a small cookie scoop (about 1 ½ tablespoons) to portion dough balls, placing them roughly 3 inches apart on the trays. Reserve some dough to form the bear ears by dividing 1 teaspoon portions into pairs of smaller balls and placing on top of the head dough balls.
- Bake cookies: Bake for 9-11 minutes or until the edges are set but the centers remain slightly puffy. Slightly underbaking will yield chewier cookies.
- Cool cookies: Allow the cookies to cool on the baking tray for 5-10 minutes, then transfer to a wire rack to cool completely.
- Decorate bear faces: Use a piping bag or toothpick to decorate with melted white chocolate for snouts and ears. Tint leftover white chocolate with pink or red oil-based food coloring for blush. Use melted milk or dark chocolate for the eyes and noses. If the colored chocolate seizes, add neutral oil gradually to smooth it out.
- Enjoy: Once decorated, allow the chocolate to set and enjoy your festive Red Velvet Valentine’s Day Bear Cookies!
Notes
- Store cookies in an airtight container at room temperature for up to one week.
- To make vegan, substitute vegan butter and vegan chocolate and omit the egg. If the dough is crumbly, add 2-4 tablespoons of alternative milk until the dough is scoopable but thick.
- Use a small cookie scoop for consistent cookie sizes and spacing for best results.
- Oil-based food coloring is essential to prevent chocolate from seizing during decoration.
Nutrition
- Serving Size: 1 cookie
- Calories: 140 kcal
- Sugar: 12 g
- Sodium: 130 mg
- Fat: 7 g
- Saturated Fat: 4 g
- Unsaturated Fat: 2 g
- Trans Fat: 0 g
- Carbohydrates: 19 g
- Fiber: 1 g
- Protein: 2 g
- Cholesterol: 25 mg

