
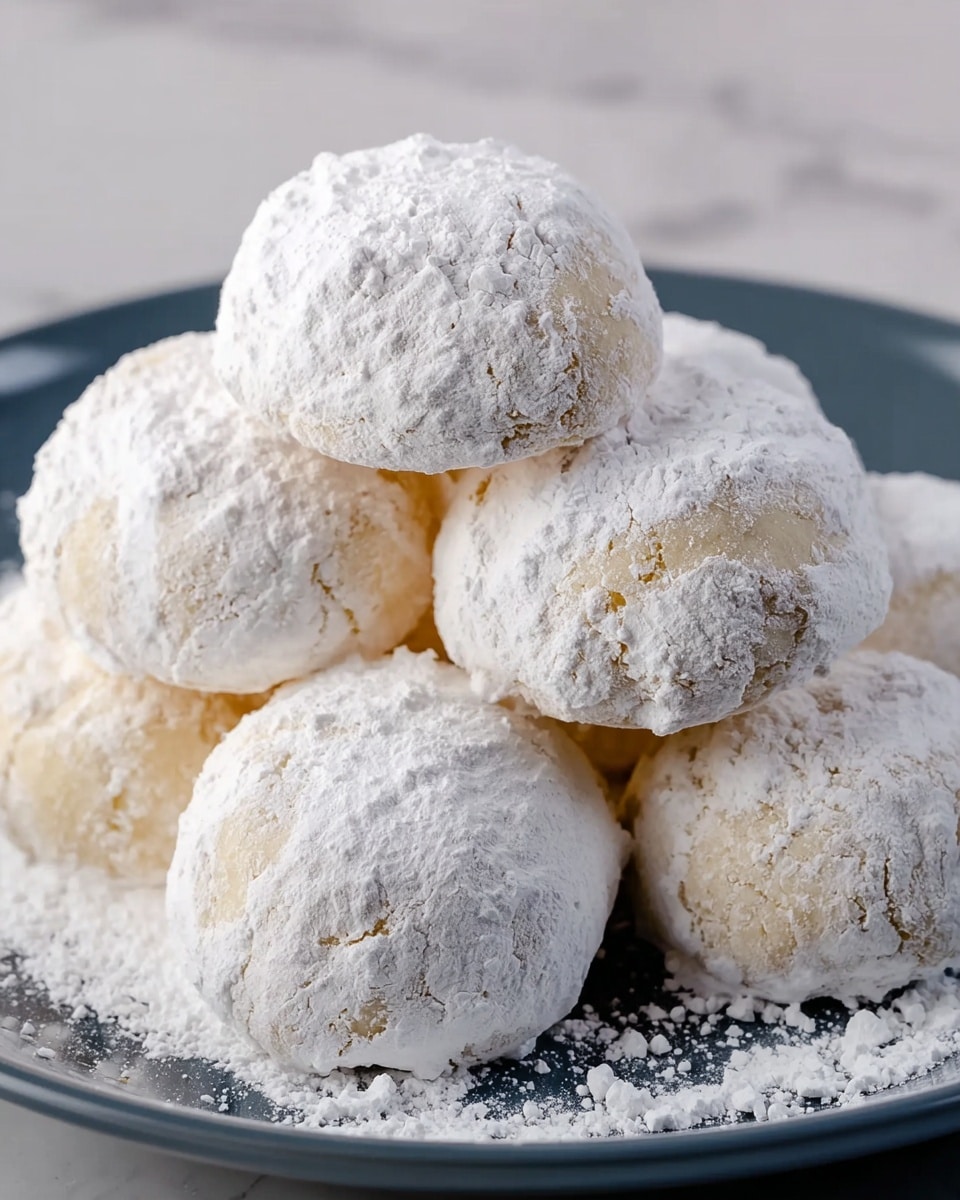
I absolutely love making Russian Tea Cakes Recipe because they’re like little bites of buttery, nutty heaven rolled in powdered sugar. These cookies have a tender crumb that just melts in your mouth, and they’re perfect for sharing at holiday gatherings or enjoying with a cup of tea on a quiet afternoon. When I first tried this classic recipe, I was amazed at how simple ingredients could come together to create something so indulgently satisfying.
You’ll find that Russian Tea Cakes Recipe is incredibly forgiving and easy to make, even if you’re new to baking. Plus, they keep beautifully for weeks, so you can bake a batch ahead of time and have ready-made treats whenever the craving hits. I’ve always found this recipe works well when you want a cozy, comforting homemade cookie that feels special without fuss.
Why You’ll Love This Recipe
- Simple Ingredients: You probably have most of these pantry staples already, making it easy to whip up anytime.
- Perfect Texture: The balance of chopped nuts and tender dough creates a delightful crumbly but melt-in-your-mouth cookie.
- Great for Gifting: They store well and look beautiful dusted with powdered sugar, perfect for holiday or party gift boxes.
- Versatile Nut Options: You can customize with your favorite nuts, adding your personal twist without losing charm.

Ingredients You’ll Need
For this Russian Tea Cakes Recipe, choosing the right nuts and a good quality unsalted butter really makes a difference. The combination of powdered and granulated sugars brings just the right sweetness and texture to these delicate cookies.
- Nuts: I like using pecans or walnuts for their mild flavor, but almonds or hazelnuts work beautifully too. Lightly toasting them before chopping ups the aroma.
- Granulated sugar: We pulse this dry to create a finer texture that blends seamlessly into the dough.
- All-purpose flour: Unbleached is best for a clean, natural flavor and perfect crumb.
- Salt: A small pinch balances the sweetness and enhances the nutty flavor.
- Unsalted butter: Softened but not melted — I cut mine into chunks so it processes smoothly.
- Vanilla extract: Adds warmth and depth that brings the cookie to life.
- Egg yolk (optional): I sometimes skip this for a lighter texture, but it adds richness if you choose to include it.
- Powdered sugar: For rolling and dusting — it’s the signature finish of Russian Tea Cakes.
Variations
I love how adaptable this Russian Tea Cakes Recipe is. Over time, I’ve tried different nuts and added a few twists to keep things interesting, and you’ll find it’s fun to make it your own.
- Nut substitution: Pistachios add a lovely green hue and a unique flavor that surprises guests, while peanuts give it a more casual, nutty crunch.
- Spiced Russian Tea Cakes: Adding a pinch of cinnamon or a dash of nutmeg to the dough really warms these up for winter gatherings.
- Vegan adaptation: I’ve replaced butter with vegan margarine and skipped the egg yolk, and the cookies still come out wonderfully tender.
- Chocolate dipped: For a festive touch, dipping one side of the baked cookies in melted dark chocolate is a hit every time at parties.
How to Make Russian Tea Cakes Recipe
Step 1: Prep and Pulse the Nuts
Start by pulsing the nuts in a food processor — about half should become like coarse powder, and the rest remain chopped for texture. When I first made this, I overprocessed my nuts into powder, and the cookies lost that satisfying bite. So keeping some chunkiness really elevates the experience. After pulsing, transfer the nuts to a bowl and wipe out the processor bowl to remove any oily residue; this keeps the dough from turning greasy.
Step 2: Mix the Dry Ingredients and Butter
Pulse the granulated sugar in the food processor until finely powdered — this little trick helps the sugar dissolve better in the dough. Then add flour and salt, pulsing just enough to combine. Next, add the softened butter, vanilla extract, and optional egg yolk, pulsing until the mixture comes together in clumps. This step is where I’ve learned not to over-process; watch for the dough to look just damp, or it can become tough if mixed too much.
Step 3: Incorporate Nuts and Chill the Dough
Fold the nuts into the dough gently with a few pulses or a spatula, just until combined. I cover and refrigerate the dough for at least two hours, but I prefer overnight because it firms up, making the dough easier to shape — and it enhances flavor melding. This is one of my favorite parts; chilling improves the texture remarkably.
Step 4: Shape and Bake Your Tea Cakes
Preheat your oven to 325°F and position the racks upper and lower for even heat. Use a tablespoon measure to scoop the dough, rolling each portion into approximately 1¼-inch balls. Place the balls on cookie sheets about 2 inches apart—trust me, this spacing is crucial so they bake properly without merging. Bake for 22–24 minutes until the tops are lightly golden and the bottoms have that beautiful nutty brown. I always rotate the sheets halfway through baking for an even finish.
Step 5: Sugarcoat and Cool
While the tea cakes bake, place the powdered sugar in a bowl ready for dusting. When the cookies come out, let them cool on the pan for about 5 minutes before sifting powdered sugar generously over the tops. Once completely cooled on a rack, you can store them. The powdered sugar adds a subtle sweetness and that classic snowy look that makes Russian Tea Cakes so charming.
Pro Tips for Making Russian Tea Cakes Recipe
- Chill the Dough Well: Refrigerating overnight prevents spreading and makes rolling easier.
- Use Room Temperature Butter: Softened butter ensures a tender crumb without greasy spots.
- Rotate Your Pans: Halfway through baking, swapping racks and turning pans avoids uneven coloring.
- Don’t Skip Powdered Sugar Coating: It’s essential for that authentic taste and texture, plus it keeps cookies moist.
How to Serve Russian Tea Cakes Recipe
Garnishes
I usually keep it classic with just a dusting of powdered sugar, but sometimes I sprinkle a little extra on top right before serving to freshen their snowy appearance. For special occasions, crushed pistachios or a drizzle of melted white chocolate makes them feel extra decadent without overpowering the delicate flavor.
Side Dishes
These cookies pair beautifully with warm drinks — I love serving them with chai tea, hot cocoa, or even a bright cup of green tea. If you’re hosting a holiday party, a platter alongside spiced mulled wine or coffee makes for a lovely sweet counterpoint.
Creative Ways to Present
For gift-giving, I arrange the Russian Tea Cakes Recipe inside decorative tins layered with parchment paper between each row to keep them pristine. Another fun idea is sandwiching two slightly warm cookies with chocolate ganache or jam — it’s a small twist that guests always rave about!
Make Ahead and Storage
Storing Leftovers
I store leftover Russian Tea Cakes in an airtight container at room temperature, layered with parchment paper to prevent sticking. They stay fresh and delicious for at least two weeks, making this recipe great to bake ahead of time for holiday prep or unexpected guests.
Freezing
Freezing is another option I often use—I freeze the baked, cooled cookies in a single layer first, then transfer to a sealed bag or container. When thawed at room temperature, they keep their texture and flavor just like freshly baked, which is a huge time saver around the holidays.
Reheating
If you want to refresh the cookies, I pop them in a warm oven (about 300°F) for 3–5 minutes — this softens them slightly without melting the sugar coating. Just be careful not to overheat, or they’ll dry out.
FAQs
-
Can I use any type of nuts in Russian Tea Cakes Recipe?
Absolutely! You can use almonds, pecans, walnuts, hazelnuts, or even pistachios. Just be sure to pulse them in the food processor to the right texture — a mix of chopped and finely ground nuts works best to achieve the classic crumbly texture.
-
Is the egg yolk necessary in this recipe?
The egg yolk is optional and adds richness and a slightly denser cookie. If you prefer a lighter or egg-free version, you can skip it. The cookies still turn out wonderfully tender and flavorful.
-
Why is chilling the dough important?
Chilling firms up the dough, making it easier to roll into balls and helps prevent the cookies from spreading too much during baking. It also allows flavors to meld and results in a better texture.
-
How long do Russian Tea Cakes last?
Stored in an airtight container at room temperature, these cookies last for at least two weeks. They can also be frozen for longer storage while maintaining texture and flavor.
-
Can I make these cookies gluten-free?
Yes, you can substitute gluten-free all-purpose flour, but results may vary slightly in texture. I recommend a blend that includes xanthan gum for better binding and to keep the delicate crumb.
Final Thoughts
This Russian Tea Cakes Recipe holds a special place in my heart because it’s simple, elegant, and always a crowd-pleaser. If you’re looking for a cookie that’s easy to make but feels beautiful and festive, you can’t go wrong here. I encourage you to try it — roll up your sleeves, enjoy the process, and watch your friends or family swoon over these little sweet bites. They’re truly timeless, and once you try them, I bet you’ll find yourself making Russian Tea Cakes over and over again.
Print
Russian Tea Cakes Recipe
- Prep Time: 15 minutes
- Cook Time: 22-24 minutes
- Total Time: 2 hours 40 minutes (including chilling time)
- Yield: 40 to 45 cookies (1/2-inch size)
- Category: Dessert
- Method: Baking
- Cuisine: Russian
Description
Russian Tea Cakes are delicate, buttery cookies filled with finely chopped nuts and rolled in powdered sugar, making them a perfect treat for any occasion. These melt-in-your-mouth cookies have a rich nutty flavor and a tender crumb, complemented by a subtle hint of vanilla. Traditionally enjoyed during the holidays, they are also known as Mexican Wedding Cookies or Snowball Cookies.
Ingredients
Dry Ingredients
- 2 cups (255 grams) unbleached all-purpose flour
- 1/4 cup (50 grams) granulated sugar
- 3/4 teaspoon salt
- 1/2 cup powdered sugar (for coating)
Nuts
- 1 1/2 cups nuts (210 grams almond or hazelnuts, 150 grams pecans or walnuts, 170 grams peanuts, 190 grams macadamias, or 255 grams pistachios)
Wet Ingredients
- 16 tablespoons (225 grams or 2 sticks) unsalted butter, softened and cut into small chunks
- 2 teaspoons vanilla extract
- 1 egg yolk (optional)
Instructions
- Prepare the Nuts: Pulse the nuts in the bowl of a food processor fitted with a steel blade until half are pulverized and the rest are chopped. Transfer the nuts to a bowl and set aside. Wipe the processor bowl with a paper towel to remove excess oil from the nuts.
- Make the Dough: Put the granulated sugar in the food processor and process until fine and powdery. Add the flour and salt; pulse just to mix. Add the butter, vanilla extract, and the egg yolk if using. Process until the mixture looks damp and begins to clump together. Add the nuts and pulse just until combined. Transfer the dough to a bowl, cover, and refrigerate for at least 2 hours or preferably overnight.
- Preheat Oven and Shape Cookies: Preheat the oven to 325°F (163°C). Position the racks in the upper and lower thirds of the oven. Shape slightly more than level tablespoons of dough into 1 1/4-inch balls. Place them 2 inches apart on cookie sheets.
- Bake the Cookies: Bake for 22 to 24 minutes or until the cookies are lightly colored on top and golden brown on the bottom. Rotate the cookie sheets from top to bottom and front to back halfway through the baking time to ensure even baking.
- Prepare Powdered Sugar Coating: While the cookies are baking, put the powdered sugar in a small bowl ready for coating.
- Cool and Coat Cookies: When the cookies are done, let them cool on the pan for 5 minutes. Sieve powdered sugar generously over the top of each cookie. Cool the cookies completely on a rack before storing.
- Store and Serve: Store the cooled cookies in an airtight container for at least 2 weeks. Sieve additional powdered sugar over the cookies before serving if desired.
Notes
- The type of nuts can be varied according to preference — almonds, pecans, walnuts, hazelnuts, or pistachios all work well.
- Using an egg yolk is optional but helps bind the dough better and lends a richer texture.
- Chilling the dough overnight improves the flavor and texture of the cookies.
- Ensure even spacing of cookies on the baking sheet to allow for spreading and proper baking.
- Rotate baking sheets midway for uniform browning.
- These cookies freeze well; thaw at room temperature and dust with powdered sugar before serving.
Nutrition
- Serving Size: 1 cookie
- Calories: 90
- Sugar: 4.5 g
- Sodium: 50 mg
- Fat: 7.0 g
- Saturated Fat: 4.3 g
- Unsaturated Fat: 2.7 g
- Trans Fat: 0 g
- Carbohydrates: 7.0 g
- Fiber: 0.5 g
- Protein: 1.2 g
- Cholesterol: 15 mg

