
If you want to wow your guests this holiday season with a fun, festive, and absolutely delicious snack, then you’ve got to try my Santa Cheese Board with Crackers and Fruit Recipe. It’s a magical charcuterie board shaped like Santa’s face, loaded with creamy cheeses, savory salami, fresh fruit, and crunchy crackers — basically, everything you love about an indulgent cheese board but with a playful twist. Plus, it comes together in about 20 minutes, making it perfect for last-minute entertaining or a cheerful appetizer at your Christmas gathering.
Why You’ll Love This Recipe
- Festive and Fun Presentation: Your guests will smile when you bring out this Santa-themed board — it’s a conversation starter!
- Quick and Easy Assembly: You don’t have to be an expert — the step-by-step makes it simple to pull together.
- Balanced Flavors and Textures: From creamy Brie to crunchy crackers and sweet fruits, every bite is delightful.
- Versatile and Customizable: Swap out fruit or nuts based on what you have — it always turns out great!

Ingredients You’ll Need
The magic of this Santa Cheese Board with Crackers and Fruit Recipe is in how the ingredients work together — the savory meats and cheeses perfectly balance the sweetness of the fruit and freshness of herbs, all complemented with crunchy crackers. When shopping, look for a good-quality Brie and Halloumi that will cut cleanly for the shapes.

- Salami: Pick a thin-sliced variety so it curls nicely and lays out playfully.
- Halloumi cheese: Use this for those cute snowflake shapes; its firm texture holds up well.
- Mozzarella balls: Mini balls add a creamy note and contrast to the other cheeses.
- Brie cheese: This is the star for Santa’s face and hat — soft and spreadable for shaping.
- Mixed nuts: Adds great crunch; choose your favorites or what you have on hand.
- Green olives or candied jalapeños: Choose olives for a salty pop or jalapeños for a spicy kick.
- Crackers: An assortment provides variety and texture — I love pairing buttery with whole grain.
- Apricots or other dried fruit: Sweet complements to the salty, creamy elements.
- Grapes (red or green): Fresh grapes are juicy and brighten the board beautifully.
- Red bell pepper: Just a small sliver for Santa’s mouth — bright and festive.
- Black olive: One olive for Santa’s nose or eye detail.
- Fresh herbs: Use rosemary or thyme for an aromatic garnish and a touch of green.
Variations
While I love the classic cheery look of this Santa Cheese Board with Crackers and Fruit Recipe, it’s totally adaptable to your taste—and what you have on hand. Don’t be afraid to get creative!
- Cheese swaps: I sometimes swap Halloumi for aged cheddar slices to give a sharper flavor.
- Seasonal fruit: In the winter, pomegranate seeds or sliced pears add a festive twist that’s equally tasty.
- Dietary tweaks: Use gluten-free crackers or nut alternatives if you’re serving guests with allergies — it still works beautifully.
- Spice it up: Adding candied jalapeños instead of olives really wakes up your guests’ taste buds!
How to Make Santa Cheese Board with Crackers and Fruit Recipe
Step 1: Shape the Cheese Pieces
Start with the Halloumi cheese—grab a medium-sized snowflake cookie cutter and press out a few snowflake shapes; these will be the pom-poms on Santa’s hat. Cut the rest of the Halloumi into cubes. For the Brie, remove the top rind slice (about a third of the circumference) and carve little triangles to form Santa’s mustache. I found that putting the Brie on a soft surface like a napkin-covered board helps prevent sliding while you’re cutting.
Step 2: Create Santa’s Face on the Board
Cover your serving board or tray with a festive napkin to keep everything in place. Arrange the slice of Brie as Santa’s face. Use the halves of green olives as his eyes and small slices of red bell pepper to make the mouth. The leftover slice of Brie becomes the cap — just shape it into a curve over the top of the face, and place a Halloumi snowflake at the tip as the pom-pom.
Step 3: Arrange the Salami and Crackers
Cut your salami slices in half and fold them loosely into whimsical curls. Lay them out on the board to build Santa’s hat, leaning the slices against each other for volume and fun texture. Then, fill the corners of the board with your assorted crackers, adding small bowls or piles of olives, apricots, or “cowboy candy” (candied jalapeños) in different corners — it creates a beautiful balance and keeps snacking easy.
Step 4: Fill in with Nuts, Cheese, Fruit, and Herbs
Finish by tucking in the mozzarella balls, cubes of Halloumi, clusters of grapes, nuts, and fresh herbs like rosemary around the edges and between other components. This step is where your board really shines visually, so try to fill up empty white spaces without overcrowding. This way, everything stays accessible and looks inviting.
Step 5: Serve Immediately and Enjoy
This Santa Cheese Board with Crackers and Fruit Recipe is best served fresh — my family goes crazy for it right after assembling, and yours will too!
Pro Tips for Making Santa Cheese Board with Crackers and Fruit Recipe
- Use a Sharp Knife: When cutting the Brie and Halloumi, a sharp knife makes shaping easier and cleaner—trust me, I learned this after a few frustrating attempts with dull blades!
- Keep Ingredients Cool: Cold cheeses hold their shape better when cutting and arranging, so refrigerate until you’re ready to start.
- Layer Textures Thoughtfully: Alternate soft cheese, crunchy nuts, and juicy fruit close to each other for a board that’s as easy to eat as it is to look at.
- Fill the Spaces Nicely: Don’t leave large gaps—fill any empty spots with herbs or small nuts to keep the board looking full and inviting.
How to Serve Santa Cheese Board with Crackers and Fruit Recipe

Garnishes
I love finishing this board with fresh rosemary sprigs for their piney aroma — it really amps up the holiday vibe. Sometimes I add a few edible flowers or sprinkle finely chopped fresh thyme for a subtle herbaceous note. They’re small touches but make a big difference visually and for your guests’ first impression.
Side Dishes
This Santa Cheese Board pairs wonderfully with a simple green salad dressed with lemon vinaigrette or a warm bowl of spiced nuts on the side. For drinks, I like to serve it alongside mulled wine or a crisp sparkling cider for a festive touch.
Creative Ways to Present
One holiday, I made a giant version of this board on a rustic wooden slab and added tiny fairy lights around the edges — it was a showstopper at the party! You can also create mini versions on individual plates for kids or smaller gatherings, making it a cute interactive snack that everyone can personalize.
Make Ahead and Storage
Storing Leftovers
If you have leftovers, just cover the board tightly with plastic wrap or pop pieces into airtight containers. The cheeses and salami stay good in the fridge for 2-3 days, but the crackers might get a bit soft, so keep them separate if possible.
Freezing
Personally, I don’t recommend freezing this cheese board assembled because the texture of cheeses and fruit changes when thawed. However, you can freeze leftover halloumi or salami separately if you’d like to save them for future use.
Reheating
Since this is a cold appetizer, reheating isn’t usually necessary. If you do want warm cheese bites, consider heating brie or halloumi separately and then adding to fresh crackers and fruit for serving.
FAQs
-
Can I make the Santa Cheese Board ahead of time?
You can prep some elements ahead, like cutting the cheeses and slicing salami, but I recommend assembling the board just before serving to keep everything fresh and visually appealing.
-
What if I don’t have a snowflake cookie cutter?
No worries! You can hand-cut small star or flower shapes from the halloumi or simply cube it for a charming look without shapes.
-
Can I substitute the cheeses?
Absolutely. Use whatever you love or have handy — just balance soft, semi-soft, and firm cheeses for the best texture mix.
-
What crackers work best with this recipe?
I like a mix of buttery water crackers and whole grain for flavor contrast and crunch, but any sturdy cracker will do fine.
Final Thoughts
This Santa Cheese Board with Crackers and Fruit Recipe is a joyful way to bring holiday cheer to any table. I absolutely love how it turns out—the playfulness makes snacking feel special, and the flavors never disappoint. Whether you’re hosting a big family gathering or an intimate Christmas Eve, this board is sure to impress and delight. Give it a try—you’ll enjoy the smiles and the easy prep as much as the delicious bites!
Print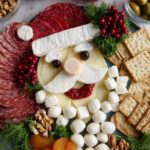
Santa Cheese Board with Crackers and Fruit Recipe
- Prep Time: 20 min
- Cook Time: 0 min
- Total Time: 20 min
- Yield: 12 servings
- Category: Appetizer
- Method: No-Cook
- Cuisine: American
Description
Create a festive and visually stunning Magical Santa Charcuterie Board featuring an assortment of savory salami, creamy cheeses, fresh fruits, nuts, and crackers arranged beautifully to resemble Santa’s face. Perfect for holiday entertaining, this no-cook recipe brings whimsy and flavor to your Christmas gatherings.
Ingredients
Meats
- 12 oz Salami
Cheeses
- 2 oz Halloumi cheese
- ½ cup Mozzarella balls
- 8 oz Brie cheese
Produce & Fruits
- 1 Red bell pepper (one small sliver)
- 1 Black olive (only one)
- 1 cup Grapes (Red or green, or both)
- ⅓ cup Apricots (or other fruit of choice)
- Fresh herbs (quantity as desired)
Other
- ⅔ cup Nuts (Assorted or your favorite type)
- ⅓ cup Green olives (or candied jalapeños)
- 1 cup Crackers (Assorted)
Instructions
- Cut Halloumi Snowflakes: Using a medium snowflake-shaped cookie cutter, cut out a few snowflakes from the halloumi cheese. Then, cut the remaining halloumi into cubes for arrangement.
- Prepare Brie Cheese Face: Remove the brie cheese from its package. Slice off the top section about one-third of the circumference. Cut small triangles from this piece to create Santa’s mustache feature.
- Arrange Brie and Features: Cover your serving tray or board with a napkin. Place the brie cheese on the board to form the face base. Use halves of green olives for the eyes and slices of red bell pepper to shape the mouth. From the leftover brie, cut a strip to form Santa’s cap on the board.
- Prepare Salami Curls: Cut the salami slices in half and arrange them in whimsical curls on the board, clustering them as if they are leaning on each other to form Santa’s hat.
- Complete Salami Cap: Continue layering salami curls to complete the shape of Santa’s hat. Place a halloumi snowflake on the tip of the cap as a pom-pom decoration.
- Add Crackers and Dippers: Position crackers neatly at the corners of the tray. In other corners, place small containers or piles of candied jalapeños (cowboy candy), olives, apricots, or your chosen dippers.
- Arrange Remaining Ingredients: Neatly arrange the mozzarella balls, nuts, fresh herbs, and grapes compactly around the cheese and meats to fill white space and complete the festive look.
- Serve: Serve the Magical Santa Charcuterie Board immediately to enjoy the fresh flavors and beautiful presentation.
Notes
- This dreamy Santa charcuterie board makes a perfect holiday centerpiece combining cheese, meats, fruits, nuts, and crackers.
- Feel free to customize with your choice of nuts and fruit to suit your preferences.
- Use fresh herbs to enhance both flavor and color contrast on the board.
- Best served immediately to maintain the texture and freshness of the ingredients.
- This is a no-cook recipe ideal for quick holiday entertaining preparations.
Nutrition
- Serving Size: 1 serving
- Calories: 295 kcal
- Sugar: 3 g
- Sodium: 929 mg
- Fat: 23 g
- Saturated Fat: 9 g
- Unsaturated Fat: 13 g
- Trans Fat: 0.1 g
- Carbohydrates: 9 g
- Fiber: 1 g
- Protein: 14 g
- Cholesterol: 43 mg

