
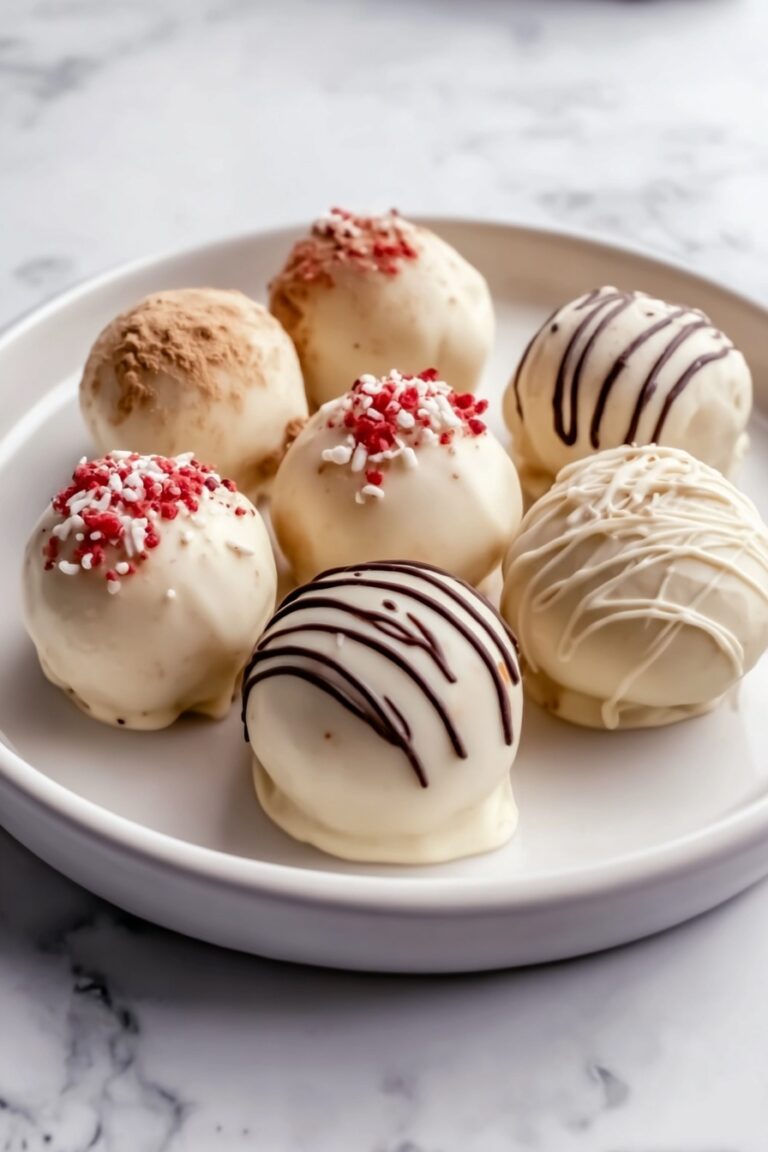
If you’re looking for a sweet, fun, and absolutely adorable treat to wow your Valentine, this Valentine’s Day Oreo Pops Recipe is an absolute must-try. I love this recipe because it’s super easy, requires just a handful of ingredients, and the result is irresistibly cute and delicious. Plus, it’s perfect whether you’re gifting, party planning, or just craving a special Oreo twist. Stick with me here—I’ll walk you through everything you need to know to get these pops perfectly coated, decorated, and ready to impress!
Why You’ll Love This Recipe
- Simple Ingredients: You only need a few tasty basics to whip up these gorgeous treats.
- Fun to Make: Kids and adults alike will have a blast assembling and decorating these Oreo pops.
- Customizable Decorations: Sprinkle, drizzle, or add candy hearts — it’s your Valentine’s Day vibe!
- Perfect for Gifting: These pops are so pretty and festive, they make an easy gift or party giveaway everyone will adore.

Ingredients You’ll Need
These ingredients are straightforward and work beautifully together for that perfect balance of crunch, cream, and sweet chocolate coating. When I shop for this recipe, I like to pick the best quality chocolate chips or candy melts you can find, because it really makes the dips silky and smooth.

- Oreo cookies: I usually go with classic Oreos, but double-stuffed ones make assembly easier and more indulgent.
- White chocolate chips or white candy melts: Candy melts tend to set smoother and are less prone to seizing, which is great for dipping.
- Milk or dark chocolate chips or candy melts: For that rich coating that adds a beautiful contrast to the white chocolate.
- Lollipop sticks: Essential for turning Oreos into adorable pops and making dipping a breeze.
- Valentine’s Day sprinkles: These add instant festive flair; get creative with hearts, pearls, or edible glitter.
- Red or pink candy melts: Perfect for drizzling and adding pops of color to really nail the Valentine’s Day theme.
Variations
I love mixing things up depending on my mood or the occasion, and you should too! This Valentine’s Day Oreo Pops Recipe can easily be tailored with different flavors or decorations so you never get bored making it.
- Try Mint or Peanut Butter Oreos: I once swapped regular Oreos for mint-flavored ones, and they gave a refreshing twist that my family went crazy for.
- Dairy-Free Version: Use dairy-free chocolate melts to make these pops friendly for those with allergies or lactose intolerance—still super tasty!
- Seasonal Decor: Beyond Valentine’s Day, switch sprinkles to match holidays—think green for St. Patrick’s Day or orange and black for Halloween.
How to Make Valentine’s Day Oreo Pops Recipe
Step 1: Gently Twist and Insert the Sticks
This part is where you want to be gentle to keep the Oreo intact. Carefully twist the Oreos apart, making sure the cream stays on one side—that’s your anchor. Then, insert a lollipop stick right into the cream side. If the stick feels loose, dip the tip in melted chocolate first to “glue” it in place before pressing the other cookie half back on top. Trust me, this little trick keeps the Oreo pops sturdy and prevents wobbling while you dip.
Step 2: Chill Before Dipping
Pop your Oreo pops in the freezer for about 5 minutes. This chilling step helps firm up the cookie so when you dip it into warm chocolate, it doesn’t crumble or fall apart. It also makes the coating set faster—win-win.
Step 3: Melt Your Chocolates Separately
Follow the package directions to melt your white and milk (or dark) chocolates in separate bowls. I usually microwave them in short bursts, stirring often to avoid burning. Using candy melts works a bit better if you’re concerned about temperature control, but either choice gives you a beautiful glossy finish.
Step 4: Dip, Decorate, and Set
Dip each Oreo pop fully into the melted chocolate, letting any excess drip off before setting it down on parchment paper. Here’s where your creative side shines: sprinkle with Valentine’s Day sprinkles or drizzle with contrasting red or pink candy melts. I like to drizzle with a fork for thin ribbons of color—it’s so pretty! Let everything set at room temperature or speed things up by popping the tray in the fridge.
Pro Tips for Making Valentine’s Day Oreo Pops Recipe
- Stick Security: Dip lollipop stick tips in melted chocolate before inserting into Oreo; it acts like glue and keeps sticks from slipping out.
- Chocolate Melting: Melt chocolates in short bursts—30 seconds max—and stir in between to avoid burning or graininess.
- Chill Before Dipping: Freezing the assembled Oreo pops for 5 minutes firms them up and prevents crumbling during dipping.
- Decorate Quickly: Sprinkles stick best when applied immediately after dipping before the chocolate sets.
How to Serve Valentine’s Day Oreo Pops Recipe

Garnishes
I love using a mix of Valentine’s-themed sprinkles — tiny red hearts, pink pearls, and edible glitter really make these pops eye-catching. Sometimes, I drizzle melted red or pink candy melts right on top for an elegant touch. It’s such a simple way to elevate the look without extra work.
Side Dishes
These fun Oreo pops go perfectly with a chilled glass of milk or a mug of hot chocolate if you want to keep things cozy. For a party, I like setting them alongside heart-shaped sugar cookies or strawberry cupcakes—sweet treats that complement the theme.
Creative Ways to Present
A personal favorite for presentation is to arrange the Oreo pops upright in a decorated foam block wrapped with tissue paper or a pretty box filled with Valentine’s Day confetti. It turns the whole display into a gift bouquet that’s as visually stunning as it is tasty. You can even wrap individual pops in clear cellophane tied with a ribbon for party favors.
Make Ahead and Storage
Storing Leftovers
I usually keep leftover Oreo pops in an airtight container at room temperature if I’m eating them within a day or two. Avoid the fridge if you can—it can cause some condensation on the chocolate that dulls its shine and texture.
Freezing
Freezing works well for these; just place the pops on a baking sheet lined with parchment and freeze individually before storing in a freezer bag. When you’re ready, thaw them at room temperature—the chocolate stays perfectly crisp and the Oreos taste fresh.
Reheating
There’s no real reheating needed here—you want to enjoy these chocolate-dipped Oreo pops cold or at room temperature. If the chocolate looks foggy after storage, letting it come to room temperature naturally helps restore its sheen without melting.
FAQs
-
Can I use regular chocolate instead of candy melts for these Oreo pops?
Absolutely! Regular chocolate chips or chopped baking chocolate work fine, but candy melts are easier to handle because they melt smoothly and set with a glossy finish without tempering. If you’re using regular chocolate, melt it gently and avoid overheating to prevent seizing.
-
How do I keep the Oreo pops from breaking while dipping?
The key is to gently twist apart the Oreos and insert sticks carefully, then chill the assembled pops in the freezer for 5 minutes before dipping—this firms them up. Also, dip slowly and allow excess chocolate to drip off so it’s not too heavy. I learned this the hard way when a few broke on me the first time I tried!
-
Can I prepare these ahead of time for a party?
Yes, you can make the Oreo pops a couple of days in advance. Store them in an airtight container at room temperature or in the fridge for longer freshness. Just bring them to room temp before serving for best taste and appearance.
-
What if I don’t have lollipop sticks?
You can skip the sticks and just dip whole Oreos into chocolate and decorate them like giant cookies. Or get creative with sturdy straws or wooden skewers, though sticks made for pops offer the best support and look the most professional.
-
Are the sprinkles necessary?
Not at all! Sprinkles add that festive flair and a bit of crunch, but you can absolutely keep these simple with just the dipped chocolate coating or use other decorations like edible glitter, mini chocolate chips, or heart-shaped candies.
Final Thoughts
I absolutely love how this Valentine’s Day Oreo Pops Recipe turns out every single time—it’s like a little party on a stick. From the crispy Oreos to the velvety chocolate coating and the playful sprinkles, it’s a treat that never fails to bring smiles. When I first tried making these, I was surprised how easy and quick it was to get bakery-worthy results at home. So go ahead, give this recipe a go for your Valentine’s Day celebrations; your family, friends, or special someone will thank you with big, happy smiles—and chances are, you’ll find yourself making these pops on repeat for every occasion!
Print
Valentine’s Day Oreo Pops Recipe
- Prep Time: 25 minutes
- Cook Time: 0 minutes
- Total Time: 25 minutes
- Yield: 12 Oreo Pops
- Category: Dessert
- Method: No-Cook
- Cuisine: American
Description
Celebrate Valentine’s Day with these delightful Oreo Pops, featuring classic Oreo cookies coated in smooth white and milk chocolate, decorated with festive sprinkles and colorful candy melts. Perfect as a charming gift or a sweet treat for your loved ones.
Ingredients
Oreo Pops
- 12 Oreo cookies
- 12 lollipop sticks
Chocolate Coating
- 1 cup white chocolate chips or white candy melts
- 1 cup milk or dark chocolate chips or candy melts
- Red or pink candy melts for decoration
- Valentine’s Day sprinkles
Instructions
- Separate Oreos: Carefully twist each Oreo cookie apart, making sure to keep the cream filling intact on one side to attach the lollipop stick securely.
- Insert sticks: Insert a lollipop stick into the cream side of each Oreo. If needed, add a small amount of melted chocolate to help adhere the stick securely. Place the other half of the cookie back on top and press gently to set.
- Freeze Oreo Pops: Place the assembled Oreo pops in the freezer for 5 minutes to firm up, making them easier to dip without falling apart.
- Melt chocolates: Melt the white chocolate chips and milk/dark chocolate chips separately according to the package instructions, usually by microwaving in 30-second intervals and stirring in between until smooth.
- Dip Oreo Pops: Dip each Oreo pop completely into the melted chocolate, ensuring full coverage. Let any excess chocolate drip off to avoid clumps.
- Decorate: Place the dipped pops on a parchment-lined tray. While the chocolate is still wet, decorate with Valentine’s Day sprinkles or drizzle with melted red or pink candy melts for a festive touch.
- Set the chocolate: Allow the chocolate coating to set completely either at room temperature or refrigerate for faster solidifying.
- Serve or gift: Once set, serve the Oreo pops arranged on a platter for your Valentine celebration or wrap individually in cellophane for gifting.
Notes
- Consider using double-stuffed Oreos for easier assembly and better stability on the sticks.
- Get creative with decoration by using colored chocolates, edible glitter, or heart-shaped candy pieces to personalize your pops.
- Ensure cookies are frozen briefly before dipping to keep them intact during coating.
- Store pops in an airtight container at room temperature or refrigerated for up to 2 days to maintain freshness.
Nutrition
- Serving Size: 1 Oreo Pop
- Calories: 210
- Sugar: 19g
- Sodium: 110mg
- Fat: 12g
- Saturated Fat: 7g
- Unsaturated Fat: 4g
- Trans Fat: 0g
- Carbohydrates: 25g
- Fiber: 1g
- Protein: 2g
- Cholesterol: 5mg


