If you’re looking for a playful, delightfully spooky treat to impress your friends and family this Halloween, look no further than this Vampire Donuts Recipe. These donuts aren’t just cute—they’re a total showstopper with their rich chocolate glaze, festive sprinkles, and quirky vampire fang decorations. I absolutely love how this recipe strikes the perfect balance between sweet, tender, and fun, making it a guaranteed hit for any party or just a cheeky weekend bake.
Why You’ll Love This Recipe
- Festive and Fun: These donuts bring Halloween to life with candy eyes and vampire fangs that make every bite whimsical.
- Soft, Fluffy Texture: Thanks to the double rise and careful kneading, the dough is pillowy soft and melts in your mouth.
- Easy to Make at Home: You don’t need fancy equipment; with just a mixer and a deep pot, you can fry up these beauties.
- Customizable Toppings: From funfetti to sanding sugar, you can personalize each donut to match your vibe or party theme.

Ingredients You’ll Need
Each ingredient in this Vampire Donuts Recipe works together to create that melt-in-your-mouth dough and luscious glaze. I always recommend using fresh yeast and whole milk to get that rich, authentic flavor.
- Whole Milk: Using whole milk adds richness that keeps the dough tender and the glaze smooth.
- Granulated Sugar: Divided between the dough and yeast proofing, sugar feeds the yeast and sweetens the donuts perfectly.
- Butter: Adds moisture and a lovely buttery flavor—don’t skip it or sub with margarine.
- Warm Water: Just warm tap water works great to activate the yeast without killing it.
- Dry Active Yeast: Two packets give the dough the lift it needs for fluffy donuts—make sure it foams when proofing!
- Eggs: At room temperature to blend smoothly, eggs enrich the dough and add structure.
- All-Purpose Flour: Nine cups might sound like a lot, but it’s key for creating a dough that’s sturdy yet tender.
- Vegetable Oil: For frying, choose a neutral oil with a high smoke point to get that golden-brown crust without imparting flavor.
- Powdered Sugar: Creates a sweet, silky base for the glaze.
- Cocoa Powder: Adds the perfect touch of chocolate to your glaze’s richness.
- Milk or Water (for glaze): Thiners for the glaze; use milk for creaminess or water for a lighter touch.
- Vanilla Extract: Just a couple of teaspoons brighten up the glaze with a warm aroma.
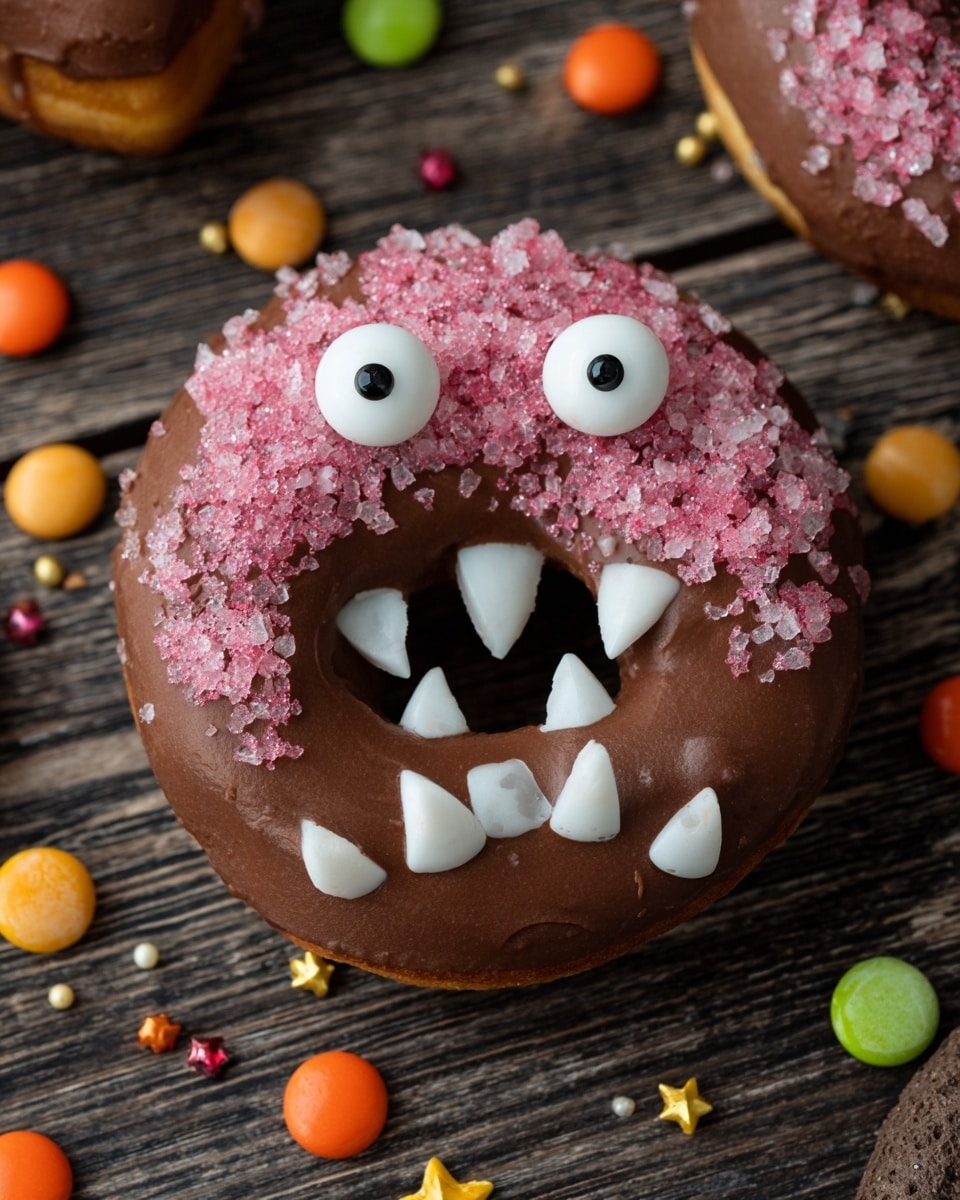
- Candy Eyes: For the spooky vampire look—you can find them at craft or baking stores.
- Fall Leaf Sprinkles: Adds a seasonal touch with some autumn flair.
- Funfetti and Red Sanding Sugar: These give the donuts some sparkle and color, making them irresistible!
Variations
While this Vampire Donuts Recipe is fantastic just as is, I love to switch things up sometimes depending on the occasion or my mood. Feel free to experiment, and you’ll discover your perfect twist!
- Gluten-Free Version: I’ve tried swapping in a gluten-free flour blend with decent results if you’re careful with kneading and rising times.
- Spiced Chocolate Glaze: Adding cinnamon or cayenne pepper to the glaze amps up the flavor and adds a touch of heat, perfect for autumn vibes.
- Vegan Adaptation: Substitute dairy milk with almond or oat milk, and use vegan butter or coconut oil for butter—try aquafaba instead of eggs for binding.
- Decorations: Instead of candy eyes, mini marshmallows or edible googly eyes can be fun alternatives for a different spooky character.
How to Make Vampire Donuts Recipe
Step 1: Make the Milk-Butter Mixture
Start by gently heating 1 ½ cups of whole milk in a medium saucepan over medium heat until it just begins to simmer — watch it closely so it doesn’t boil over! Remove it from the heat and stir in ½ cup granulated sugar, salt, and butter until everything melts together beautifully. This warm, buttery milk mixture adds a rich flavor that makes the dough exceptionally soft.
Step 2: Bloom Your Yeast
In a small bowl, pour warm water (think bathwater, not hot!) and add 1 tablespoon sugar plus your dry active yeast packets. Stir gently and set aside for 5 minutes. I promise it’s worth the wait because you’ll see it foam and bubble—this signals your yeast is ready to give your donuts their airy texture.
Step 3: Combine Ingredients and Mix Dough
In your stand mixer bowl (or a large mixing bowl if you’re going old-school), mix the yeast mixture and the warm milk-butter mixture. Add your eggs and beat together with an electric mixer until fully incorporated. Then start adding 1 cup of flour at a time, mixing with the dough hook after each addition—don’t rush, this slow blending helps develop gluten for bounce without toughness.
Step 4: Knead and Rise the Dough
Turn your dough onto a floured surface and knead for about 5 minutes until it’s smooth and elastic. Add flour gradually if it’s too sticky—just enough to make it manageable. Place the dough in a greased large bowl, cover with a clean kitchen towel, and set it somewhere warm. You’ll want it to rise until doubled in size—about 60 to 90 minutes. Punch it down gently and let it rise again for another 60 minutes. Trust me, this double rise is key for those perfect vampire bites!
Step 5: Shape the Donuts
Once your dough is ready, roll it out on a floured surface to about 1-inch thickness. Use a donut cutter or biscuit cutter to cut circles, then a smaller cutter to remove the centers. Place your donuts on cookie sheets, ready to fry. I like to keep everything organized here so frying is smooth and efficient.
Step 6: Fry Until Golden Brown
Heat at least 2 inches of vegetable oil in a deep pot or Dutch oven to 350°F. Using a metal spatula, gently lower a donut or two at a time into the oil. Fry for about 1 minute on each side until they’re golden brown and puffed up. Remove them carefully and set on a cooling rack over a baking sheet to catch any drips—no one likes soggy bottoms!
Step 7: Glaze and Decorate Your Vampire Donuts
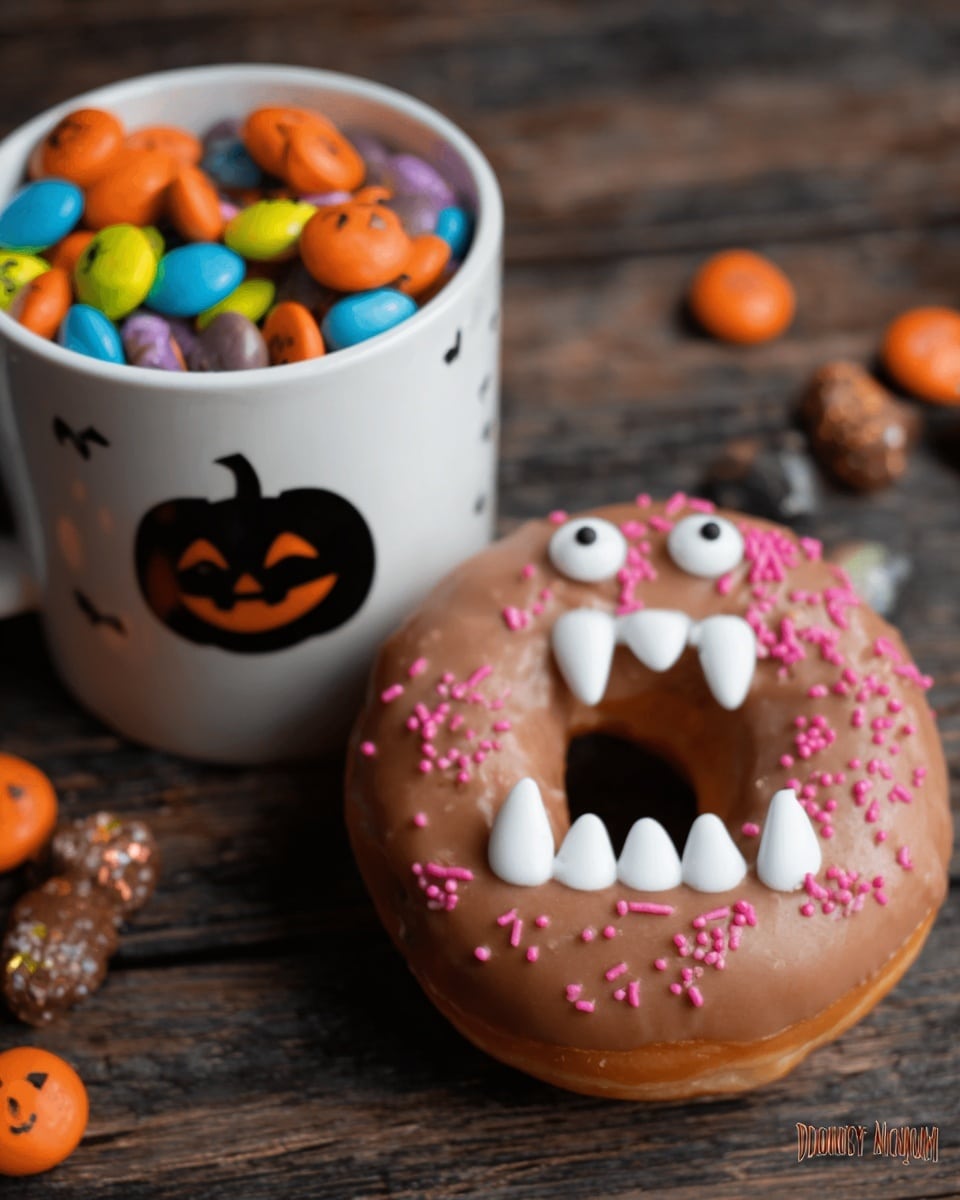
Sift powdered sugar and cocoa powder into a bowl, and slowly stir in milk or water along with the vanilla until you have a glossy, pourable glaze. Dip the top of each donut in the glaze and place back on the wire rack to set. Then comes the fun part—sprinkle with funfetti beads, sanding sugar, and fall leaf sprinkles. Finally, fold plastic vampire fangs in half and pop one into the hole of each donut to create the mouth. Add candy eyes above for that iconic vampire stare. At this point, your kitchen will smell like candy-coated magic, and you’ll be so proud!
Pro Tips for Making Vampire Donuts Recipe
- Perfect Yeast Proofing: I once rushed this step and ended up with dense donuts — make sure your yeast foams fully for the best rise.
- Oil Temperature Matters: Use a thermometer to monitor oil temperature consistently; overheating burns donuts, and too cool makes them greasy.
- Avoid Over-Kneading: Knead just until smooth; too much develops gluten and toughens the dough.
- Glaze Consistency: Strive for a glaze thick enough to coat but thin enough to drip slightly; adjust milk or powdered sugar accordingly.
How to Serve Vampire Donuts Recipe
Garnishes
I love adding candy eyes for that spooky vibe, plus sprinkling fall leaf shapes and red sanding sugar for extra Halloween flair. Funfetti beads bring a burst of color and texture that kids and adults both adore. Sometimes, I even add edible glitter for a magical touch—because why not?
Side Dishes
Pair with a warm cup of spiced apple cider or a rich hot chocolate to keep the cozy Halloween mood going. For brunch settings, these donuts go surprisingly well alongside whipped cream-topped pumpkin pancakes or even a simple fresh fruit platter to balance the sweetness.
Creative Ways to Present
I’ve had fun arranging these donuts on cake stands surrounded by autumn leaves and little Halloween props. For a party, you can place them on a tray with a fog machine underneath for spooky smoke effects—or stack them into a donut tower with picks for a cool centerpiece that guests love to snack on.
Make Ahead and Storage
Storing Leftovers
Store any uneaten Vampire Donuts in an airtight container at room temperature for up to two days. I usually keep them on a wire rack inside the container to avoid sogginess, and they stay wonderfully soft, though the glaze might lose a little shine.
Freezing
I prefer freezing these donuts before glazing. Wrap each donut individually in plastic wrap and place them in a freezer-safe container or bag. They freeze nicely for up to a month, and when you’re ready, thaw at room temperature before glazing and decorating fresh.
Reheating
A quick zap in the microwave for about 15 seconds revives their softness if they’ve hardened, but don’t overdo it or the glaze can melt too much. Alternatively, a quick 2-minute warm-up in a low oven keeps them fresh without getting soggy.
FAQs
-
Can I bake these Vampire Donuts instead of frying?
You sure can! While frying gives that classic golden crust and texture, baking at 375°F for about 10-12 minutes until golden brown is a great alternative—just remember that the texture will be a bit different, less crispy outside but still delicious.
-
What if my yeast doesn’t foam during proofing?
This usually means your yeast is old or the water temperature was off. Try using new yeast and lukewarm water (around 100–110°F). If it still doesn’t foam within 10 minutes, it’s best to get fresh yeast to ensure your dough rises properly.
-
How do I get the glaze to stick properly?
Make sure your donuts are slightly warm but not hot when you dip them. The glaze will adhere best if the donuts have cooled enough to hold shape but are still fresh. Also, let the glaze set on a wire rack without stacking.
-
Can I prepare the dough the night before?
Yes! After kneading, you can refrigerate the dough overnight, covered tightly. Bring it back to room temperature and allow it to rise before rolling and cutting to get the best results without compromising texture.
-
What’s the best way to avoid oily donuts?
Maintain the oil temperature steady around 350°F and avoid overcrowding your fryer. Let donuts drain well on a wire rack and blot gently with paper towels if you notice excess oil. Proper frying temperature is key!
Final Thoughts
This Vampire Donuts Recipe has been one of my favorite seasonal traditions because it combines the whimsical fun of Halloween with the timeless comfort of homemade donuts. It always brings out laughs and big smiles at family gatherings, and I know you’ll enjoy making them as much as I do eating them. So grab that rolling pin, fire up your fry pot, and let’s bring some deliciously spooky magic to your kitchen!
Print
Vampire Donuts Recipe
- Prep Time: 30 minutes
- Cook Time: 3 minutes 2 seconds
- Total Time: 2 hours 33 minutes 2 seconds
- Yield: 24 donuts
- Category: Dessert
- Method: Frying
- Cuisine: American
Description
These Vampire Donuts are a fun and spooky Halloween treat that combines soft, fluffy fried donuts dipped in a rich chocolate glaze and decorated with festive candies. Perfect for celebrating the season, these donuts feature a homemade dough that is risen twice for the ideal texture and fried to golden perfection before being adorned with candy eyes, sprinkles, and vampire fangs for an eye-catching party snack.
Ingredients
For the Dough:
- 2 cups whole milk, divided
- ½ cup plus 3 tablespoons granulated sugar, divided
- ½ teaspoon salt
- ½ cup butter
- 1 ½ cups warm water (warm tap water is fine)
- 2 packages (0.25 ounce each, 0.5 ounce total) dry active yeast
- 2 eggs, at room temperature
- 9 cups all-purpose flour, plus additional for kneading
For Frying:
- Vegetable oil for frying (enough for 2-inch depth in pot)
For the Glaze and Decoration:
- 3 cups powdered sugar
- ½ cup cocoa powder
- ¼ cup milk or water
- 2 teaspoons vanilla extract
- Candy eyes
- Fall leaf sprinkles
- Funfetti assorted bead-shaped sprinkles
- Red sanding sugar
- Plastic vampire fangs
Instructions
- Heat Milk Mixture: In a medium saucepan, warm 1 ½ cups of whole milk over medium heat just until it begins to simmer. Remove from heat and stir in ½ cup granulated sugar, salt, and butter until fully melted and combined. Set aside to cool slightly.
- Activate Yeast: In a small bowl, combine warm water, 1 tablespoon granulated sugar, and dry active yeast. Stir and let sit for 5 minutes until foamy and bubbly, indicating the yeast is activated.
- Combine Wet Ingredients: In the bowl of a stand mixer, add the yeast mixture and the warm milk/butter mixture. Beat in the eggs using the paddle attachment or an electric mixer until smooth and well combined.
- Add Flour: Add 1 cup of flour to the wet ingredients and mix with a dough hook attachment. Gradually add the remaining flour 1 cup at a time, mixing lightly just until incorporated. The dough should start to pull away from the sides of the bowl.
- Knead Dough: Turn the dough onto a floured surface and knead by hand for about 5 minutes until smooth. Add extra flour as needed to prevent sticking but keep the dough soft.
- First Rise: Place the dough into a large, greased bowl and cover with a clean kitchen towel. Set in a warm place to rise until doubled in size, about 60 to 90 minutes.
- Second Rise: Punch down the dough to release air, cover again, and let it rise a second time for 60 minutes until puffed and doubled.
- Roll and Cut: Turn the dough out onto a floured counter and roll to approximately 1-inch thickness. Use a donut cutter or biscuit cutter to cut out circles, then remove the centers with a smaller cutter to create donut shapes. Place donuts and centers on cookie sheets.
- Heat Oil: In a large pot, Dutch oven, or deep fryer, pour vegetable oil to a depth of 2 inches. Heat the oil to 350°F (175°C) and maintain temperature throughout frying.
- Fry Donuts: Using a metal spatula, carefully lower one or two donuts at a time into the hot oil. Fry each side for about 1 minute or until golden brown. Remove with a slotted spoon and drain on a cooling rack set over a baking sheet.
- Prepare Glaze: Sift powdered sugar and cocoa powder together in a bowl. Gradually whisk in milk (or water) and vanilla a little at a time until you create a smooth, pourable glaze.
- Glaze Donuts: Dip the top side of each cooled donut into the chocolate glaze and place on a wire rack to let the glaze set and harden.
- Decorate: While the glaze is still wet, sprinkle funfetti sprinkles, red sanding sugar, and fall leaf sprinkles onto the donuts as desired for a festive look.
- Assemble Vampire Face: Fold plastic vampire fangs in half and insert one set into the center hole of each donut to resemble a mouth. Place two candy eyes above the mouth on the donut. Serve and enjoy your spooky Vampire Donuts!
Notes
- This recipe creates about 24 donuts, perfect for a party or Halloween gathering.
- Be sure the yeast mixture foams well to ensure proper rising of the dough.
- Maintain oil temperature at 350°F for even frying to avoid greasy or undercooked donuts.
- The glaze can be adjusted in thickness by adding more powdered sugar or milk as needed.
- Decorations are flexible—feel free to substitute any Halloween-themed sprinkles or candies for a personalized touch.
- Allow donuts to cool slightly before glazing to prevent the glaze from melting off.
- Use fresh ingredients, especially yeast, for best results.
Nutrition
- Serving Size: 1 donut
- Calories: 300
- Sugar: 17 grams
- Sodium: 97 milligrams
- Fat: 6 grams
- Saturated Fat: 3 grams
- Unsaturated Fat: 2 grams
- Trans Fat: 0 grams
- Carbohydrates: 54 grams
- Fiber: 2 grams
- Protein: 7 grams
- Cholesterol: 28 milligrams


