
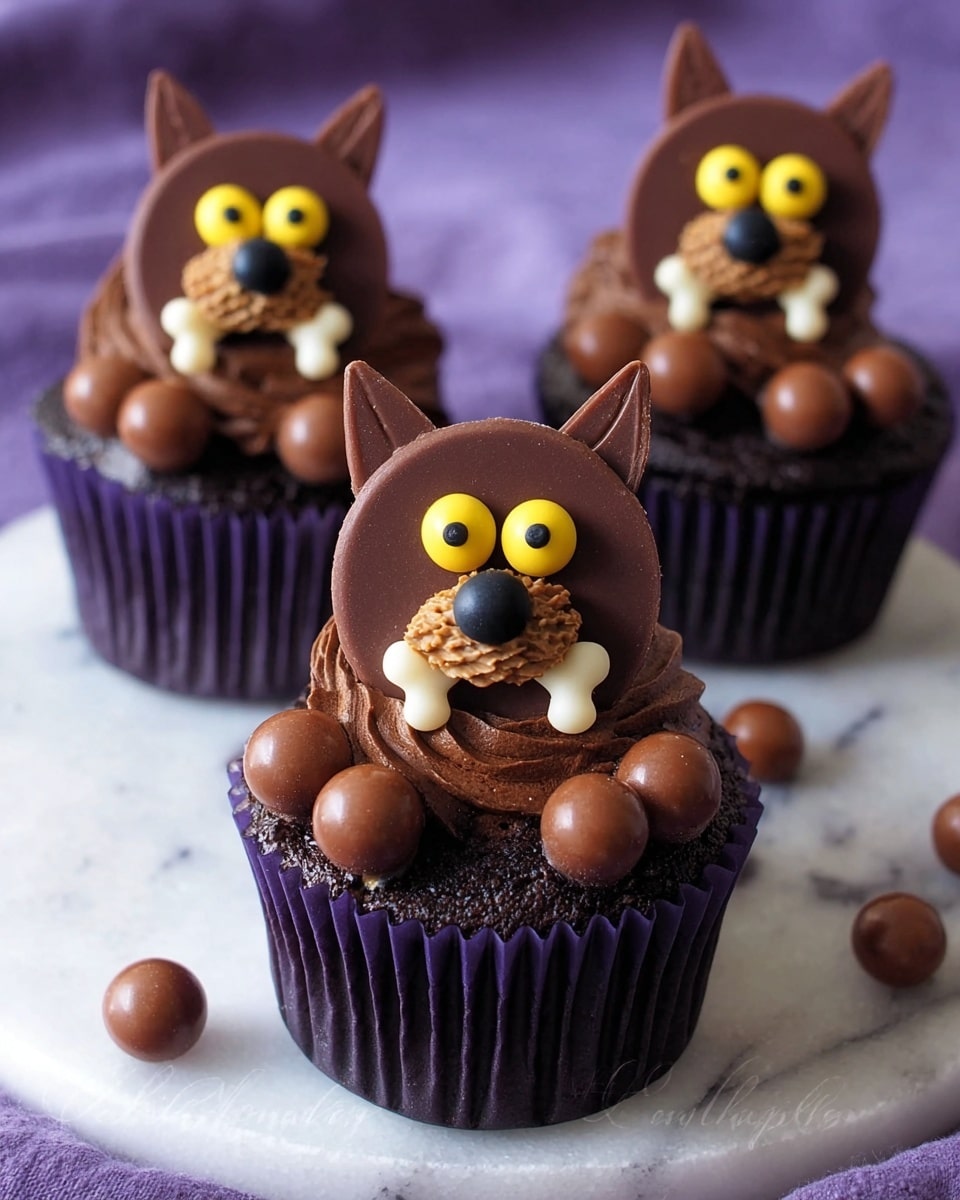
If you’re on the hunt for a spooky and super fun dessert to wow your friends and family, I’ve got just the thing for you. This Werewolf Cupcakes Recipe is not only adorably creepy but also surprisingly easy to make. I absolutely love how these cupcakes turn out—complete with furry little werewolf faces crafted from Reese’s Cups and candy melts. Trust me, once you try this, your Halloween or themed party will earn you serious dessert bragging rights!
Why You’ll Love This Recipe
- Creative and Fun: These cupcakes bring a playful werewolf theme to your dessert table that’s sure to impress kids and adults alike.
- No-Bake Components: The candy decorations are simple and don’t require baking, so you can focus on decorating without stress.
- Perfect for Parties: Each cupcake is a miniature masterpiece that instantly livens up any event, especially around Halloween.
- Quick to Prepare: Despite the detailed look, making the werewolf heads and assembly only takes about 10 minutes once you get going.

Ingredients You’ll Need
Getting the right ingredients sets you up for cupcake success. Here, the combination of chocolate cupcakes and candy melts with Reese’s Cups really brings out that werewolf vibe perfectly. It’s a fun mix of textures and colors that play really well together.
- Light cocoa candy melts: These melts are perfect for creating the furry texture and details, plus the light cocoa color looks like wolf fur.
- Full size Reese’s Cup: The base of your werewolf head – the chocolate and peanut butter combo gives great flavor and structure.
- Reese’s Cup Mini: Used for the snout, adding a dimensional touch to your werewolf faces.
- Black M&M’s: These work perfectly as tiny noses, giving the werewolf an extra expressive touch.
- Yellow candy eyes: They add spooky personality – you can find them in candy craft sections or order online.
- Light cocoa candy melt wafers: Cut into ears; they’re easy to shape and blend in well with the “fur.”
- White candy melts: Used for fangs and the moon decorations, adding contrast and detail.
- Chocolate cupcakes: Use your favorite recipe or store-bought to keep things simple.
- Thick chocolate frosting: A sturdy base to hold your werewolf and decorations in place.
- Whoppers malted milk balls: These become the werewolf’s paws – a fun and crunchy detail.
- Candy bones: Classic spooky sprinkles to place between the paws for extra creep factor.
Variations
While I adore the classic werewolf look this recipe creates, you can totally make it your own. I’ve played around with a few tweaks over time that add a fresh spin or accommodate dietary preferences.
- Nut-Free Version: If you’re serving to nut-allergic guests, swap out Reese’s Cups for nut-free peanut butter cups or plain chocolate disks and adjust your candy details accordingly. I tried this with peanut butter-flavored candy melts and it still looked hauntingly good!
- Flavor Twist: Adding a hint of espresso powder to the chocolate frosting gives a sophisticated kick that grown-ups appreciate at parties.
- Vegan Option: Use dairy-free cupcakes, vegan-friendly candy melts, and frosting. It takes a little hunting but still results in an awesome werewolf cupcake everyone can enjoy.
How to Make Werewolf Cupcakes Recipe
Step 1: Create the Werewolf Heads
Start by gently spreading the melted light cocoa candy melts all over each full-size Reese’s Cup. I like to use a food-safe paintbrush for this because it lets you create cool, furry textures. Just press your brush into the wet candy and pull upward quickly to make little spikes that look like wolf fur. It’s kind of magical watching those furry textures appear!
Next, take a Reese’s Cup Mini and attach it as the snout using more melted candy melts. Don’t forget to brush melted candy around the snout edges so it blends in with that fuzzy wolf face. Then, place a black M&M for the nose and use yellow candy eyes for that wild, spooky stare. Pop these into the freezer for about a minute so everything firms up before moving on.
Step 2: Add Ears and Fangs
Cut two triangular ears from the light cocoa candy melt wafers. Attach them on top of the Reese’s Cup heads with a little bit of melted candy as glue. Then, use your brush again with candy melts to add fur texture to the ears, matching the head.
For the fangs, you can pipe on white melted candy or affix tiny white heart sprinkles as teeth. Both methods work great and add to the werewolf’s ferocious charm. Repeat this process until you’ve created all six werewolf heads – I promise it gets easier and more fun with each one!
Step 3: Make the Candy Moon Picks
Pipe white candy melts into small crescent moons on parchment paper and insert a pick into each one before the candy sets. Freeze for 3-5 minutes until firm – these moons will serve as spooky backdrops for your werewolves on the cupcakes.
Step 4: Decorate the Cupcakes
Pipe a generous swirl of chocolate frosting onto each chocolate cupcake. Then set one Reese’s Cup werewolf head gently on top. Insert the white chocolate moon pick behind the werewolf in the frosting so it looks like the moon is glowing behind the creature.
Add two Whoppers malted milk balls as paws on either side of the werewolf’s base, and finish by pressing a candy bone sprinkle between the paws. The final touch of the little bones makes these cupcakes pop with Halloween spirit.
Pro Tips for Making Werewolf Cupcakes Recipe
- Use a Food-Safe Paintbrush: This makes texturing the “fur” a breeze and gives your werewolves their signature wild look.
- Work Quickly with Candy Melts: Melted candy sets fast, so have your tools ready and work in small batches to avoid clumping.
- Freeze Between Steps: Popping the candy-covered pieces in the freezer helps harden and hold the shape, which makes assembly smoother.
- Be Gentle When Attaching Ears: The candy melt wafers can be fragile; dip them into melted candy before attaching to strengthen and secure them better.
How to Serve Werewolf Cupcakes Recipe
Garnishes
For garnishes, I love adding a light dusting of cocoa powder or edible glitter to give the cupcakes an eerie moonlit shimmer. You can also sprinkle some crushed chocolate cookie crumbs around the base to mimic dirt or forest floor textures, making your werewolves look like they’re lurking in the wild woods.
Side Dishes
Pair these cupcakes with simple sides like mini pumpkin spice lattes or dark cherry punch for a full autumnal treat experience. I’ve also served them alongside bowls of candied nuts and dried fruits to complement the rich chocolate flavors perfectly.
Creative Ways to Present
I once set up a Halloween party table with a “werewolf den” theme – the cupcakes sat on top of a bed of moss-like greenery with little toy trees and trees made from pretzel sticks wrapped in candy melts. It was so fun seeing the cupcakes looking like actual creatures in a forest, and guests couldn’t stop taking pictures!
Make Ahead and Storage
Storing Leftovers
These cupcakes keep best at room temperature for up to 3 days. I recommend storing them in an airtight container to protect the delicate candy decorations from humidity, which can make the candy melts soften or lose their texture.
Freezing
If you want to prep in advance, you can freeze the decorated cupcakes wrapped carefully in plastic wrap and then in a freezer bag. When I’ve done this, I let them thaw in the fridge overnight to prevent condensation from melting the candy details.
Reheating
Since these are cupcakes, you don’t really want to reheat them. Instead, bring frozen cupcakes to room temperature on the counter while still wrapped to avoid moisture accumulation. This keeps your werewolf candy heads intact without any melty mishaps.
FAQs
-
Can I use other types of candy for the werewolf faces?
Absolutely! While the Reese’s Cups are ideal for their shape and flavor, you can get creative with other chocolate disks or peanut butter candies. Just make sure to choose something flat enough to pipe on the candy melts and sturdy to hold the candy eyes and nose.
-
What’s the best way to melt candy melts without burning them?
Use a microwave in short 15-20 second bursts, stirring well between each session. This prevents overheating and keeps your candy melts silky and smooth, ideal for painting and dipping.
-
Can I prepare the werewolf heads a day in advance?
Yes, prepping the werewolf heads a day ahead and storing them in an airtight container in the fridge helps the candy set nicely and makes assembly faster on the day you want to serve them.
-
How can I make the candy eyes stick better?
Use a small dab of melted candy melts as glue when attaching them. Let them set in the freezer briefly, and they’ll stay firmly in place without sliding off.
Final Thoughts
Making this Werewolf Cupcakes Recipe has always been one of my favorite ways to bring a little magic and mischief to dessert time. The look on my kids’ faces when they spot those furry werewolves peeking out of chocolate cupcakes—priceless! It’s a fun little project with big payoff, and once you get the hang of painting the candy melts, it’s downright relaxing. So grab your brushes and candy melts, and treat yourself to some monstrously delicious fun. You’ll enjoy sharing these as much as I do!
Print
Werewolf Cupcakes Recipe
- Prep Time: 10 mins
- Cook Time: 0 mins
- Total Time: 10 mins
- Yield: 6 cupcakes
- Category: Dessert
- Method: No-Cook
- Cuisine: American
Description
Delightfully spooky and fun, these Werewolf Cupcakes are a perfect Halloween treat. Each cupcake is topped with a detailed Reese’s Cup werewolf decorated with candy melts, candy eyes, and Whoppers as paws, creating an adorable and eerie dessert that’s sure to impress at any party.
Ingredients
Werewolf Candy Decorations
- 4 ounces light cocoa candy melts, melted
- 6 full size Reese’s Cups
- 6 Reese’s Cup Minis
- 6 black M&M’s
- 12 yellow candy eyes
- 12 light cocoa candy melt wafers
- 4 ounces white candy melts, melted
Decorating the Cupcakes
- 6 chocolate cupcakes
- 1 ½ cups thick chocolate frosting
- 12 Whoppers (small malted milk balls)
- 6 candy bones (bone sprinkles)
Instructions
- Prepare the Werewolf Bodies: Spread the melted light cocoa candy melts over each full-size Reese’s Cup. Using a food-use-only paintbrush, press it into the wet candy melts and pull up quickly to create furry spikes on the surface. This gives the appearance of the werewolf’s fur.
- Attach the Snout: Press a mini Reese’s Cup onto one end of each full-size cup to form the snout. Brush melted candy melts all around the snout to blend and add furry texture.
- Add Facial Features: Attach a black candy nose (black M&M) and yellow candy eyes to the werewolf face, securing them with additional melted candy melts.
- Chill for Setting: Place the decorated Reese’s Cup werewolves into the freezer for 1 minute to firm up the candy melts before continuing.
- Make Werewolf Ears: Cut two triangle shapes from the light cocoa candy melt wafers per werewolf. Attach these on top of each werewolf’s head with melted candy melts, and texture the ears by brushing with more melted candy melts to match the furry look.
- Create Fangs: Using white candy melts, either pipe small fangs onto the snout or attach 4 small white heart sprinkles as fangs, securing them with more light cocoa candy melts.
- Make Candy Moons: Pipe six candy moon shapes with the white candy melts onto parchment paper, attaching a pick to each for easy cupcake insertion. Freeze the candy moons for 3-5 minutes until hardened.
- Decorate Cupcakes: Pipe a big swirl of thick chocolate frosting onto each chocolate cupcake. Place a Reese’s Cup werewolf on top of the frosting. Insert a white chocolate moon pick behind the werewolf by pushing it into the frosting.
- Add Final Details: Place two Whoppers on either side of the werewolf on the frosting to create paws. Press a candy bone sprinkles between the Whoppers to complete the look.
Notes
- Store cupcakes at room temperature for up to 3 days to maintain cupcake and frosting freshness.
- Use a food-safe paintbrush to create the fur texture carefully for the best effect.
- Freezing the candy decorations slightly helps set the candy melts and makes assembly easier.
- These cupcakes are best served the day they are decorated for optimal texture and taste.
Nutrition
- Serving Size: 1 cupcake
- Calories: 380 kcal
- Sugar: 32 g
- Sodium: 180 mg
- Fat: 22 g
- Saturated Fat: 10 g
- Unsaturated Fat: 8 g
- Trans Fat: 0 g
- Carbohydrates: 42 g
- Fiber: 3 g
- Protein: 5 g
- Cholesterol: 30 mg


