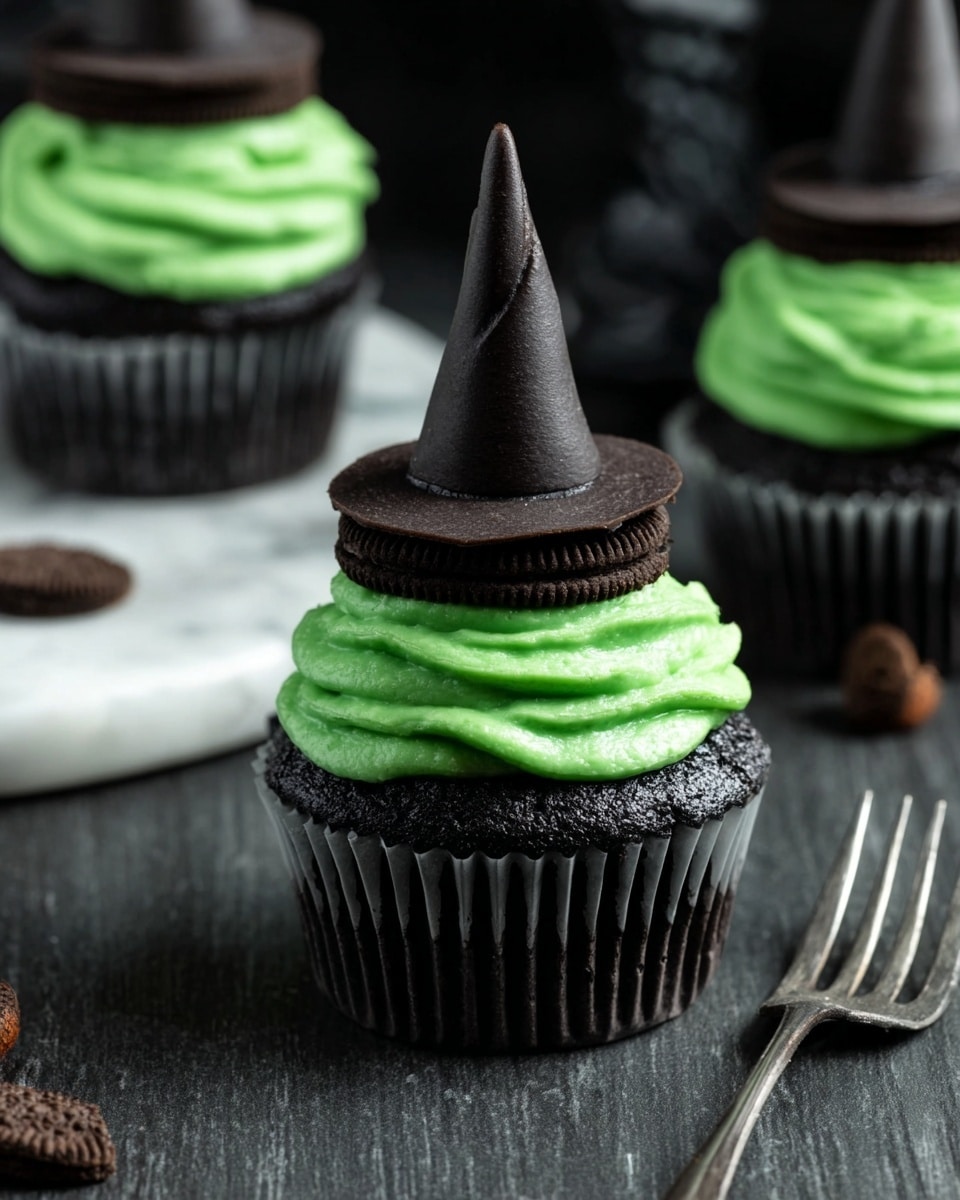
If you’re on the hunt for a show-stopping treat that’s as fun to make as it is to eat, you’re going to adore this Witches Hat Cupcakes Recipe. These cupcakes are perfect for Halloween parties or anytime you want a whimsical dessert that wows without fuss. I absolutely love how the chocolatey black batter combined with the green frosting and adorable fondant witch hats turns out every single time — my family goes crazy for them and they always disappear fast!
Why You’ll Love This Recipe
- Fun and Festive: These cupcakes bring a playful Halloween vibe everyone will adore.
- Chocolatey Goodness: The milk chocolate chips add melty pockets of yum in every bite.
- Customizable Decorating: You can tweak colors and decorations to your heart’s content.
- Perfect for Parties: Easy to make ahead and impress a crowd without stress.

Ingredients You’ll Need
All the ingredients come together to create a moist, chocolaty cupcake with buttery frosting and those charming fondant hats. You don’t need anything fancy, but picking good-quality butter and fresh eggs will really make your cupcakes shine.
- Unsalted butter: Room temperature butter whips up beautifully for both the cake and frosting.
- Caster sugar: Fine sugar ensures the cupcakes have a soft crumb.
- Eggs: Provide structure—using large eggs gives the best balance.
- Vanilla extract: Adds that lovely warm aroma.
- Plain/all-purpose flour: The backbone of your cupcakes for a tender crumb.
- Baking powder: Helps the cupcakes rise nice and fluffy.
- Salt: Just a pinch to enhance all the flavors.
- Milk chocolate chips: Melty little surprises in the batter.
- Milk: Makes the batter smooth and moist.
- Black food colouring: I used Wilton gel for deep, even color with minimal product.
- Icing sugar (powdered sugar): For silky smooth frosting.
- Green food colouring: Like the black, gel works wonders for vibrant frosting.
- Black fondant icing: Perfect for shaping the witch hats.
- Oreo cookies: Use halved and filling removed for the hat base.
- Green fondant icing: For the colored hatbands.
- Edible glue: Helps hold the fondant decorations together securely.
Variations
I love making this Witches Hat Cupcakes Recipe my own by playing with colors and flavors — and you should too! Whether you want to shake things up for a different occasion or cater to dietary needs, there’s always a way to tweak this recipe.
- Dairy-Free Version: Swap butter for a vegan margarine and use a plant-based milk; the texture stays moist and delicious.
- Flavor Switch-Up: Add a teaspoon of cinnamon or pumpkin spice to the batter for a cozy twist that screams fall.
- Alternative Decorations: Use chocolate waffle cones instead of fondant for easier hats that still look amazing.
- Color Theme Change: Go with purple or orange frosting and matching hatbands if you want a different Halloween look.
How to Make Witches Hat Cupcakes Recipe
Step 1: Whip Up the Batter
Start by creaming your room-temperature butter and caster sugar together until light and fluffy — this usually takes about 2 minutes with a mixer, and it’s key for a tender crumb. Then, beat in the eggs and vanilla extract until well combined, scraping down the bowl to make sure nothing’s stuck on the sides. Next, toss the flour, baking powder, salt, and chocolate chips in a separate bowl, stirring so the chips get a light dusting of flour (this stops them sinking). Gradually add this to the wet ingredients, mixing on low while pouring in the milk. Finally, add your black food colouring a little at a time until the batter is a rich, even black color — I found a quarter of a Wilton gel pot did the trick. Use a cookie scoop or spoon to fill your cupcake liners about two-thirds full for even baking.
Step 2: Bake and Cool Your Cupcakes
Bake your cupcakes at 350°F (180°C) for 18-22 minutes or until a skewer comes out clean. Don’t overbake! As soon as they’re done, transfer them to a wire rack to cool completely — this stops the liners from peeling away and keeps your cupcakes moist. I learned the hard way that rushing this step leads to crumbling cupcakes, so patience is your friend here.
Step 3: Craft the Witches Hat Decorations
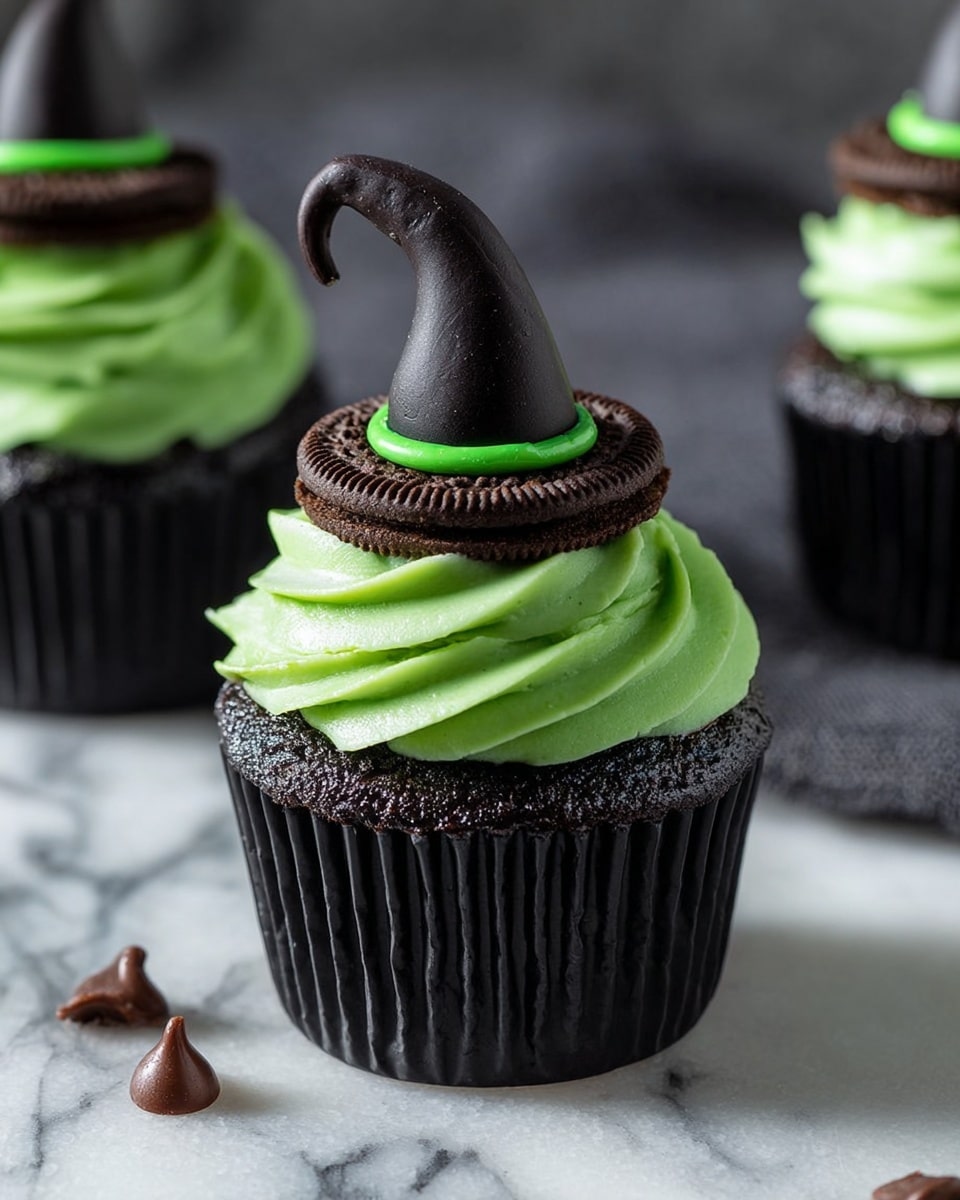
While the cupcakes cool, tackle the fun part: making the witch hats! Lay out Oreo halves, scraping out the creamy filling so you get a flat base. Divide your black fondant into 12 small portions; rolling each into a cone shape takes a bit of practice, but don’t worry if they’re not perfect — that adds to the charm! Use edible glue to stick each cone on top of an Oreo half. Then, roll out thin strips of green fondant to wrap around the base as a “hatband,” securing those with more edible glue. Let these set for about 30 minutes so they firm up nicely before going on the cupcakes.
Step 4: Make the Green Buttercream Frosting
Beat your butter and icing sugar on low until the mixture just starts coming together, then crank it up to medium — this helps achieve a light, fluffy texture. Add milk a little at a time to get just the right consistency for piping. Then add your green food colouring slowly until you hit that perfect witchy shade of green. If you want frosting that holds its shape with a star nozzle, stop adding milk once it’s thick but pipeable.
Step 5: Assemble Your Witches Hat Cupcakes
Fill a piping bag fitted with an open star tip halfway, then pipe a pretty swirl of frosting on each cooled cupcake. Pop your witch hat decorations right on top — straight or tilted, both look great! This is where the magic comes together, and trust me, the kids and adults alike will be enchanted!
Pro Tips for Making Witches Hat Cupcakes Recipe
- Use Room Temperature Ingredients: I discovered this trick makes the batter mix more smoothly, giving you a finer crumb every time.
- Coat Chocolate Chips in Flour: Keeps them from sinking to the bottom and gives you chocolate in every bite.
- Be Gentle When Folding: Mix just until combined to avoid dense cupcakes — you want them light and fluffy!
- Let Fondant Hats Set Well: Don’t skip the setting time or hats might slide off the frosting — patience pays off here!
How to Serve Witches Hat Cupcakes Recipe
Garnishes
I usually keep it simple with just the fondant hats because they’re so adorable, but sometimes I sprinkle edible glitter or use a tiny dash of black sanding sugar on the frosting for a little sparkle — it adds a bit of whimsy without overwhelming the design.
Side Dishes
These cupcakes pair beautifully with a warm apple cider or a rich hot chocolate, especially during chilly fall evenings. For parties, I like to serve them alongside simple fruit skewers or savory finger foods to balance out the sweetness.
Creative Ways to Present
One Halloween, I arranged mine on a cake stand topped with faux spider webs and mini pumpkins — super easy but made the cupcakes look like a real centerpiece. You could also pop them into themed cupcake boxes for gifting or layer the cupcakes on a tiered tray for a party display that’s both spooky and elegant.
Make Ahead and Storage
Storing Leftovers
I usually store any leftover cupcakes in an airtight container in the fridge for up to one day to keep the frosting fresh. Just be aware the Oreos under the fondant hats soften after a day or so, but the cupcakes themselves remain moist and delicious for up to 3 days chilled.
Freezing
I’ve frozen the cupcakes before (without the fondant hats on) wrapped tightly in plastic wrap and in an airtight container. When thawed overnight in the fridge, they retain their moist texture and taste great — just add the hats and frosting fresh after thawing for best presentation.
Reheating
Since these are cupcakes, reheating isn’t usually necessary, but if you want them a bit warm, a few seconds in the microwave does the trick — just skip the hats and frosting when warming or you’ll melt them! It’s best to add those afterward at room temperature.
FAQs
-
Can I use a different cookie instead of Oreos for the witch hat base?
Absolutely! While Oreos work perfectly due to their size and shape, you could swap in sandwich cookies of a similar size or even mini chocolate wafers. Just make sure to scrape out any filling first so the fondant sticks well.
-
How do I make the black color without food coloring?
While black food coloring is best for achieving that striking dark color, you can deepen the shade by adding extra cocoa powder instead of some of the flour. However, expect the cupcakes to be more chocolatey and less black. Gel food coloring tends to provide the boldest color with less product.
-
Can I skip the fondant decorations and still make these cupcakes festive?
Definitely! You can simply pipe on green frosting swirls and add little Halloween-themed sprinkles or edible glitter. The cupcakes will still look festive and taste amazing.
-
What’s the best way to transport these cupcakes?
I recommend using a cupcake carrier or a flat box with cupcake inserts to keep them secure. If you’re traveling a long distance, keep the frosting firm by chilling the cupcakes beforehand.
Final Thoughts
This Witches Hat Cupcakes Recipe has quickly become one of my favorite festive bakes. I love how it combines whimsy with taste — it’s not just a pretty centerpiece but genuinely delicious. If you want a recipe that’s approachable, fun, and guaranteed to impress your guests or family, give this a try. I promise you’ll smile every time you take a bite of these charming, chocolatey cupcakes topped with those cute little witches’ hats. Happy baking!
Print
Witches Hat Cupcakes Recipe
- Prep Time: 45 minutes
- Cook Time: 20 minutes
- Total Time: 1 hour 5 minutes
- Yield: 12 cupcakes
- Category: Dessert
- Method: Baking
- Cuisine: American
- Diet: Vegetarian
Description
These Witches Hat Cupcakes are a spooky and fun treat perfect for Halloween or any themed party. Featuring rich black chocolate chip cupcakes dyed with black food coloring, topped with fluffy green buttercream frosting, and adorned with adorable handmade witch hat decorations crafted from black and green fondant on Oreo bases. Moist, flavorful, and visually impressive, these cupcakes combine classic chocolate flavors with creative decoration for a festive dessert that’s sure to impress.
Ingredients
For the Cupcakes:
- 1 stick (113g) unsalted butter, at room temperature
- 1 cup (200g) caster/white sugar
- 2 large eggs
- 2 tsp vanilla extract
- 1 1/2 cups (210g) plain/all-purpose flour
- 2 tsp baking powder
- Pinch of salt
- 1 cup (175g) milk chocolate chips
- 1/3 cup + 2 tbsp (100ml) milk
- Black food colouring (Wilton gel), as needed
For the Frosting:
- 2 sticks (226g) unsalted butter, at room temperature
- 2 1/2 cups (300g) icing/powdered sugar
- 1-2 tbsp milk
- Green food colouring (Wilton gel), as needed
For the Witches Hat Decorations:
- 6 oz (175g) black fondant icing
- 6 Oreos, halved and with filling scraped out
- 1.5 oz (42g) green fondant icing
- Edible glue
Instructions
- Preheat and Prepare: Preheat your oven to 180C/350F and line a 12-hole cupcake tray with cupcake liners.
- Cream Butter and Sugar: Place the butter and sugar into a large bowl or the bowl of your stand mixer. Beat on medium-high speed for about 2 minutes until the mixture is light and fluffy.
- Add Eggs and Vanilla: Add the eggs and vanilla extract to the butter-sugar mixture. Scrape down the sides of the bowl as needed and mix on medium-high speed for about 1 minute until well combined.
- Coat Chocolate Chips: In a separate bowl, combine the flour, baking powder, salt, and chocolate chips. Stir until the chocolate chips are fully coated in flour to prevent sinking during baking.
- Combine Dry and Wet Ingredients: Gently tip the flour and chocolate chip mixture into the egg mixture. Mix on low speed while gradually adding the milk. Stir until the batter is smooth and well combined.
- Color the Batter: Add black food coloring a little at a time, mixing thoroughly after each addition until the batter reaches your desired black color. Approximately 1/4 of a Wilton gel pot is typically enough.
- Fill the Cupcake Liners: Divide the batter evenly among the cupcake liners, filling each about two-thirds full. Use a 2-tablespoon scoop to ensure even portions.
- Bake the Cupcakes: Bake in the preheated oven for 18-22 minutes, or until the cupcakes have risen and a skewer inserted into the center comes out clean. Remove from oven and transfer to a wire rack to cool to prevent liners from peeling.
- Prepare Witch Hat Toppers: While cupcakes cool, set up a workspace with halved Oreos placed text side up on a flat surface or silicone mat.
- Shape Black Fondant Hats: Divide the black fondant into 12 equal pieces. Roll each piece into a sausage shape, tapering one end to form a point. Stand each cone upright and shape the base to about 1/2 inch in diameter.
- Attach Hats to Oreos: Brush edible glue onto the base of each fondant cone and stick it to the center of each Oreo half.
- Add Green Fondant Bands: Cut green fondant into thin strips (~5mm wide and long enough to circle the base). Brush edible glue around the base of cones, then place a green strip around, pinching gently to close.
- Set the Decorations: Allow the witch hat decorations to set for about 30 minutes.
- Make the Frosting: Beat together butter and icing sugar at low speed until combined, then increase to medium and beat until smooth. Gradually add milk and green food coloring a little at a time to tint the frosting to a vibrant green color while maintaining pipeable consistency.
- Pipe Frosting on Cupcakes: Fill a piping bag fitted with an open star nozzle about halfway with frosting. Pipe a swirl atop each cooled cupcake.
- Top with Witch Hats: Place a finished witch hat decoration on top of each frosted cupcake, straight or angled according to preference.
- Serve or Store: Serve immediately or store in an airtight container in the refrigerator. Cupcakes keep for up to 3 days chilled; decorations keep best if consumed within 1 day to avoid softening.
Notes
- Once the black fondant is attached to the Oreo, you can leave the tip of the hat straight or gently bend it for added character.
- You can prepare the cupcakes a few hours ahead of serving and refrigerate, but consume the decorations within a day to maintain crunchiness.
- Using a cookie scoop ensures uniform cupcake sizing and even cooking.
- Gel food coloring is recommended as it requires less quantity and does not thin the batter or frosting.
- Edible glue can be substituted with a small amount of water if unavailable, but glue offers better adhesion for fondant.
Nutrition
- Serving Size: 1 cupcake
- Calories: 340
- Sugar: 30g
- Sodium: 150mg
- Fat: 18g
- Saturated Fat: 11g
- Unsaturated Fat: 6g
- Trans Fat: 0g
- Carbohydrates: 39g
- Fiber: 1g
- Protein: 4g
- Cholesterol: 60mg
